ZenduMA User Guide
Standard Operating Procedures- Admin Guide

Background
What is a CMMS?
CMMS stands for “Computerized Maintenance Management System”. Maintenance software is used by maintenance managers to assist them in the management of their maintenance activities. Some software is very basic, such as work order software – used to receive work requests and manage repairs, or more complex such as a CMMS (Computerized Maintenance Management Software) which is used to document and manage all aspects of maintenance operations. Here is a list of common uses of CMMS software:

Tracking Work Orders -‐ Maintenance managers can select equipment with a problem, describe the problem and assign a specific technician to do the work. When the machine is fixed, the responsible technician marks the work-‐order “complete” and the manager gets notified that the work is done.
Scheduling Tasks -‐ As a team starts to schedule preventive maintenance in advance, they need a reliable work calendar. CMMS systems are especially good at scheduling recurring work and sending reminders to
the right people. Organized scheduling helps even out the workload for a maintenance team, and makes sure that tasks don’t get forgotten.
Work Requests -‐ Maintenance teams often have to take a work-‐request from people outside the team. This can be a request from an assembly line operator who is hearing a strange noise from a drill, or a tenant at an apartment building who is requesting shower repairs. The CMMS is a central place for recording these requests and tracking their completion.
Recording Asset History -‐ Many maintenance teams have to care for assets that are 10, 20, even 30 years old. These machines have a long history of repairs. When a problem comes up, it is always useful to see how this problem was solved last time. In CMMS systems, when repairs are done, they are recorded in the machine’s history log and can be viewed again by workers. This saves a lot of time – technicians can rely on past experience to solve problems.
Managing Inventory -‐ You might not think about it at first, but maintenance people have to store and manage a lot of inventory: spare parts for machines, and supplies like oil and grease. CMMS systems let the team see how many items are in storage, how many were used in repairs and when new ones need to be ordered. This inventory management ability saves the organization a lot of money, because purchases can be pre-‐planned (shopping around for savings) instead of done last-‐minute (paying any price just to have the component now).
Audit & Certification -‐ Many CMMS systems keep an unchangeable record of every action, so an asset’s maintenance history can be audited. This is useful in case of an accident or insurance claim – an inspector can verify if the proper maintenance was completed on a machine. CMMS systems also keep data in a centralized system, which helps keep “one version of the truth” for ISO certification. By helping keep up regular maintenance of HVAC systems, CMMS systems help with getting LEED certification.
What does a CMMS do for an organization?
Automates scheduled maintenance
Tracks and manages inventor
Automatically notifies staff of upcoming tasks and even
Tracks inspections and meter readings
Assigns work orders to staff electronically
Simplifies repeatable tasks through standardized checklists
Flexibility to modify & upgrade the system and add special features from MA Community
Helps meet requirements for system warranties
When entering data into the CMMS, it must be:
Clean: the data does not contain spelling mistakes, is free of unnecessarily complex syntax and tables do not contain duplicate records
Complete: all of the required fields in each record have been populated.
Accurate: all of the required fields in each record have been populated correctly.
Consistent: the data is described in a standardized, structured manner and adheres to an agreed upon naming convention.
Why a Standard Operating Procedures manual?
The importance of consistent data entry cannot be understated. Using data to analyze trends, identify areas of improvement and track where your organization stands can only be accomplished when everyone is on the same page. This manual is not as much a manufacturer’s owner’s manual, as it is a user manual defining how your organization will utilize ZenduMA in the day-to-day operations of your facility.
Just as you review your data and make adjustments to your operations, you must do the same with the SOP. This should be a living document that gets reviewed minimally annually.
Basic Account Management
Logging in to ZenduMA
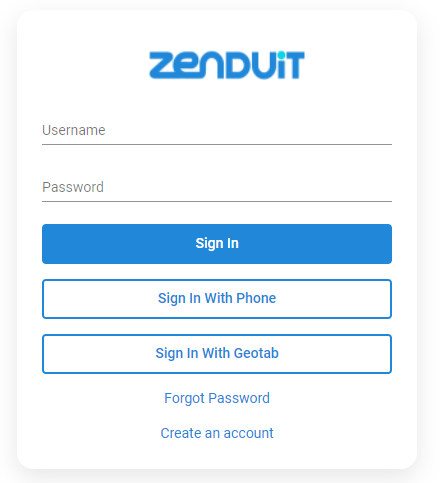
Login to ZenduMA using your Zenduone Account on https://one.zenduit.com/sign-in and click on the ZenduMaintenance Icon to proceed with the login process
In the case the user forgot their password, you can click on the forgot password button to reset it
Basic Navigation
Dashboard
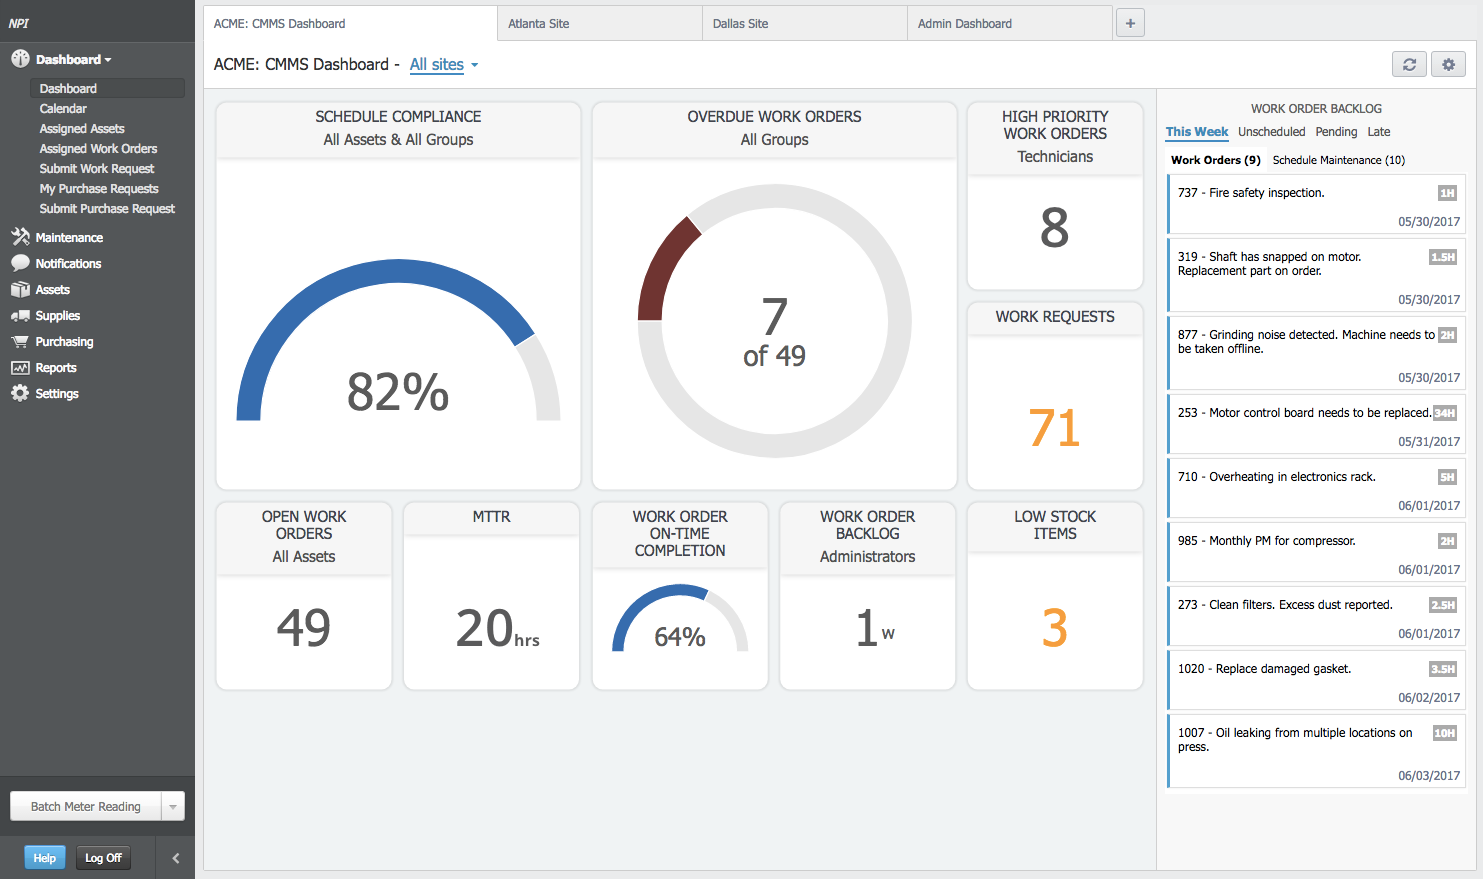
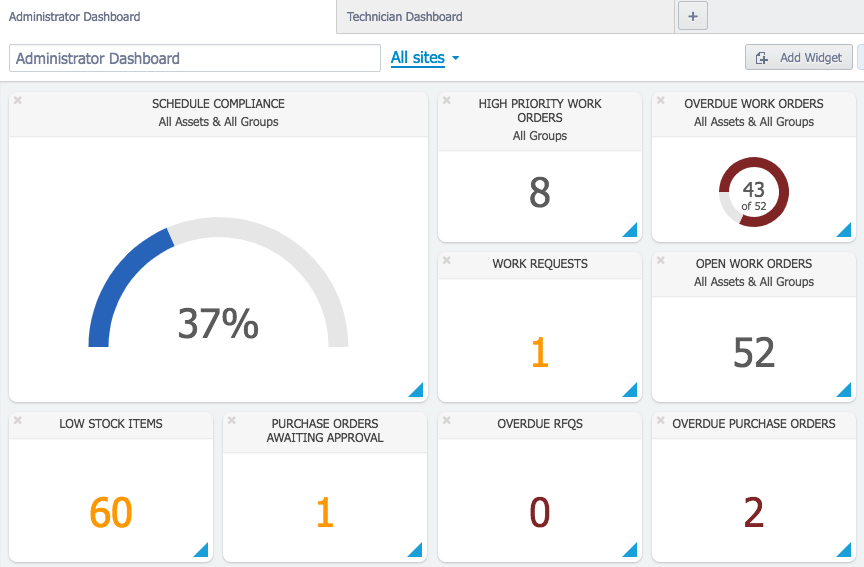
The dashboard is the first page that a user sees when they login (NOTE: CERTAIN USERS MAY SEE WORK ORDERS AS THE FIRST PAGE INSTEAD OF THE DASHBOARD). The Dashboard page displays whichever "widgets" the user has enabled. A widget is a small item on the page which can report different information to the user, quickly and conveniently. With ZenduMA Dashboards, you can drill down to see exactly the information you need, with quick "at-‐a-‐glance" usage. Since the ZenduMA Dashboard is part of the system and doesn't require the installation of any additional components, widgets can become essential tools for users.
Widget List
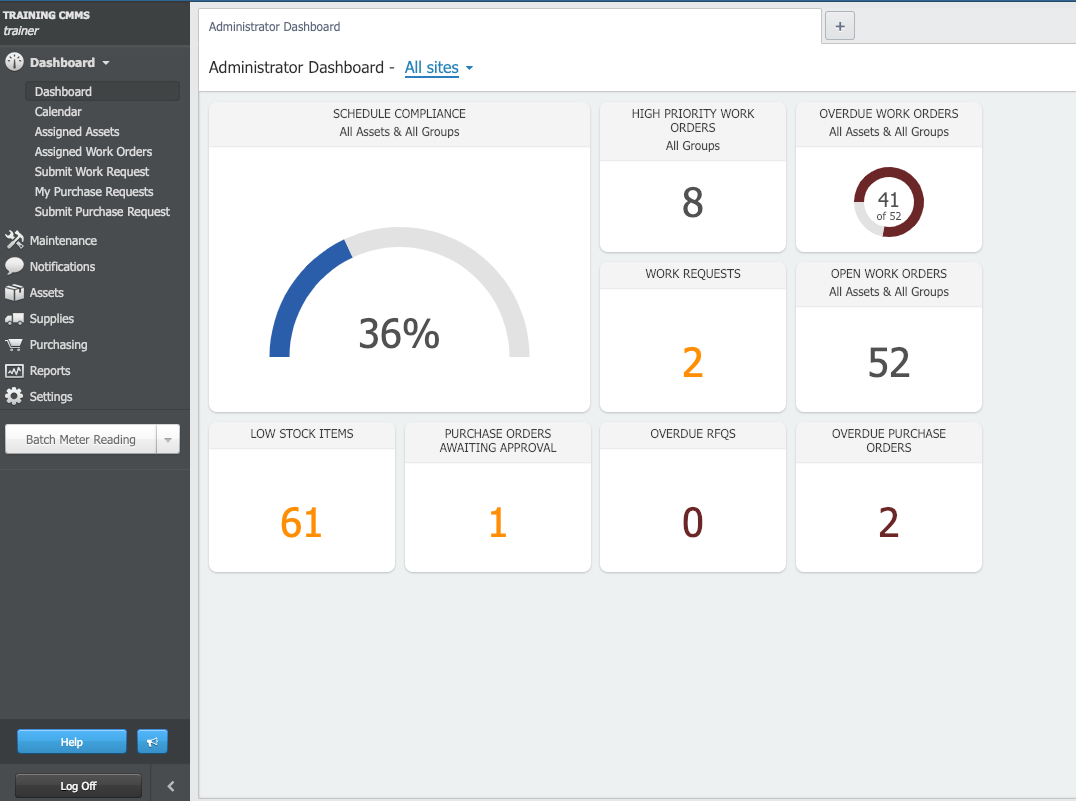
Overdue Work Orders: Work Orders that are late (in the above example it shows 7 out of 49 work orders are late).
High Priority Work Orders: Work Orders with the highest priority level; Highest and High.
Open Work Orders: All Work Orders that are in the “Open” or “Active” state, this does not include anything in the “Closed”, “Draft” or “Requested” state.
Work Request: A Work Order in the “Requested” state, if a work order is in the requested state it is not considered a Work Order as of yet. Generally, a user may create a Work Request on a work that needs to go through more levels of approval before it should be considered a Work Order.
Work Order Backlog: The total number of hours associated with open work orders.
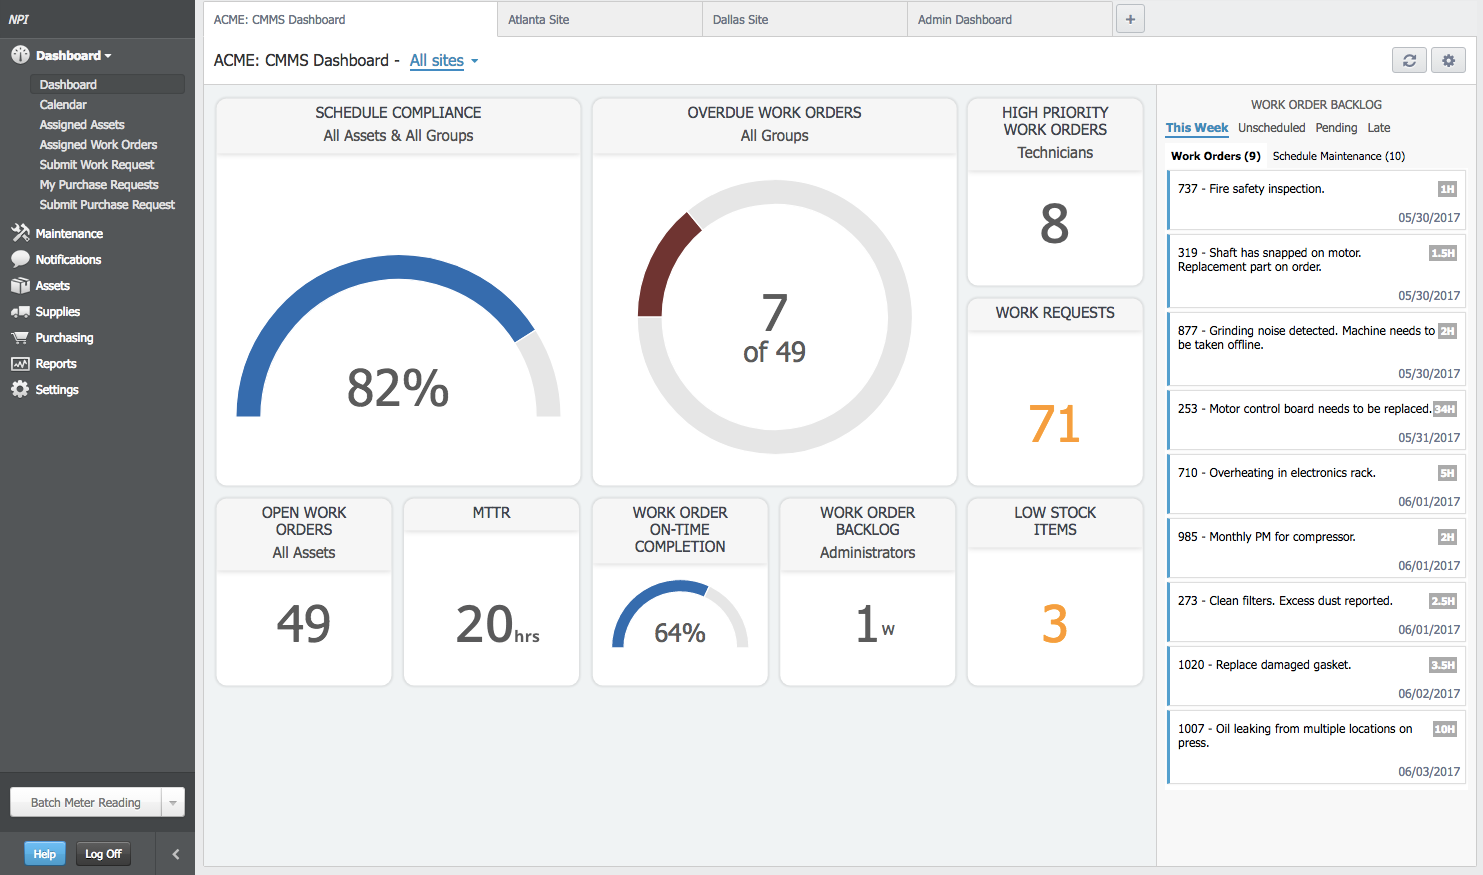
Configure Dashboards- Adding More Widgets
Not happy with the existing widgets in your dashboard? You can add more!
Steps:
Press the configuration button in the top right hand corner:
Click on the “add widget” button:
Pick the widget you would like to add in the list
You can configure and customize the dashboard for different user groups by adding/editing from the preexisting widgets available in configuration mode
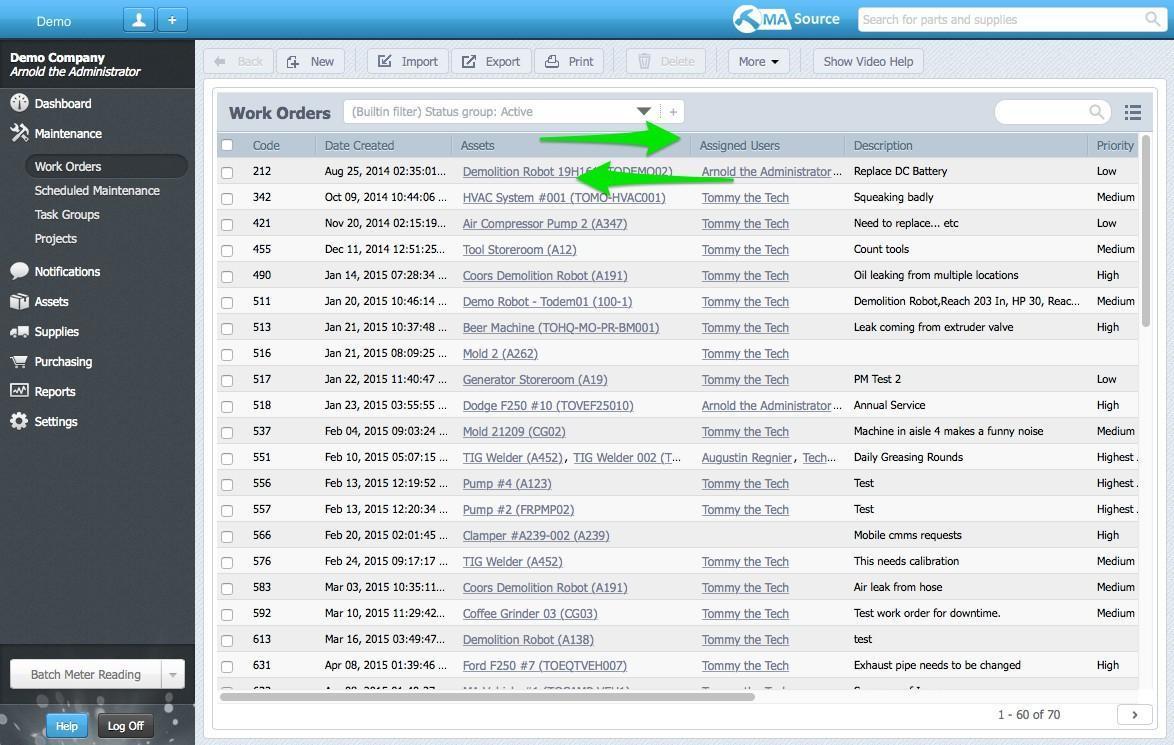
Check Your Assigned Work Orders
There are a number of ways in which a user can view open work orders. These include:
1. Dashboard -‐ Assigned Work Orders.
2. Menu Item -‐ Assigned Work Orders.
Method 1 -‐ Dashboard
1. Open your CMMS and your Work Orders are visible on various widgets. They are available by work order status but can be customized using the filters for each widget. You can also resize and rearrange the widgets by dragging (using the blue corner on the bottom right of the widget) and expanding.
Method 2 – Assigned Work Orders Menu
1. Click Dashboard – My Assigned Work Orders.
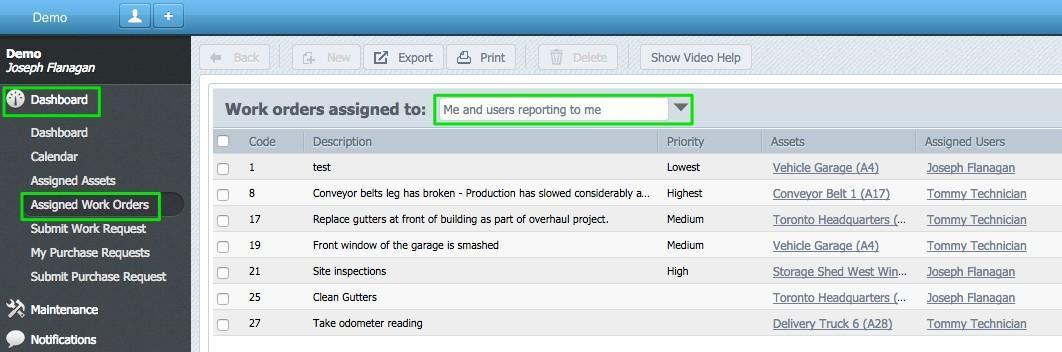
From here you have the option to decide whose work orders you want to view. The options are as follows:
- Me and users reporting to me -‐ this will display work orders for every user who reports to you. If you have 5 guys reporting to you each of their work orders will be displayed.
- Me -‐ Only your work orders will be displayed.
- Any users who report to you will have an individual section where you can view their specific work orders, this is a more specific view than Me and users reporting to me.
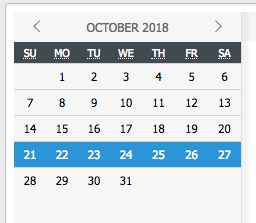
Check Your Upcoming Week using Calendar
The calendar is a great place to view work orders and Scheduled Maintenances that are open on that specific day.
1. Navigate to Dashboard -‐ Calendar
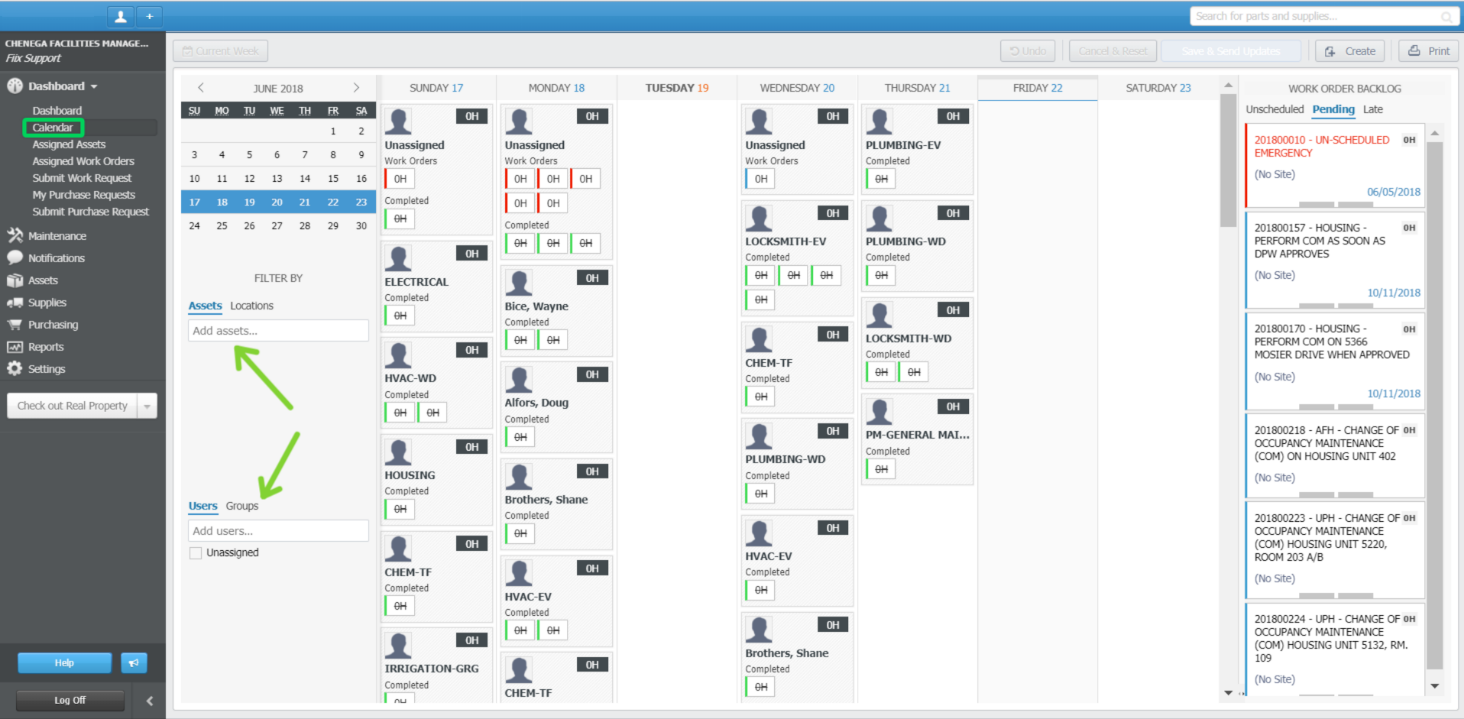
This specific view as you will notice above is displaying Calendar Events assigned to: all users and all assets. Just like the assigned work order view, there are a number of ways you can use the calendar to filter work orders:
Assets: select an asset to view the work orders specific to the asset
Locations: select a location to view the work orders specific to that location
Users: select a user to view the work orders assigned to the specific user
Groups: select a user group to view the work orders assigned to the specific user group
By default, all scheduled work orders for all users, locations and assets will display for the current week when you first open the calendar
Changing the Calendar Week
Up in the top left corner you will see a mini calendar which you can use to choose which week you would like to display. Use the left and right arrows in the top right to move from week to week.
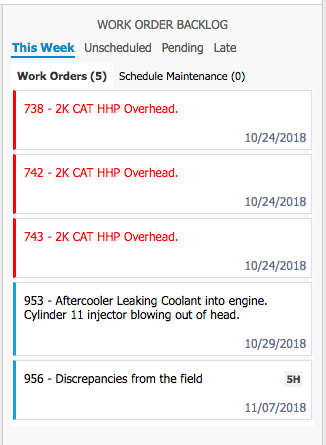
Work Order Backlog
The Work Order Backlog is located on the right- hand side of the main Dashboard page and the Calendar. It is meant to show you what work orders are coming up for the week, which ones are unscheduled (not scheduled to be due on a particular day), Work Orders in the pending state (such as work requests) and Late Work Orders.
You can also check which Work Orders are correctives and which ones are from the Scheduled Maintenance by switching back and forth through the “Work Orders” and “Scheduled Maintenance Tab”. In the below example, you can see that there are 5 corrective work orders (3 of which are late and 2 are in the open state), there are no Schedule Maintenance work orders.
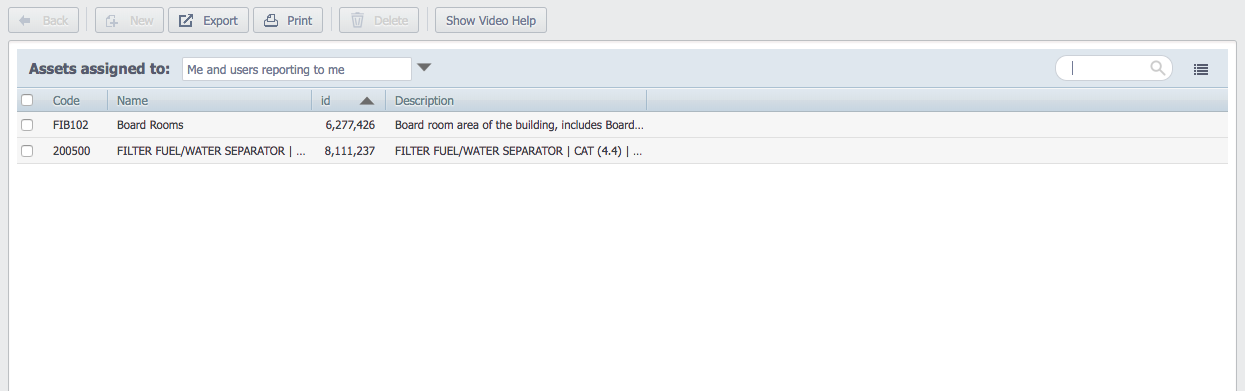
Assigned Assets
The assigned assets section will allow you to view assets that are assigned to you. The reason a user may be assigned to an asset is either because they are a subject matter expert on a piece of equipment or in charge of a certain area/facility. If you do not have any assets assigned to you, the list will appear blank.
Assigned Work Orders
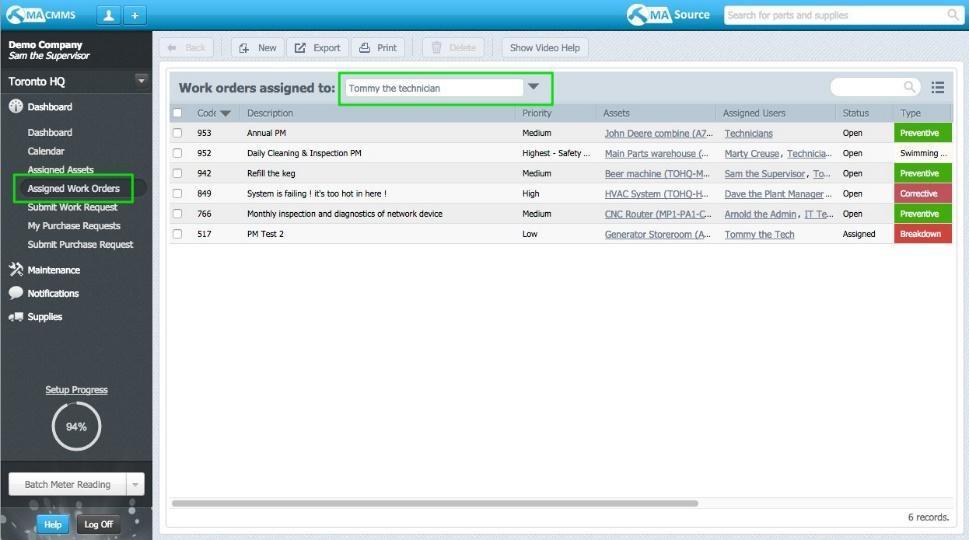
1. Click Dashboard – My Assigned Work Orders.
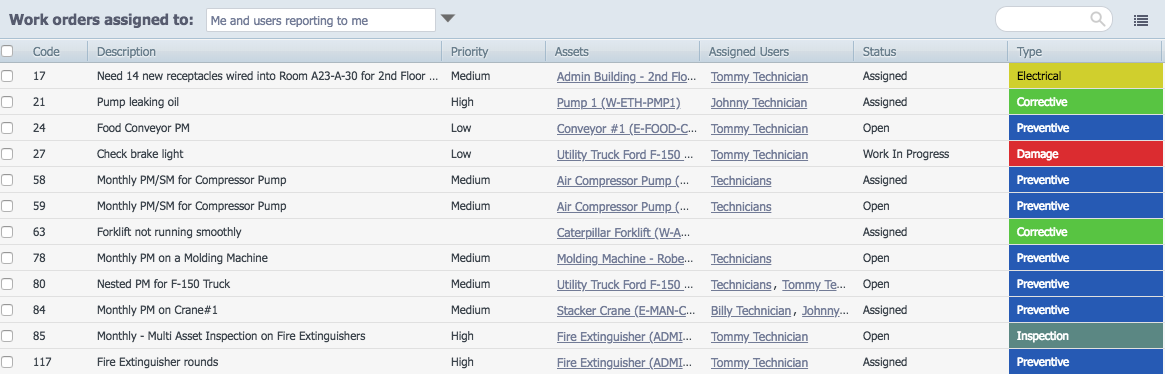
From here you have the option to decide whose work orders you want to view. The options are as follows:
Me and users reporting to me: This will display work orders for every user who reports to you. If you have 5 guys reporting to you each of their work orders will be displayed.
Me: Only your work orders will be displayed.
*Any users who report to you will have an individual section where you can view their specific work orders, this is a more specific view than “Me and users reporting to me”.

Customize your List Views
List views can be customized using the Visible Columns on the top right-hand side of the screen. Each user’s view can be customized to their own taste. This example will demonstrate how to customize the work order view.
1. Click the Select Visible Columns icon on the right-hand side of the work order screen. The icon looks like a bulleted list beside the search box
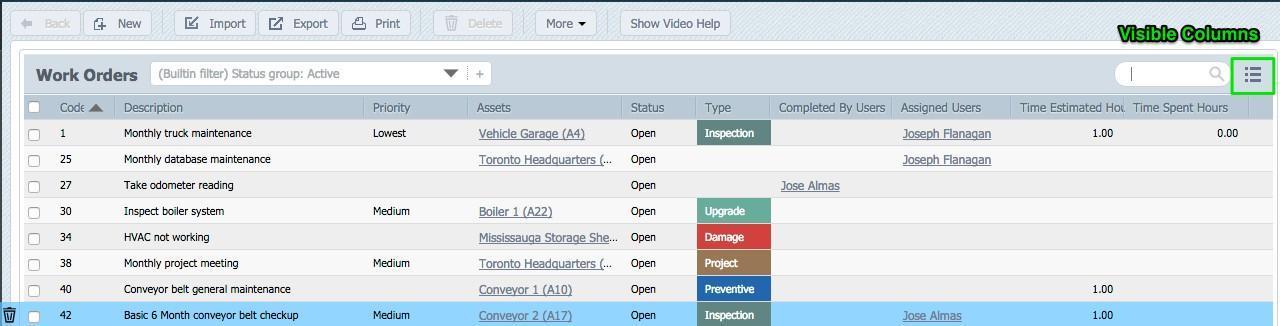
2. Check off the checkboxes to add or remove heading from view.
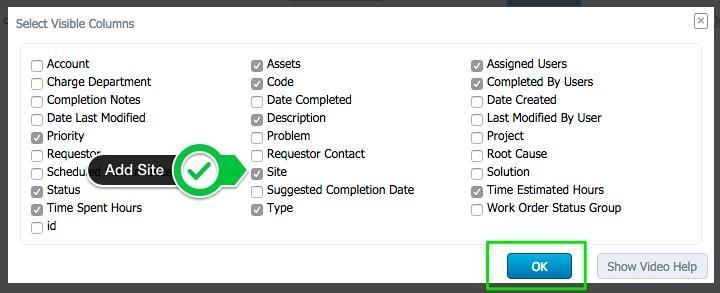
3. Click OK. The change is now reflected in the work order main browser window. Your new Site Column will be visible when viewing work orders.
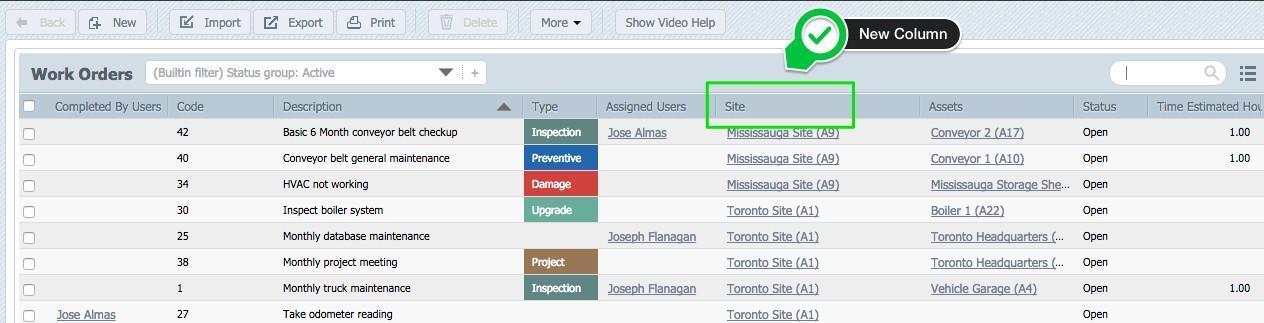
Alternatively, users can use ZenduMA’s drag and drop to customize views. By dragging the heading bar across, it can be dropped into a new position.
Modules
Assets
The asset module is essentially the “heart” of ZenduMA. Without it, the body cannot function. While our definition of an asset is anything you perform maintenance on or to, most customers will expand that definition to align with their business practices. The asset module is comprised of three sections: Facilities/Locations, Equipment and Tools. Typical definitions of each follow:
Facilities/Locations – an identifier of where your equipment or tools reside. Examples include:
Factories
Buildings
Structures
Production Lines
Rooms
Equipment/Machines – those items that you maintain and care to track historical repair histories. Examples include:
CNC machines
Conveyors
Vehicles
Air Handler Units
Pumps
Tools – a device or implement used to carry out a particular function. Items in this category typically have a higher dollar value than a standard set of hand tools. As such there may be a desire to track these items (who has possession of them, what is their repair history, etc.,). Examples include:
Torque wrench
FLIR device
Electric drill
Multimeter
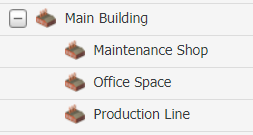
ZenduMA utilizes a hierarchy when creating your asset records (also commonly called “Parent\Child Relationship”). Similar to the file structure you will find in file explorer on your computer, each Asset record can have both a parent and unlimited children. For example, your main building may have three areas: a production line, a maintenance shop and office space. In a hierarchy the “master” parent would be the asset “Main Building” with three children – production, maintenance and office. This would be displayed in ZenduMA as:
The hierarchy also flows into equipment and tools. Within the Maintenance shop there may be a FLIR device and Multimeter. In the Office space an air handling unit that has a circulating pump attached and the production line may have a CNC machine. This hierarchy would be displayed in ZenduMA as:
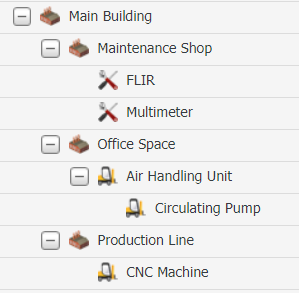
Note that in the graphic above the Circulating Pump is a child of the Air Handling Unit, which is a child of Office Space. In turn, Office Space is a child of Main Building.
Asset Category
Asset Categories are used to group similar records together for the purpose of reporting, sorting and custom field usage. You can add as many asset categories as you please. It is important to choose the correct parent category when creating new categories (you will have to decide which category to use as the parent category based on your own personal needs).
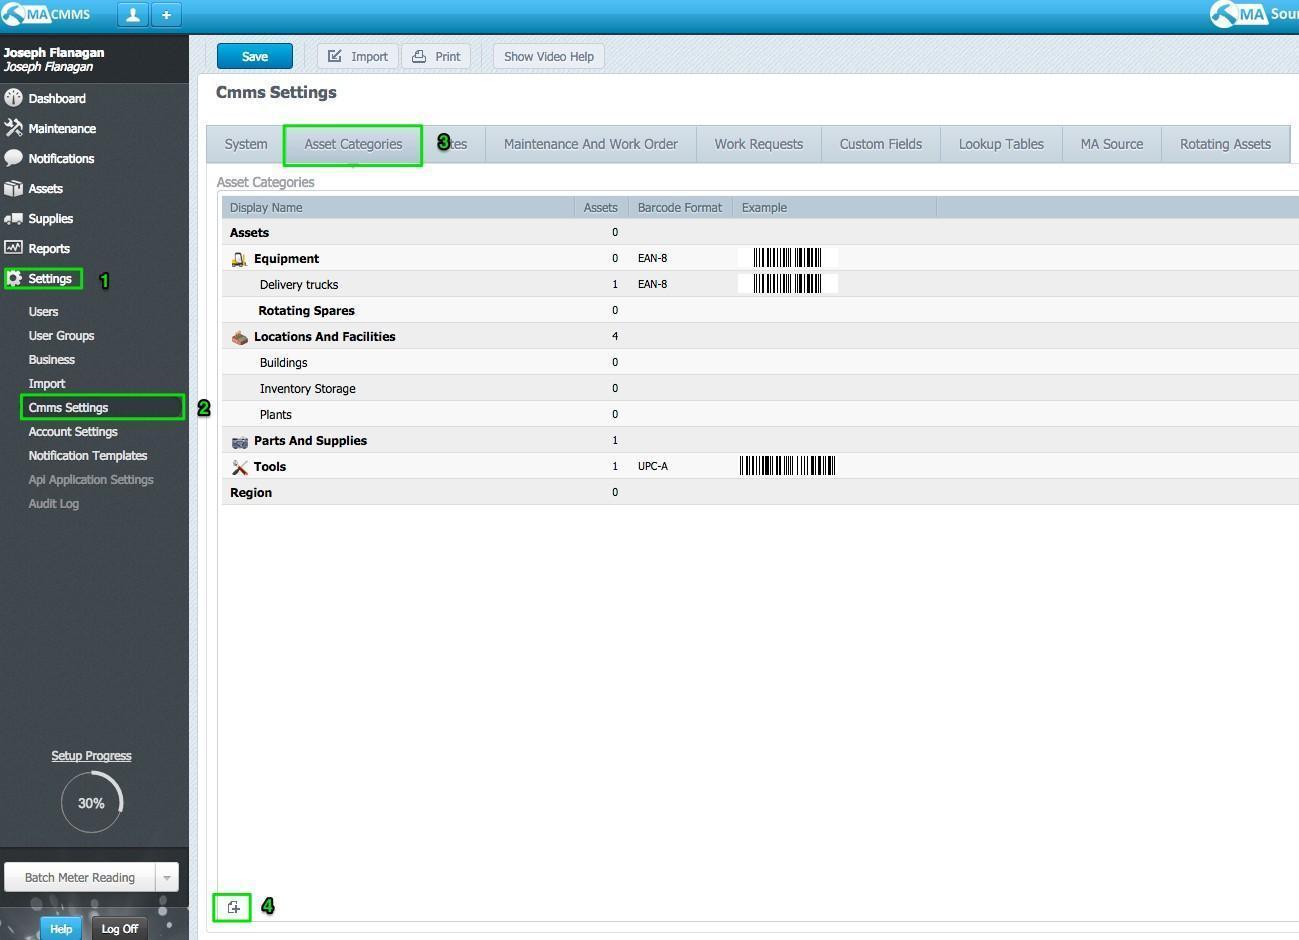
To create custom asset categories, navigate to Settings\CMMS Settings\Asset Categories then click the “Add” button”.

In the example above, a new category called “National Deliveries” is being created with a parent of “Delivery trucks”. After clicking “OK” you should now see your new subcategory directly below your Delivery truck category
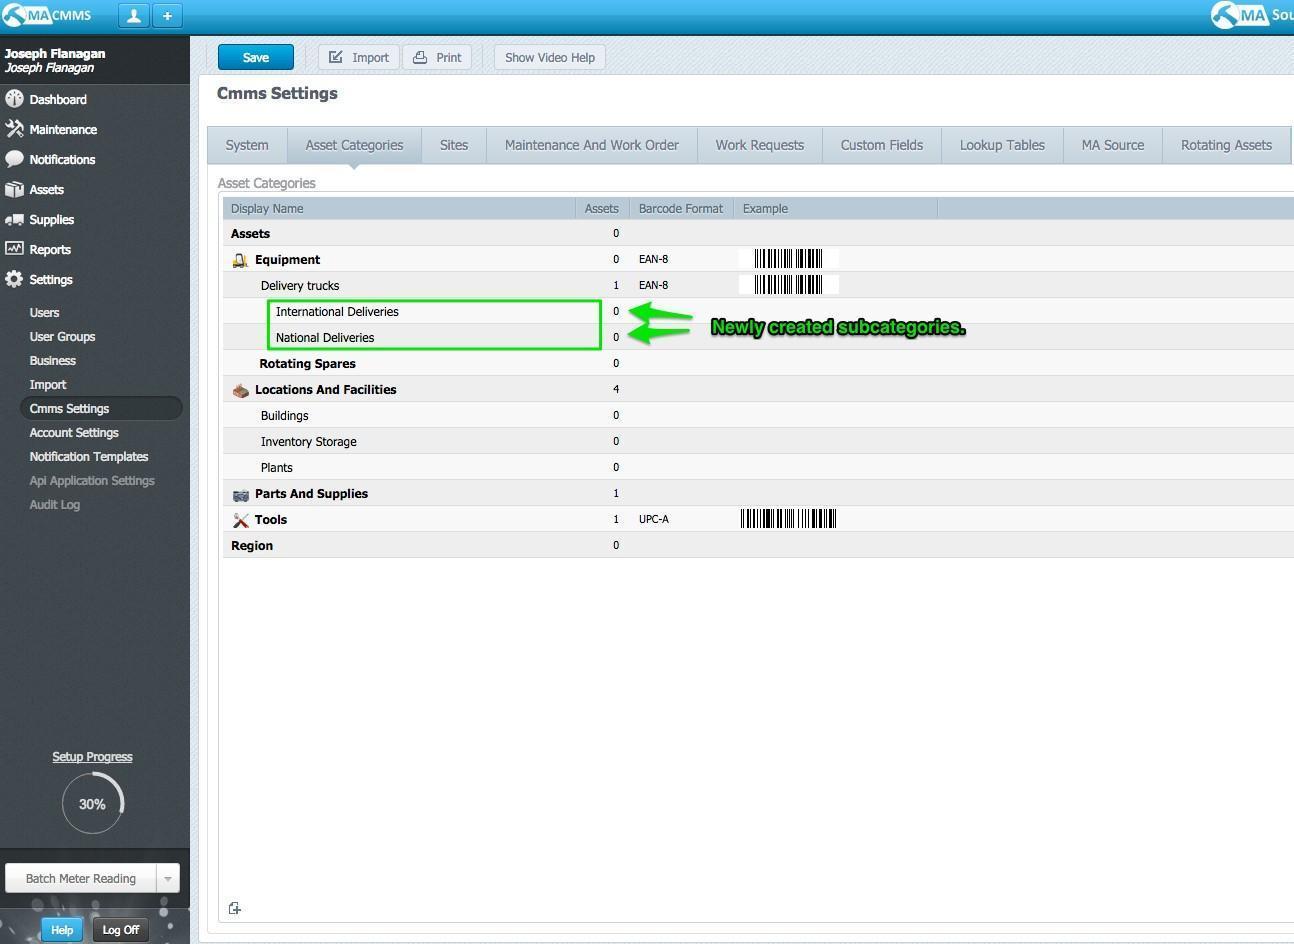
These new categories will now be available for you to choose from when creating new assets
Add New Facility/Location
A new facility record can be created by either clicking on “All Assets” from the main menu bar then clicking on New or by first clicking on “Facilities” from the main menu bar then clicking on New. NOTE: If first selecting “Facilities” from the main menu then skip the next step.
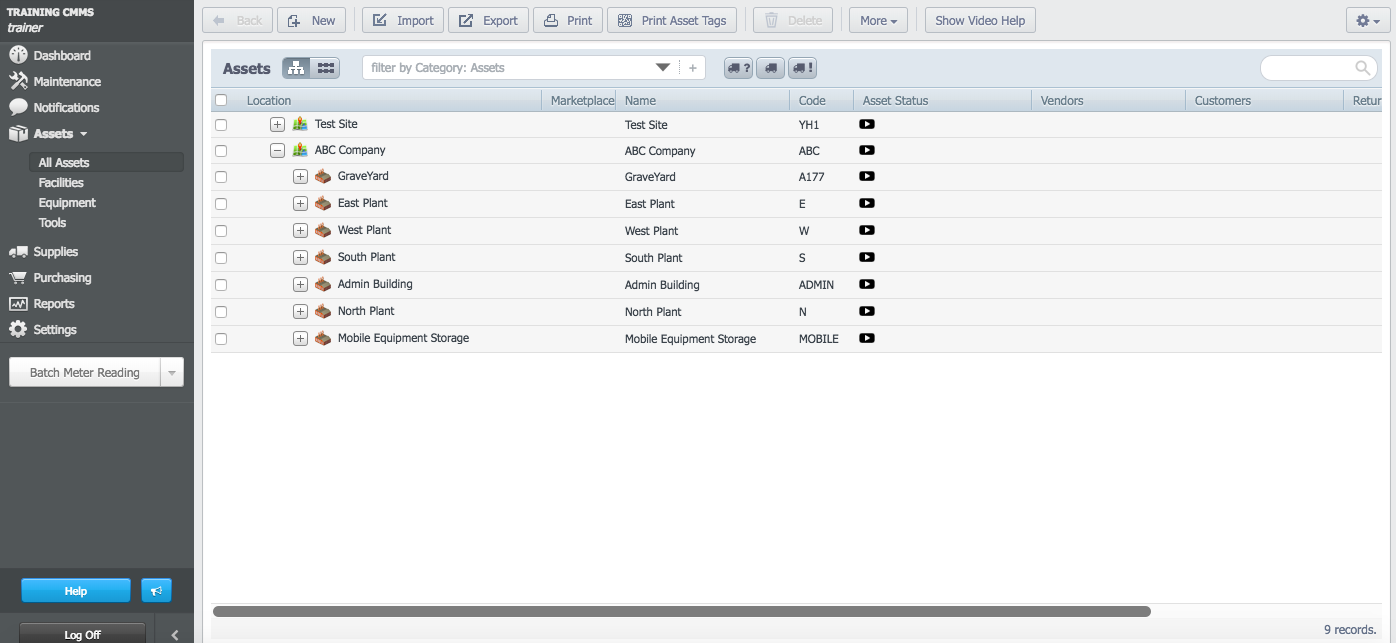
The next step is to choose Locations or Facilities.
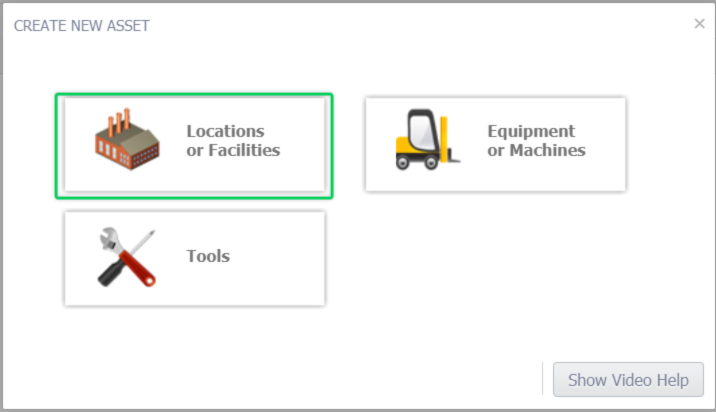
After selecting “Locations or Facilities”, a new popup form will open asking you to identify if the new record will reside within an existing location or if it will be a location on its own. (The default is to set as a new location).
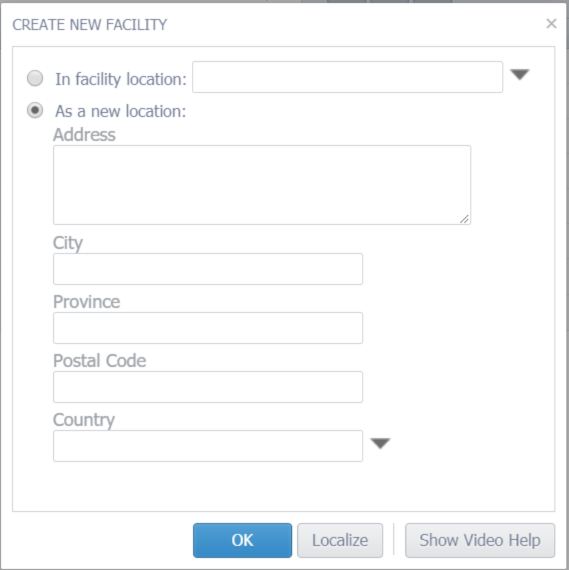
If your record will exist in an existing location then click in the “In a facility location” radio button, then click the dropdown to select the appropriate parent location. If this record will be a new location, then populate the address information as appropriate. Click OK when done.
When the new record form opens, you will notice that there are two sections: the upper half of the page is called the record header, the lower half is called the tabs section.
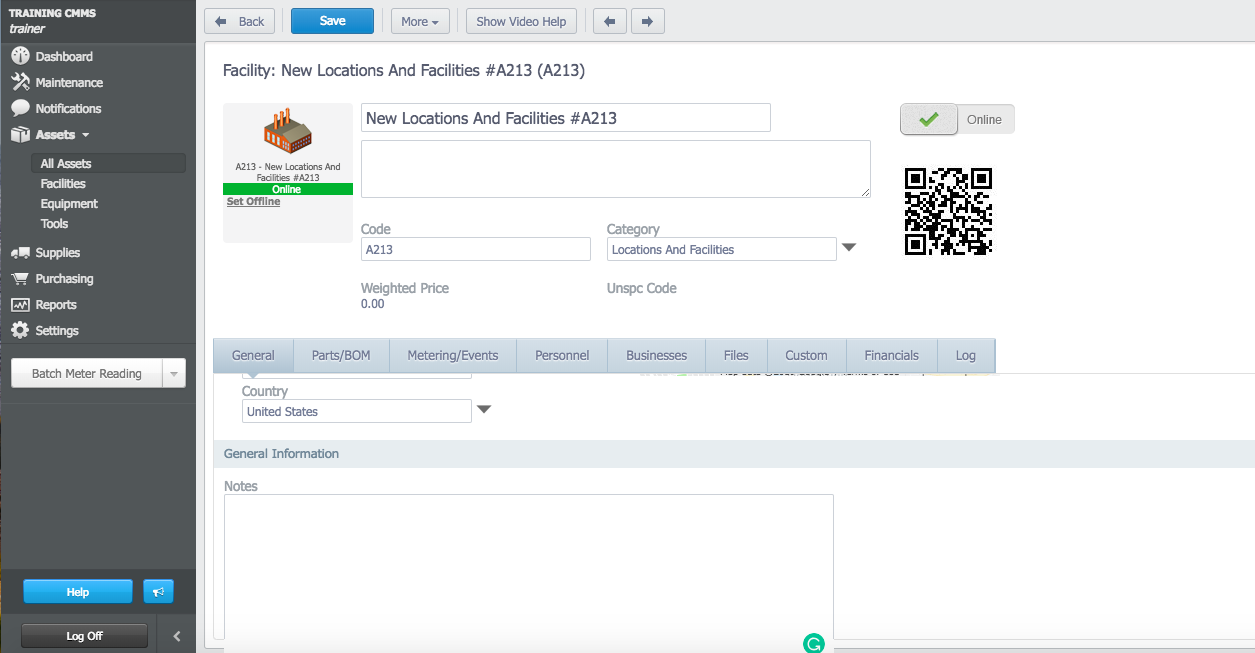
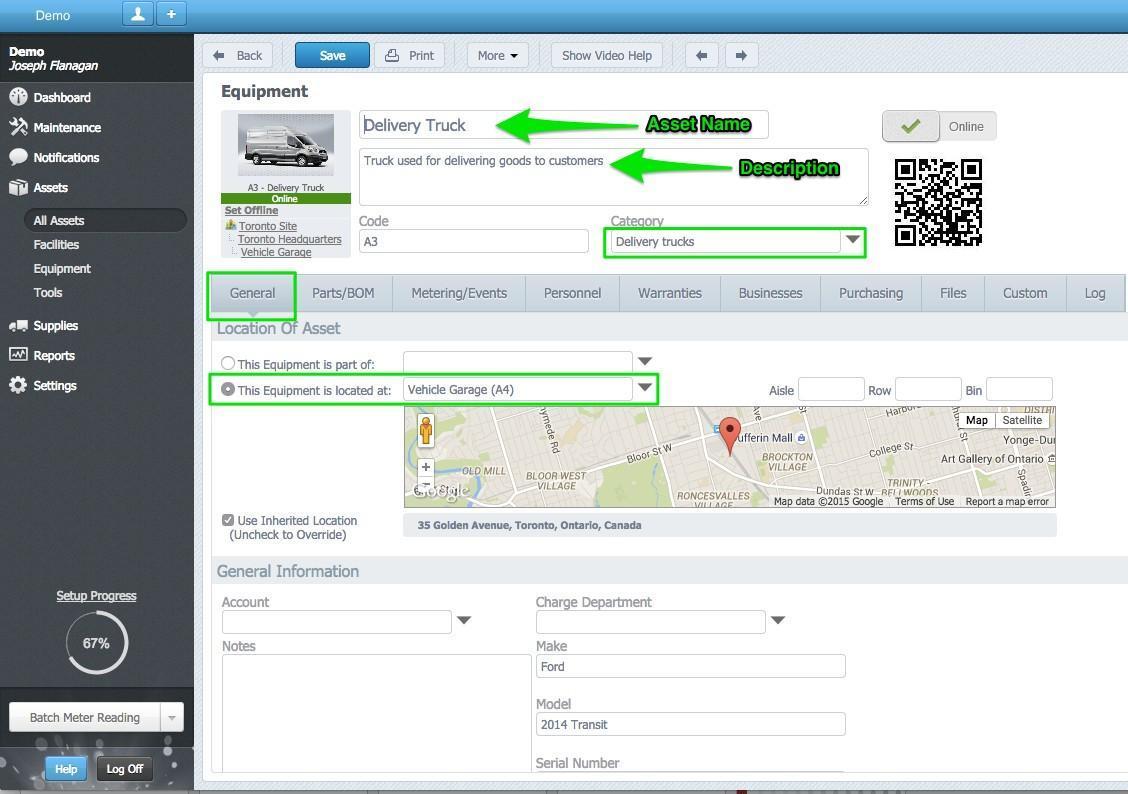
General Tab
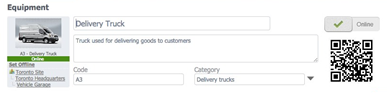
Fill in the general information for the asset.
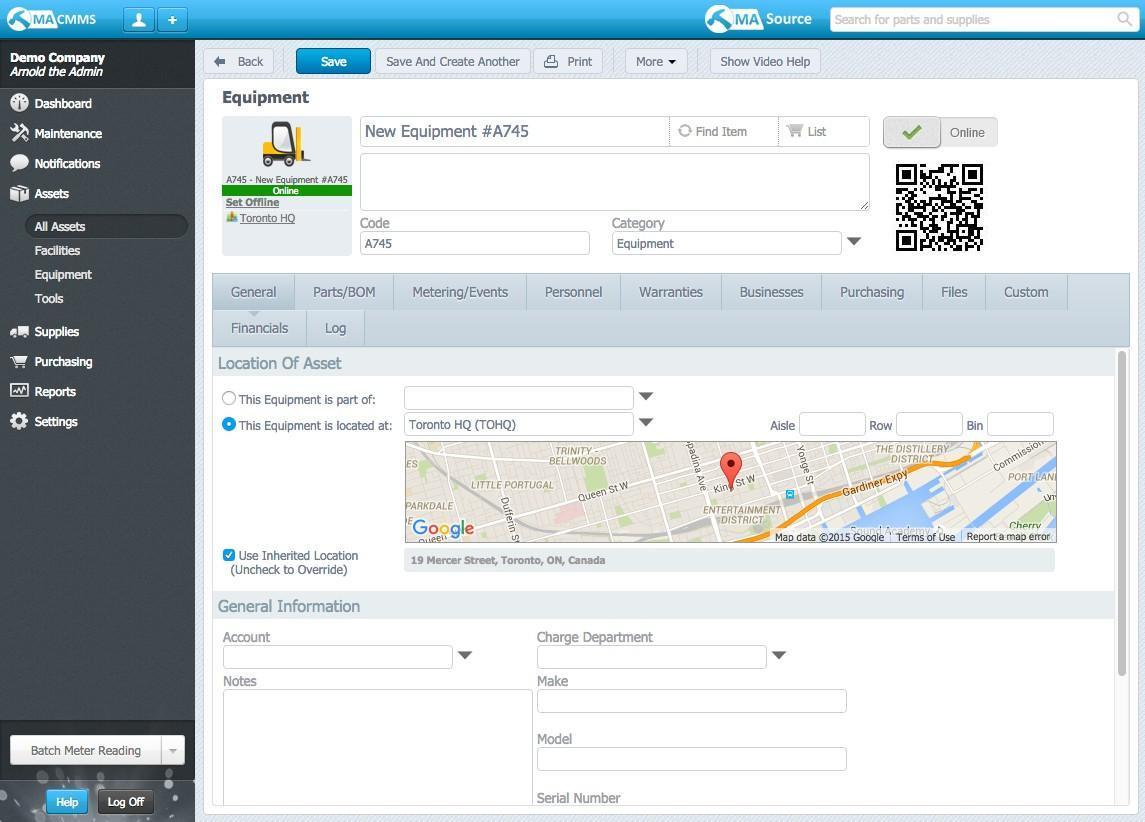
This tab is where you will input your Asset Name, Description, Code, Location etc. In this example we want the delivery truck to be located in the Vehicle Garage facility. This is where we will keep all vehicles in our CMMS.
Parts/BOM
Select the Parts/BOM tab. This is where consumable parts associated with a piece of equipment can be added.
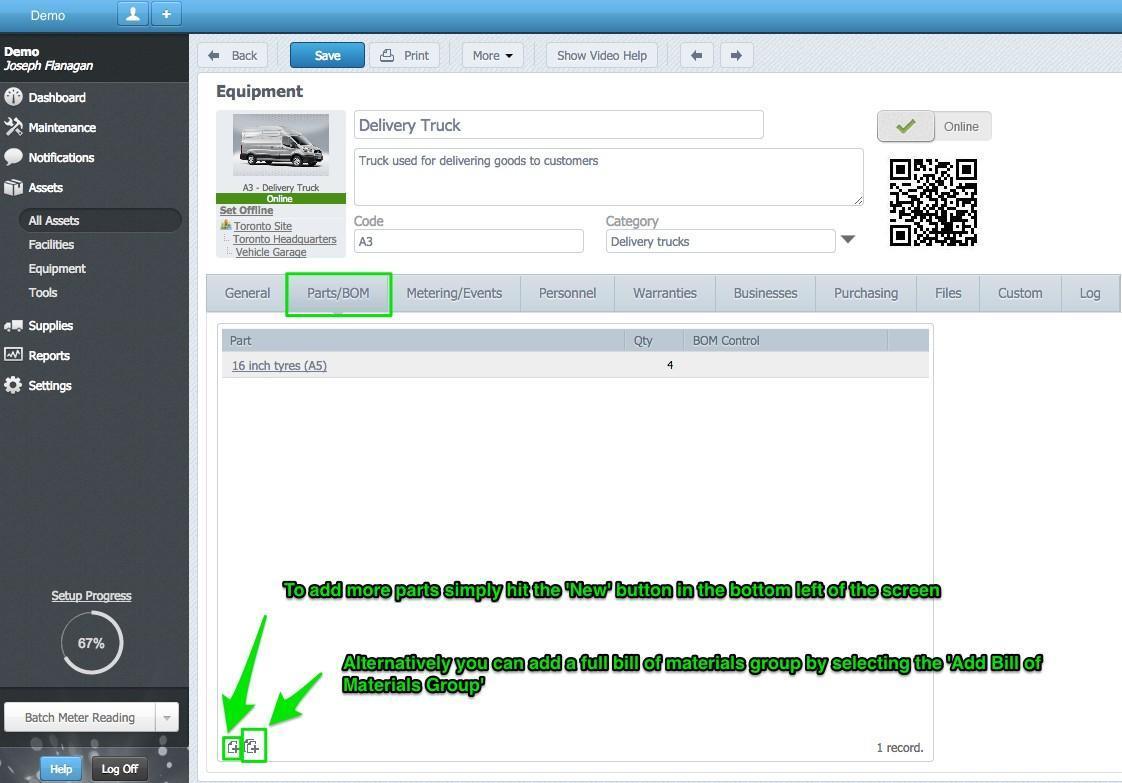
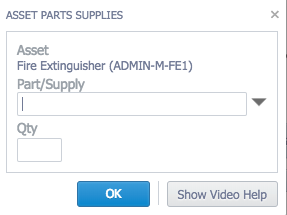
Clicking on the Add button will open the Asset Parts Supplies selector form. If you know the number # of the part you want to add, you can type it into the Part/Supply field which will open the Parts/Supplies search form. Click on your part from the result set which will then populate the Part/Supply field. Alternatively, you can click on the dropdown arrow on the Asset Parts Supplies selector form to open the Parts/Supplies search form. You would then search for your part and click on it when found to add it to the Asset Parts Supplies form. Fill in the Qty field with the suggested quantity that you would use for this asset.
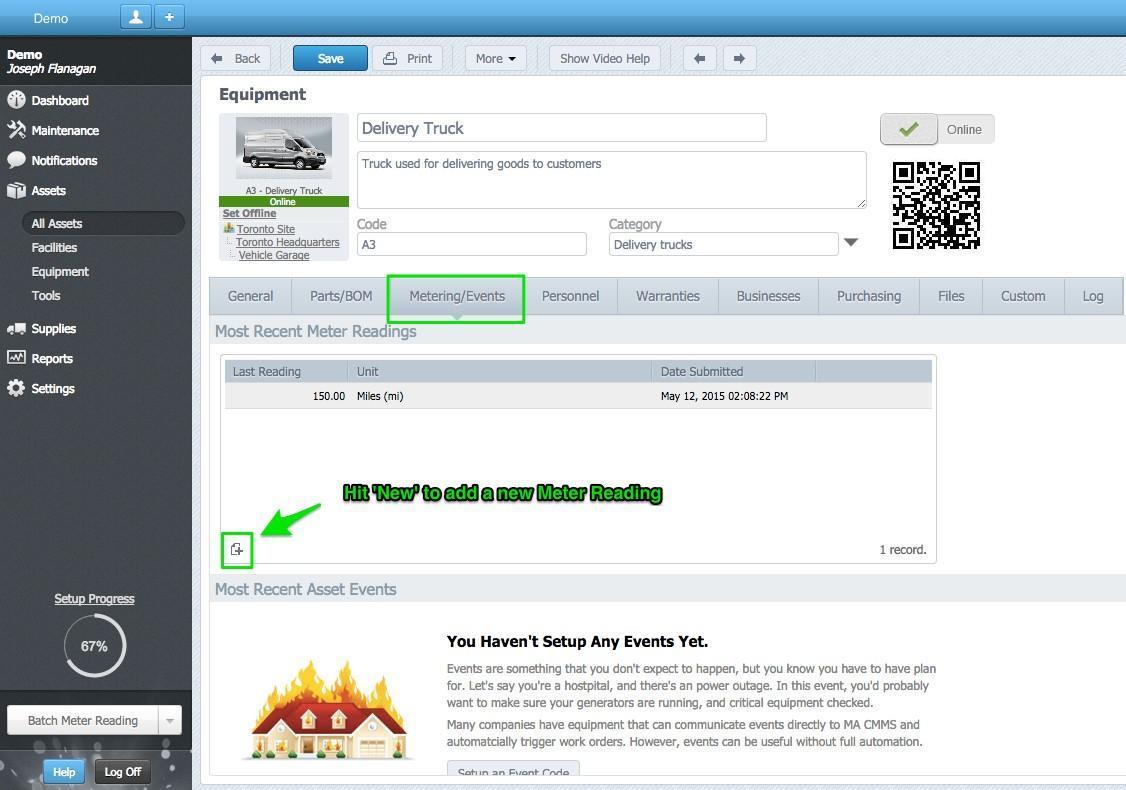
Metering/Events
This tab allows you to enter meter readings against the asset. The meter readings may then trigger Scheduled Maintenance Work Orders when certain thresholds are met.
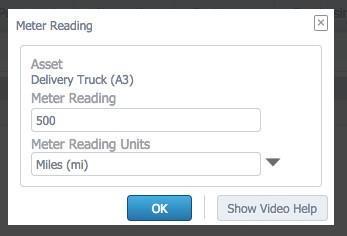
To add a Meter Reading you simply click "Add" input the Meter Reading, choose the unit type and click ok. The reading, unit and date will all be displayed, clicking into the reading will show who actually submitted it. Any previous readings can also be found by clicking on the existing reading. A word of caution when it comes to meter readings. It is important to be sure you are entering the correct reading as any meter reading that triggers a Scheduled Maintenance cannot be deleted.
To add the meter reading you simply input the meter reading, choose the unit type and click ok
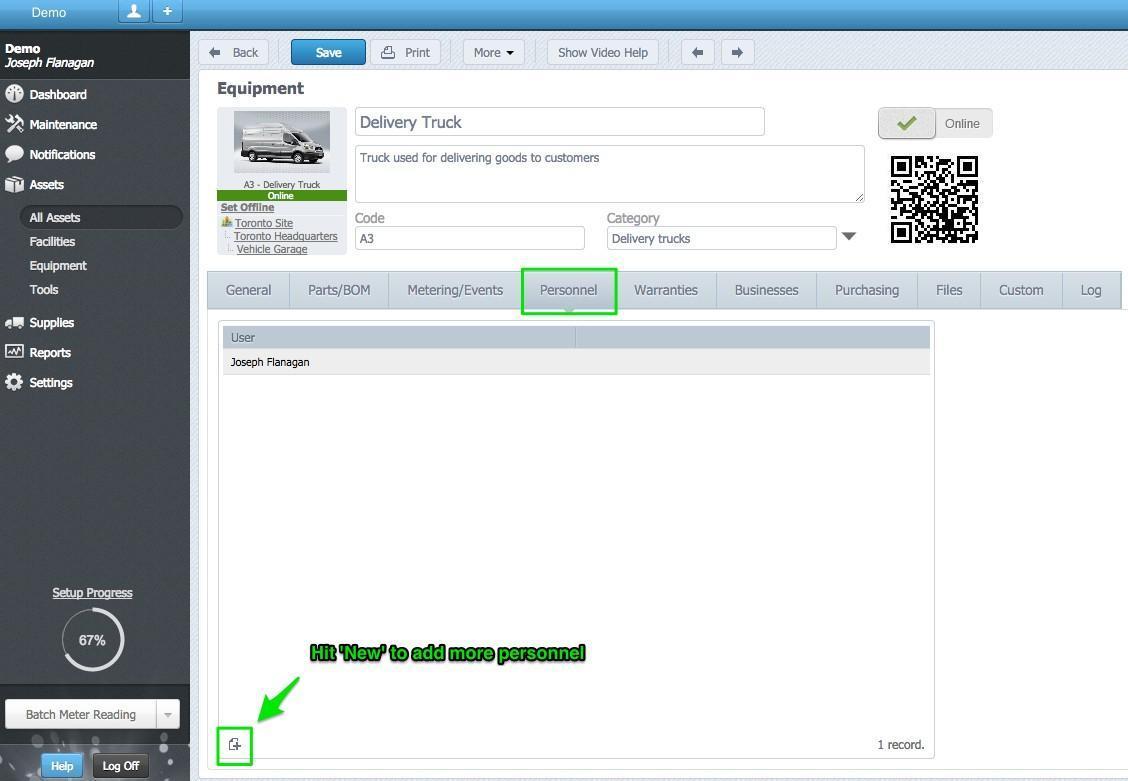
Personnel
The Personnel tab allows you to define which users have an “ownership” stake for the record. For instance, these users may want to receive an email notification whenever a work order is created against the asset. Click “Add” and choose the User. The user will then be displayed in the Personnel tab.
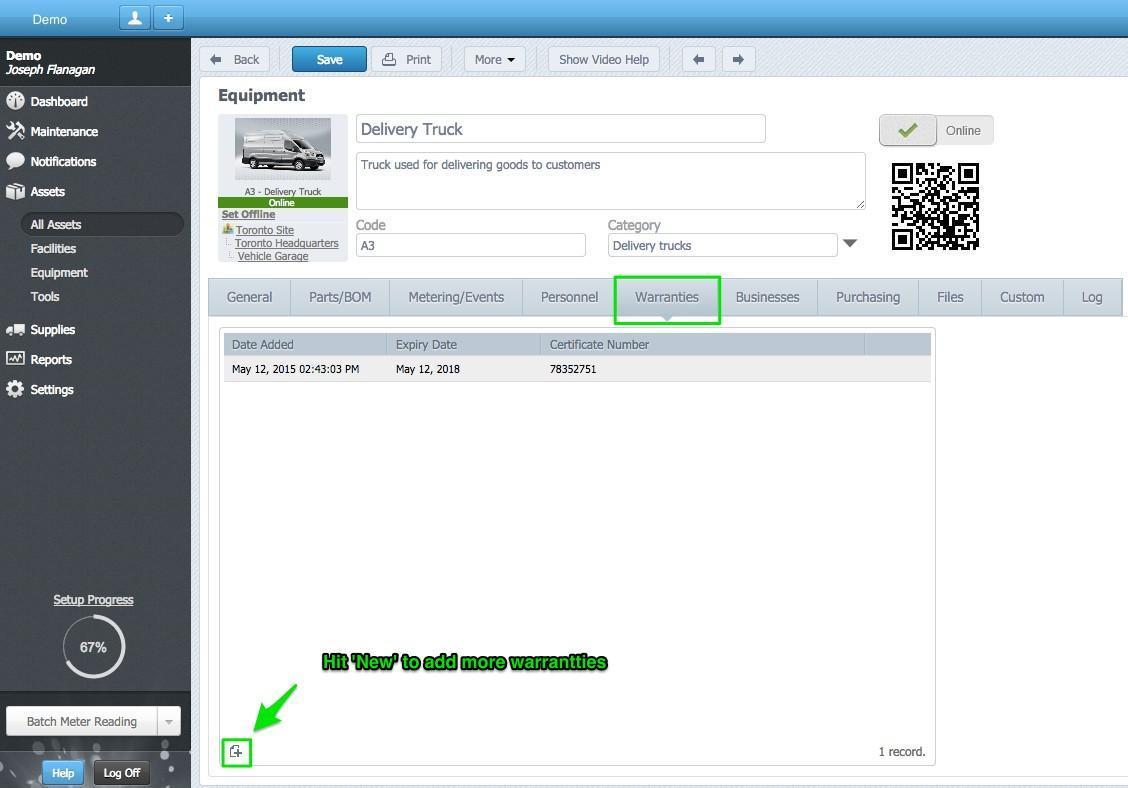
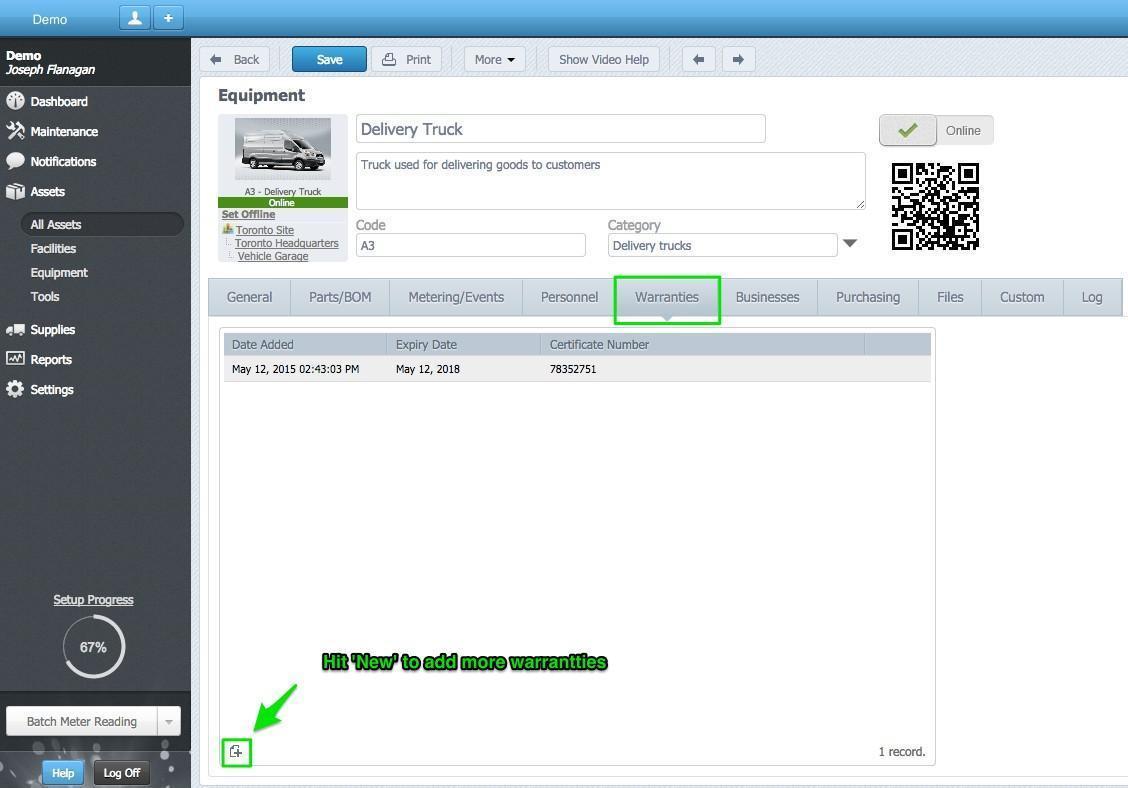
Warranties
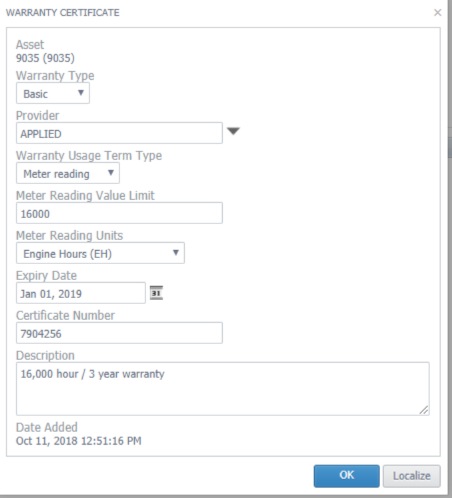
Warranties can be added to your equipment in the Warranties tab. To achieve this switch to the Warranties tab and hit 'New'. From here you will be met with the following pop up box where you fill in the relevant information.
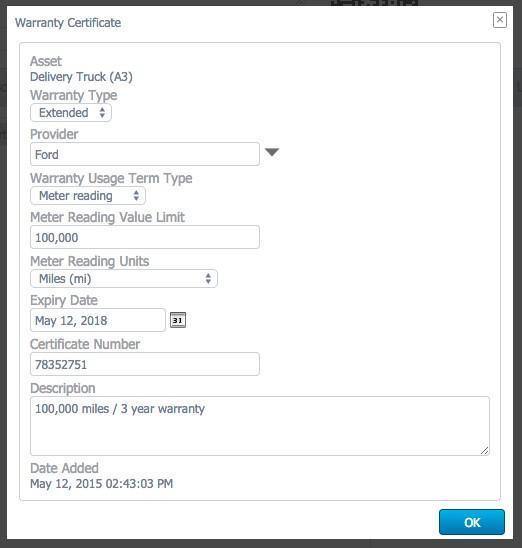
This information will then be stored and displayed as shown below
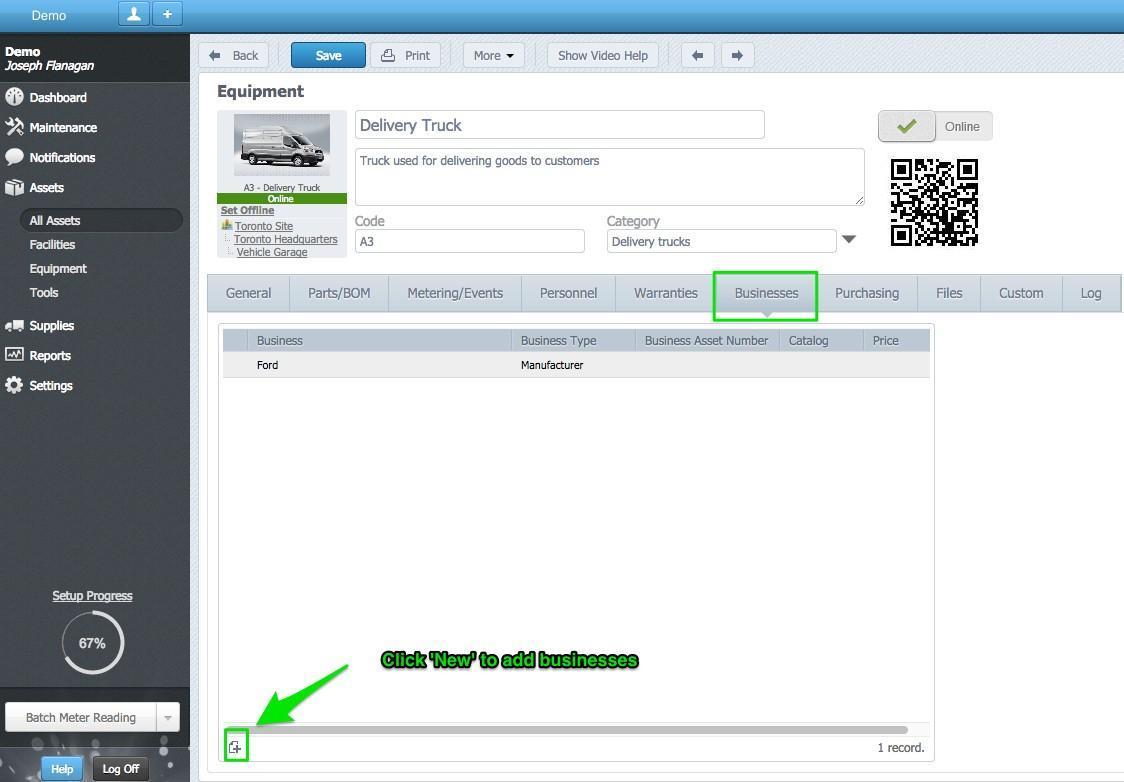
Businesses
Add associated business to the business tab. Information on suppliers, manufacturers and service providers for the equipment can be entered by clicking the Add [+] icon. For assets such as facilities, machines or equipment, an economic batch quantity won’t be required. For parts and small tools, economic batch quantity refers to the quantity to be ordered. Once entered the business information will be displayed in Business tab.
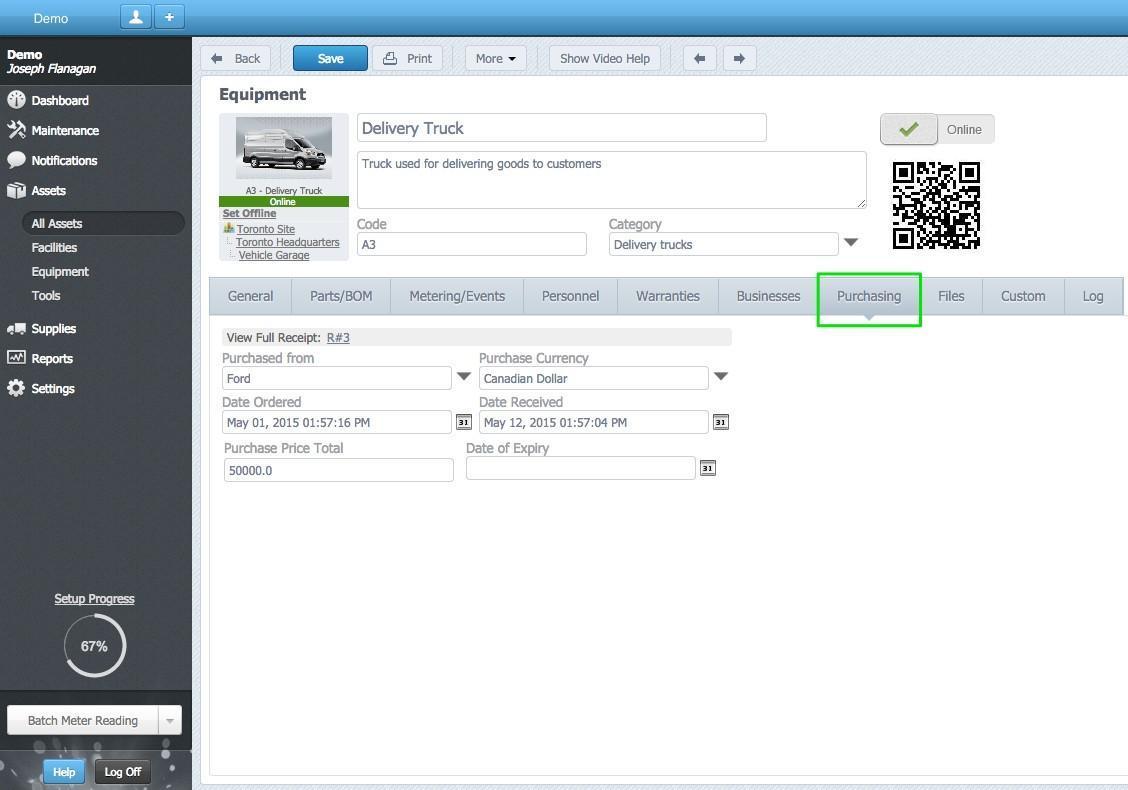
Purchasing
To add a purchasing record for the asset, select the Purchasing tab and hit 'Add Purchasing
Information' and fill in the relevant information as shown below.
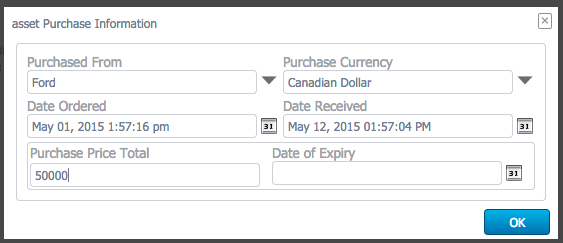
Your information will now be shown in the Purchasing tab as shown below.
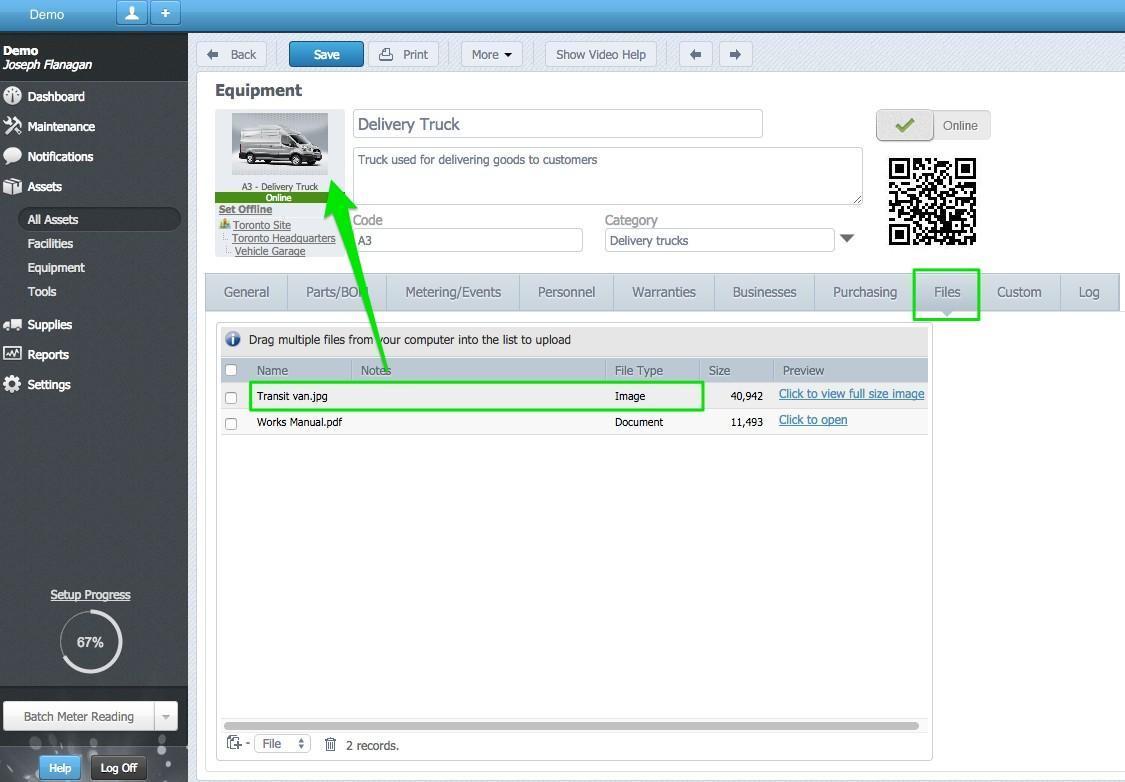
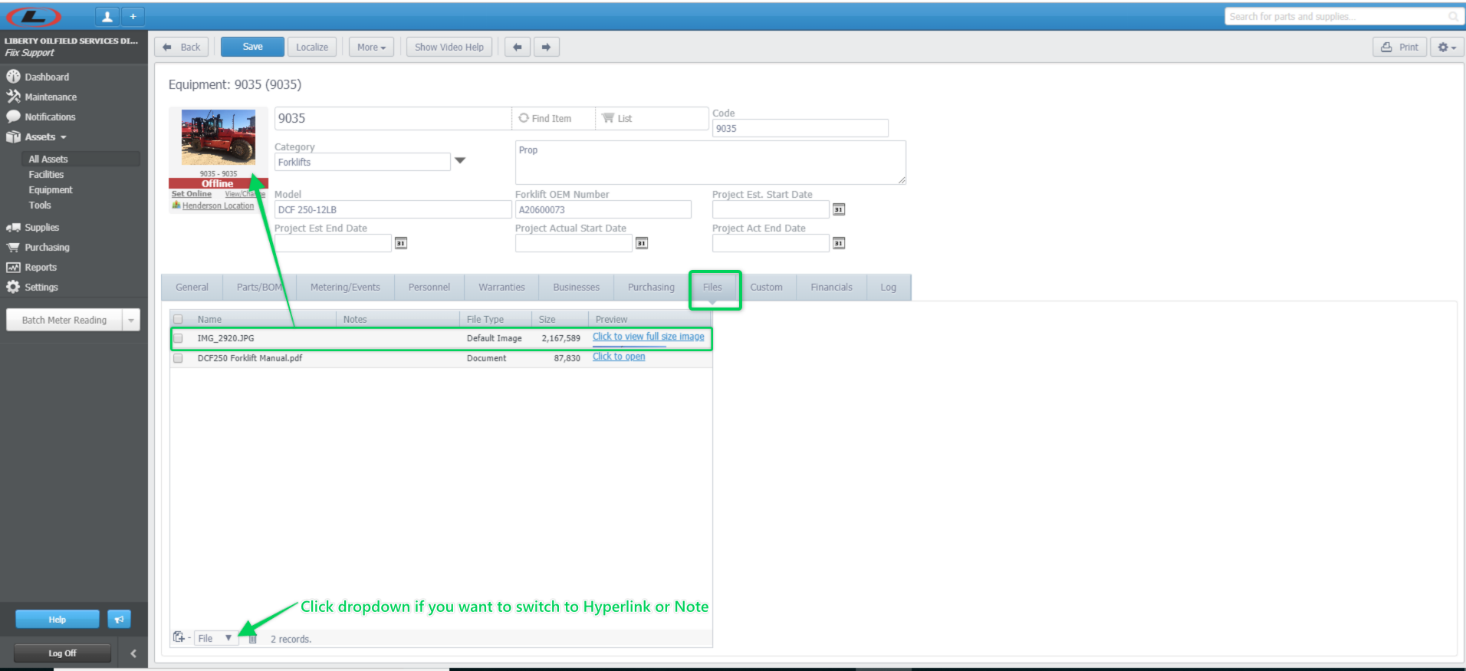
Files
To add a File, hit Files and drag and drop the file into the Files window. Here we will attach an image and a pdf manual that can be referenced when carrying out works/services on the vehicle. As when setting up facilities, the attached image will be displayed.
Note: when adding a file attachment, you must have the appropriate application to open the attachment (i.e. do not add a CAD drawing if you do not have a CAD viewer installed on your computer). Also, when adding a hyperlink do not add a link to your local computer (i.e. “C:\Users\Steve\Documents\Owners Manual.pdf) as the link will fail. Hyperlinks must use a web address
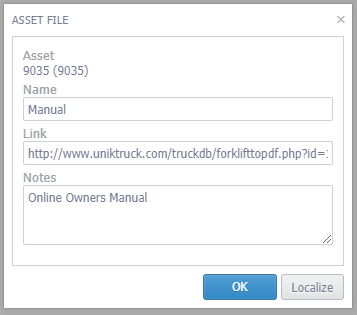
To add a hyperlink, click the dropdown and change the attachment type from “File” to “Link” then click the “Add” button. A new form will open prompting you to fill in a name, link address and a note (optional). Fill fields then click “OK”
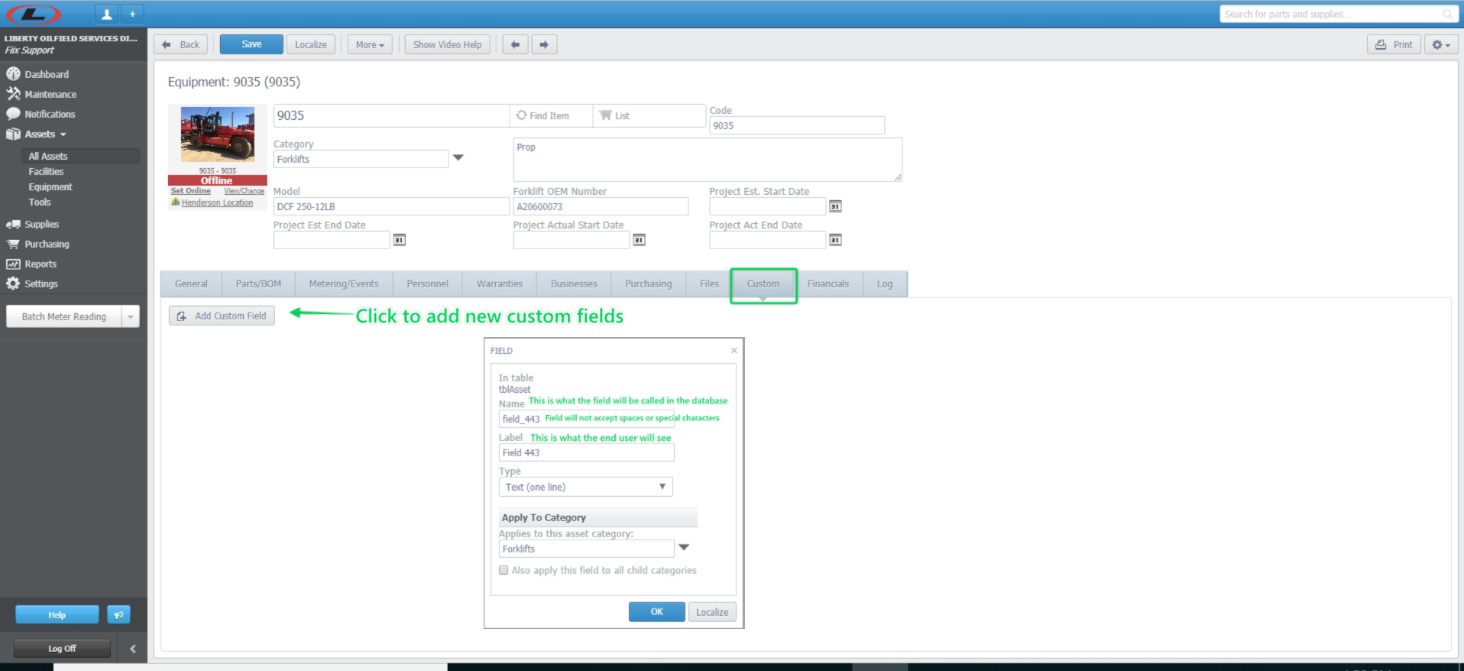
Custom
The Custom tab allows you to create (and populate) custom fields for the asset. Any custom fields added are associated to an Asset Category and will display for every asset that is assigned that category. ZenduMA supports the following custom field types:
To add custom fields click the “Add Custom Field” button then populate the “Field form that opens, then click OK
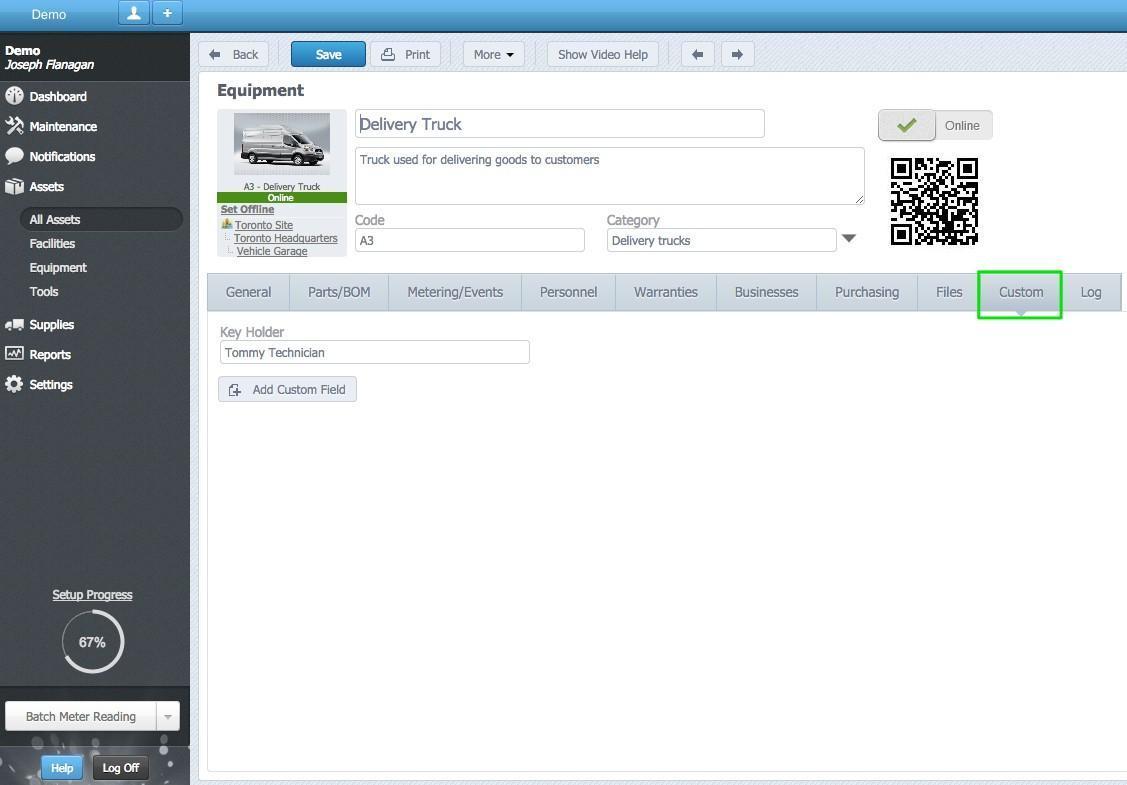
NOTE: The addition of custom fields should only be performed by a system administrator
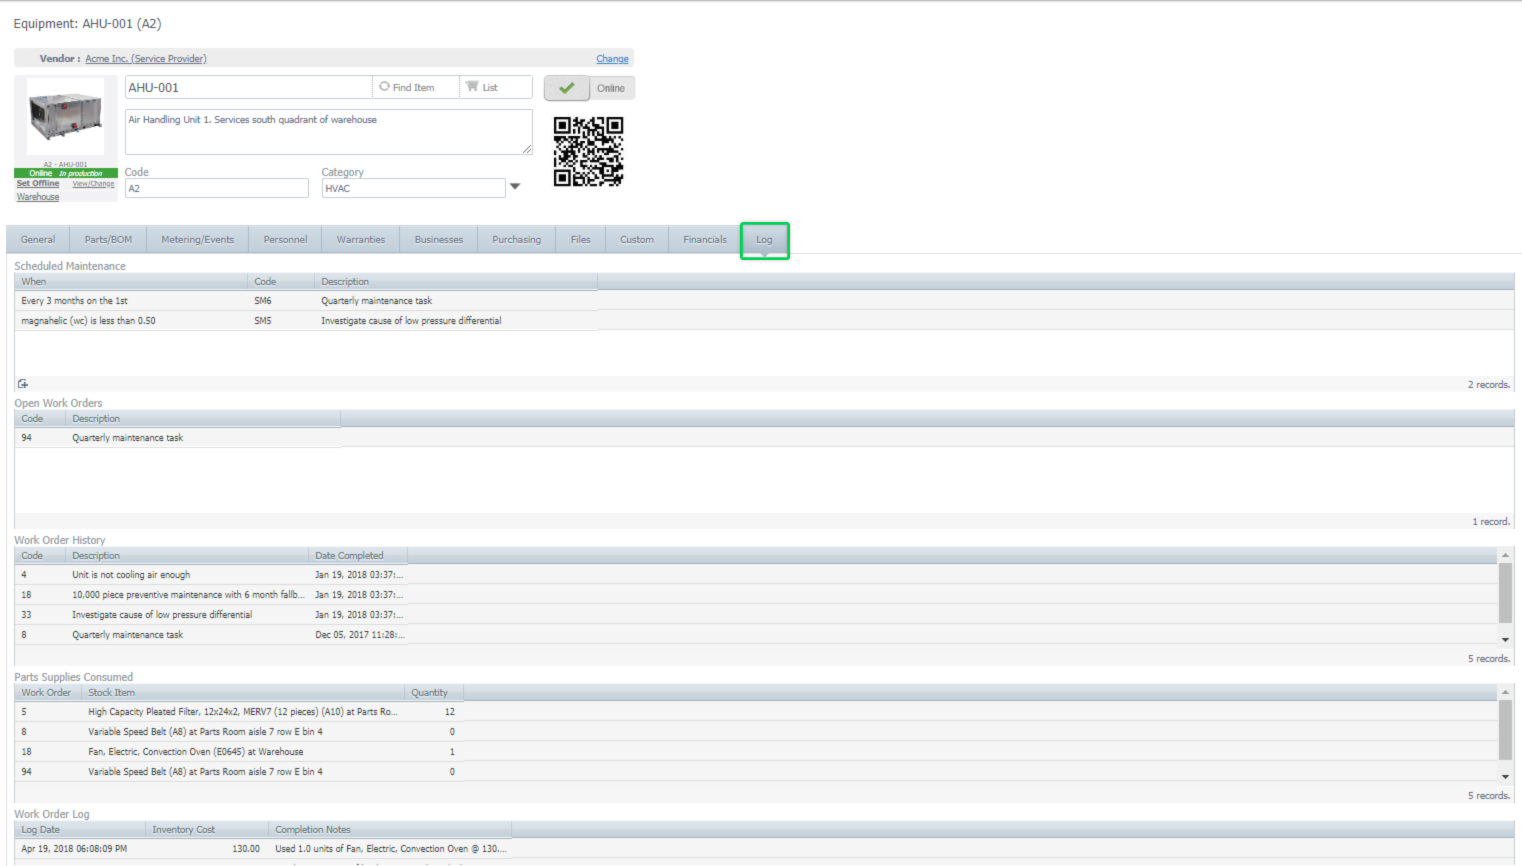
Log
The Log tab will store any information relating to the asset. It will contain the Work Order history, current Work Orders, Scheduled Maintenance, the offline/online history of the asset and it will track any moves the asset has made (Rotating Assets)
Move an Asset
The fully enabled Rotating Asset module makes use of the Move Tracking and Move Control features. Move Control allows authorized users to move assets such as Equipment and Tools between Sites in the organization.
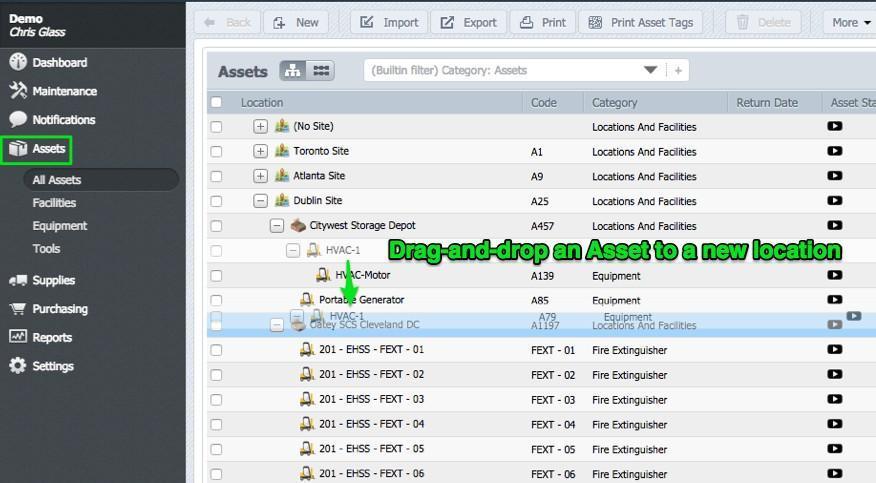
The simplest way to change an assets location is to drag-‐and-‐drop an asset to a new location in the asset hierarchy. It is also possible to change the location by selecting a new location from the assets Location dropdown menu. However, to help manage the movement of assets, Users can track and/or control who can move assets with the Rotating Assets module.
Method 1 -‐ Drag-‐and-‐Drop:
To change an assets location quickly, select Assets, expand the Asset Hierarchy and Drag-‐and-‐Drop the asset to a new location
Method 2 – Manual Method
Navigate to an Equipment or Tools asset click on the More button and select Move To:
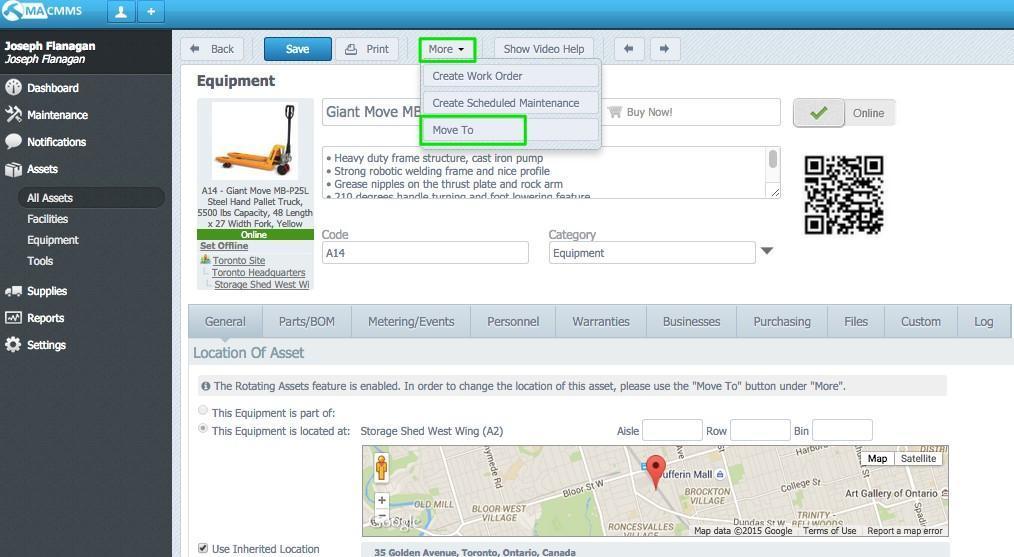
In the new window, fill in the Destination and Move Originator, Move Date and Notes.
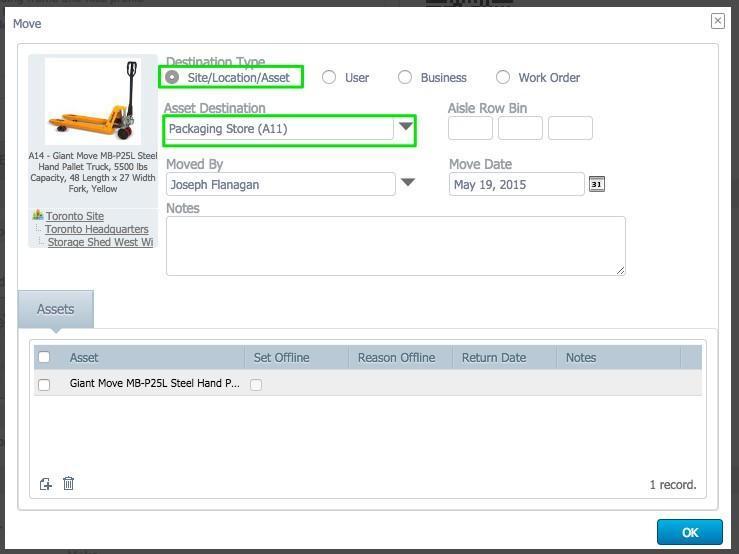
You can move equipment to a Site, User, Business or Work Order -‐ In this instance I will move the piece of equipment to another Site.
Fill in the required move information and click OK to commit the move
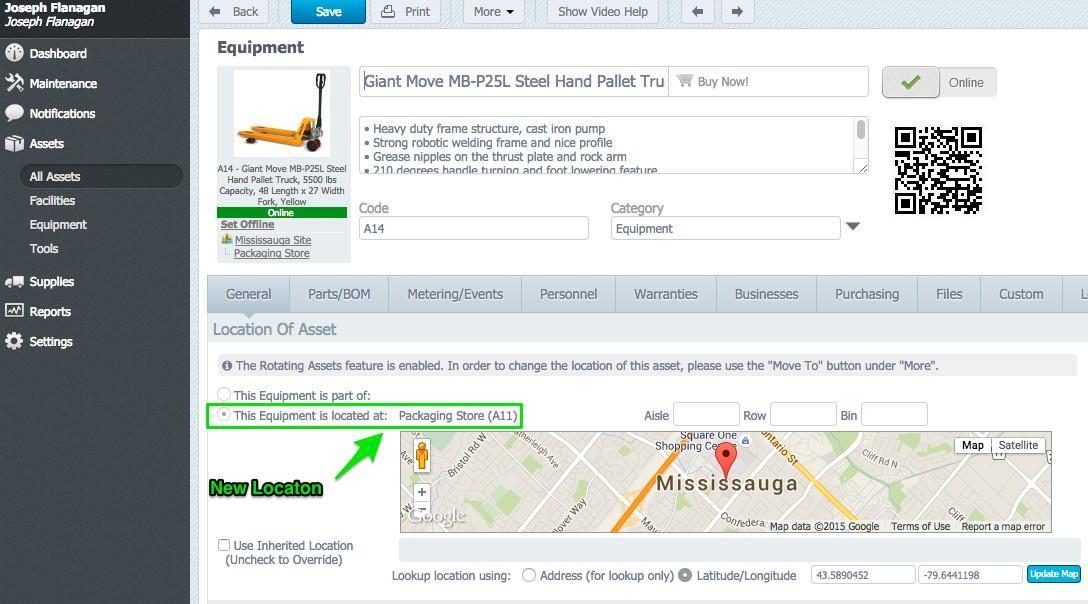
The next window will display the assets new location and status.
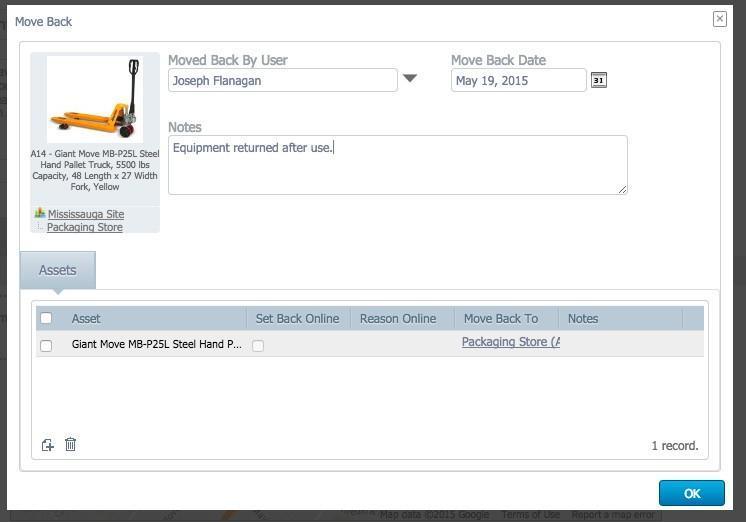
When moving an asset to a Work Order, User or Business you will notice the 'Check Back In' button. This is used to check assets back in after rotation. In this example we have moved to a work Order, the move is documented beside the 'Check Back In' button.
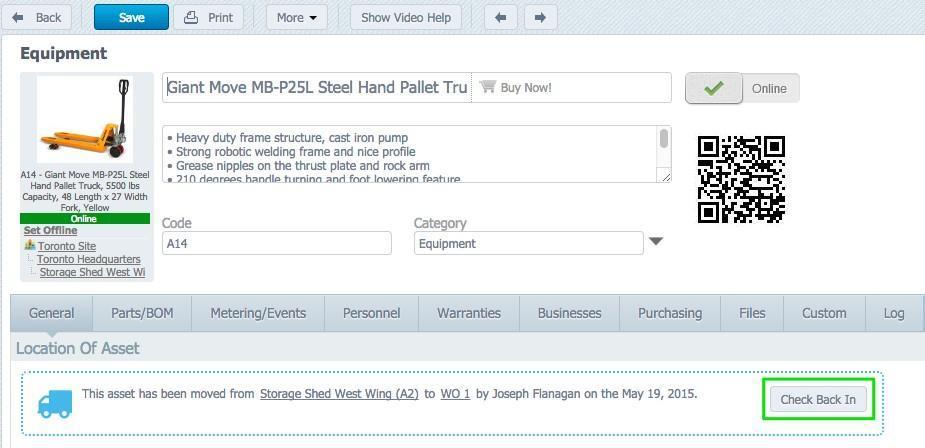
Clicking the Check Back In button will open a new window where Notes and Moved Back by
User fields must to be filled-‐in to complete the Check-‐In procedure
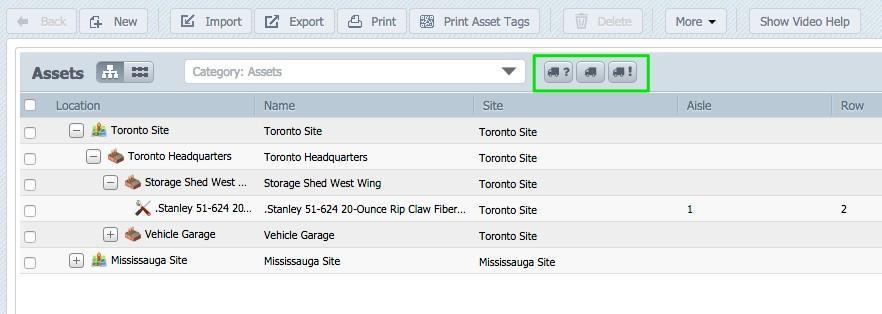
There are 3 buttons on the top of the Equipment and Tools pages, beside the Filter by drop down list, that permits filtering list of assets shown by the Move status: Waiting for Approval; Moved away and Overdue.
When the move is originated by someone other than the Site/Move Manager, the Move will need approval from that site’s Manager.
Finally, any Moves and Check-Ins done on a piece of equipment will be reflected in the Log tab of that equipment asset. In this instance we have made multiple moves, all of which are documented in the activity log of the asset.
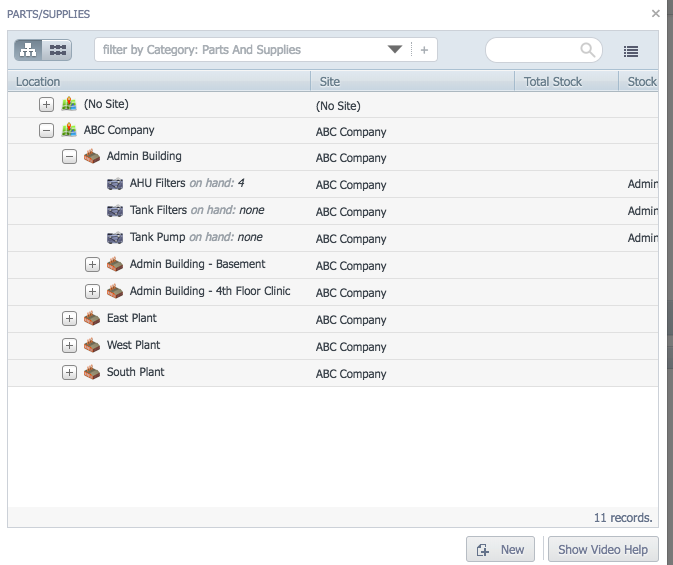
Parts & Supplies
The Parts & Supplies module is where the user can identify materials that they would like to track in their CMMS. These materials would typically be issued out to Work Orders and received in from Purchase Orders.
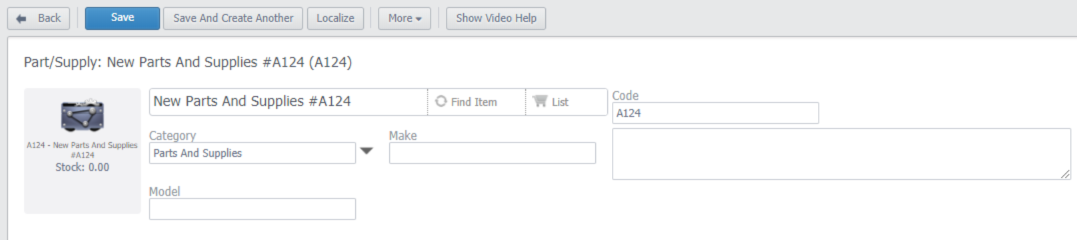
Part Header
The part header is where you will define the Part Name, Description, Part Code, Category, Make and Model.
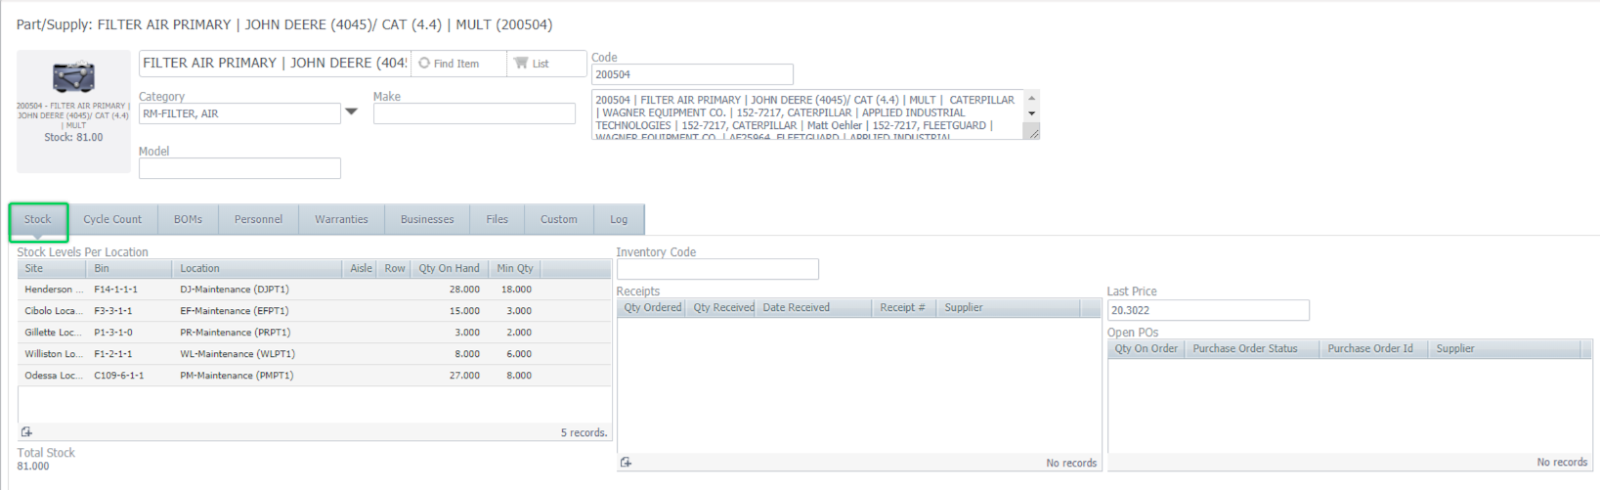
Stock
The stock tab will show the user where parts are stored, how many pieces are on hand, and receipts for the part and any open Purchase Orders for the part. Additionally, the tab will show an Inventory Code (“A”, “B” OR “C”) and the last price paid for the part
Cycle Count
ZenduMA has a utility that will schedule physical inventory for the user by use of a cycle count based on an ABC part classification.
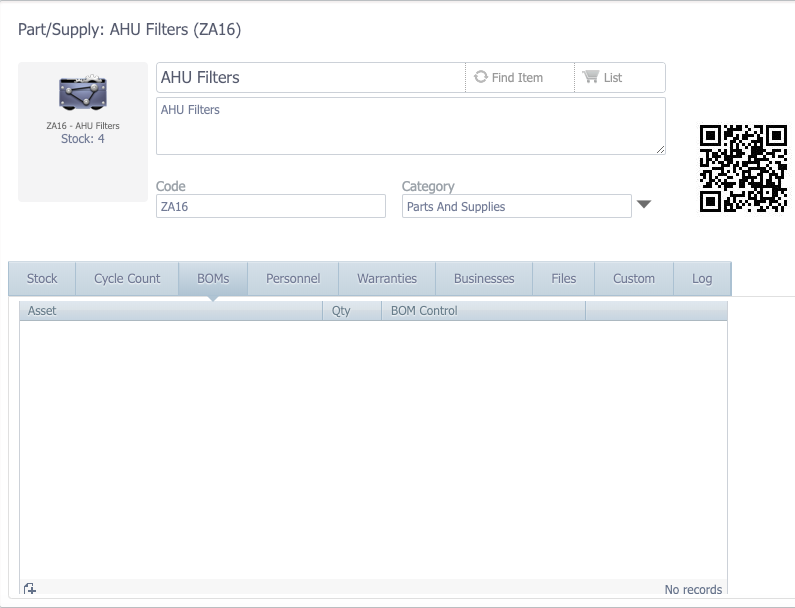
Parts/BOM
This tab allows the user to identify which assets this part record may be used on.
Click on the ‘Add’ button to add new assets to the list. This will open the Asset selector form. If you know the Asset Code of the asset you want to add, you can type it into the search field which will narrow your list. You can further limit the results by filtering the list with the filter search. Click on the record (or records if you want to add more than 1 asset) when found to add it to the BOMs tab. Once added, fill in the Qty field with the suggested quantity that you would use for this asset.
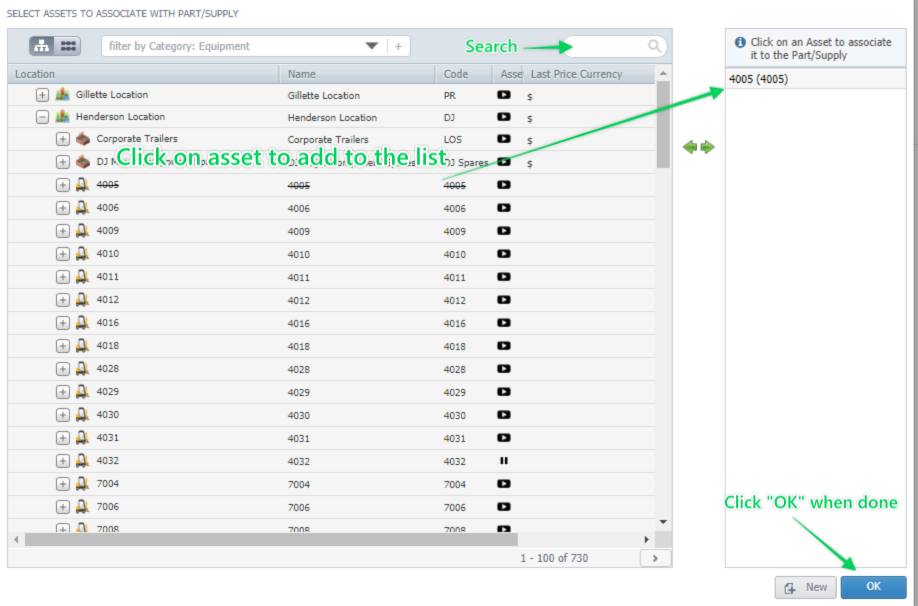
Fill in the quantity and then Save.
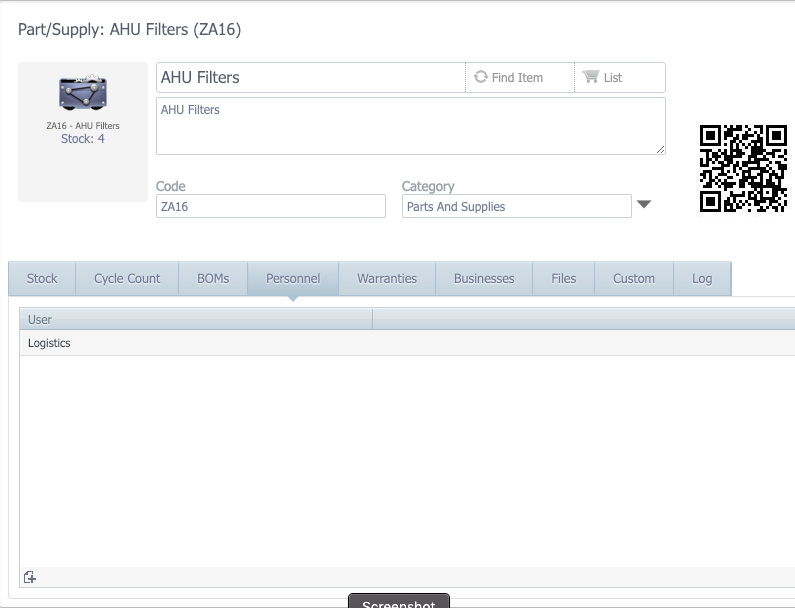
Personnel
The Personnel tab allows you to define which users have an “ownership” stake for the record. For instance, these users may want to receive an email notification whenever a work order is created against the asset. Click “Add” and choose the User. The user will then be displayed in the Personnel tab
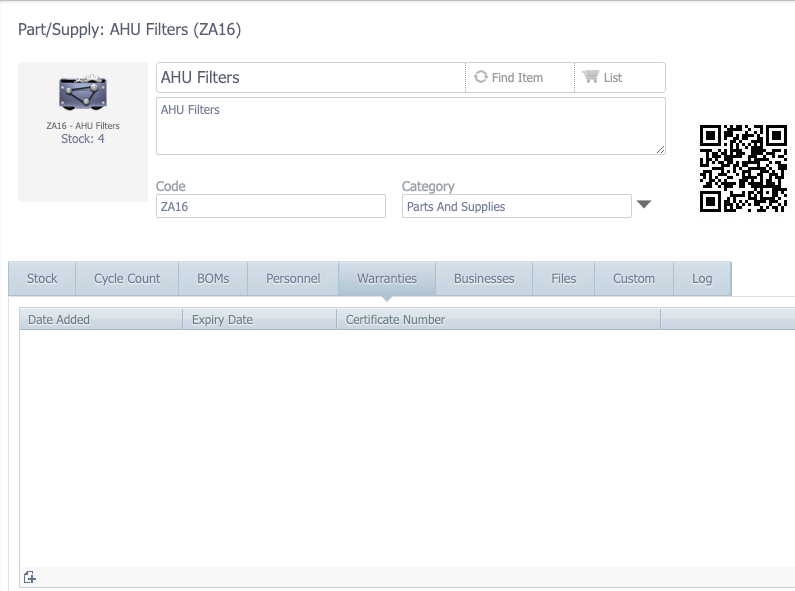
Warranties
Warranties can be added to your part in the Warranties tab. To achieve this switch to the Warranties tab and click 'Add'. From here you will be met with the following pop up box where you fill in the relevant information.
Businesses
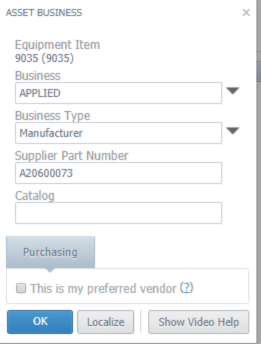
The Businesses tab allows you to track information on suppliers, manufacturers and service providers for the part. If a business is identified as a preferred vendor, then the business will automatically be assigned to any RFQ’s for the part. Click the “Add” button to associate a business to the asset.
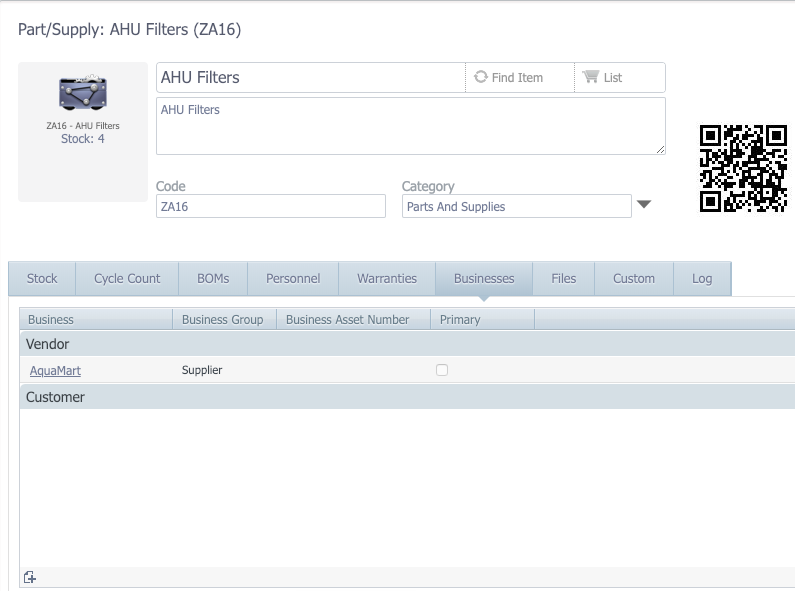
Select the appropriate business and business type from the dropdowns. If the business has a part number and/or catalog number, populate those fields with the appropriate information.
Add a New Business (alternate method)
The following procedure demonstrates how to add "Businesses". Business information is used to associate assets with suppliers. Businesses need to be associated with assets to automatically send Request for Quotes (RFQs), compare supplier prices, and make purchases in the purchasing module.
To add a business, select Supplies -‐ Businesses -‐ New

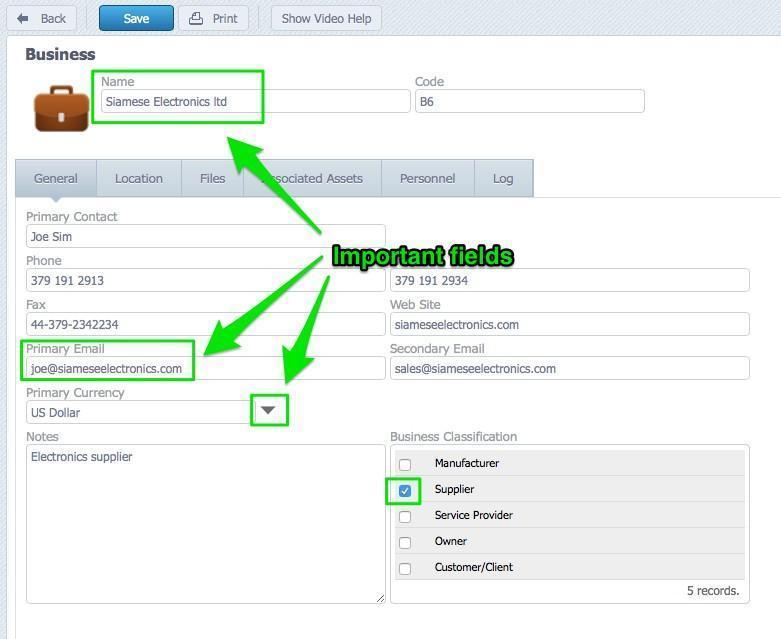
In the general tab, add information about the business to the empty fields in the General tab. Select the business currency from the Primary Currency drop down menu and select the Business Classification. It is important that the Name, Primary Email, and Primary Currency are defined. The
Name is used to identify the business, the Primary Email is used to contact the business by email, and the Primary Currency determines the business currency used for purchases in the Purchasing module.
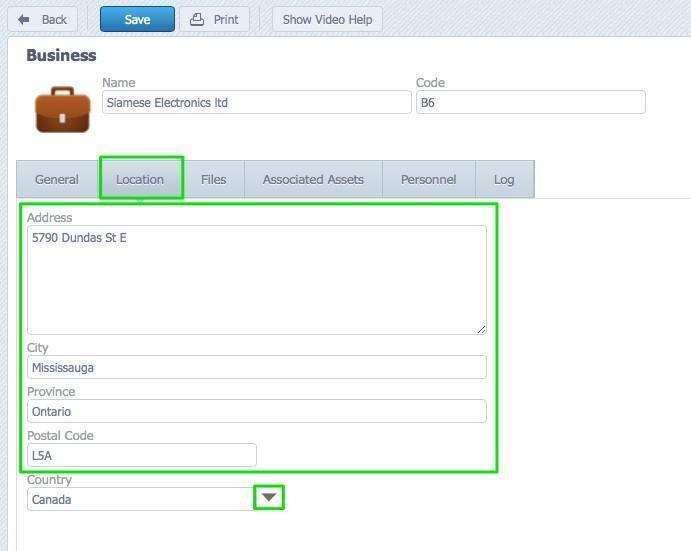
Select the Location tab and add location information to the empty fields. Select the country from the Country dropdown menu
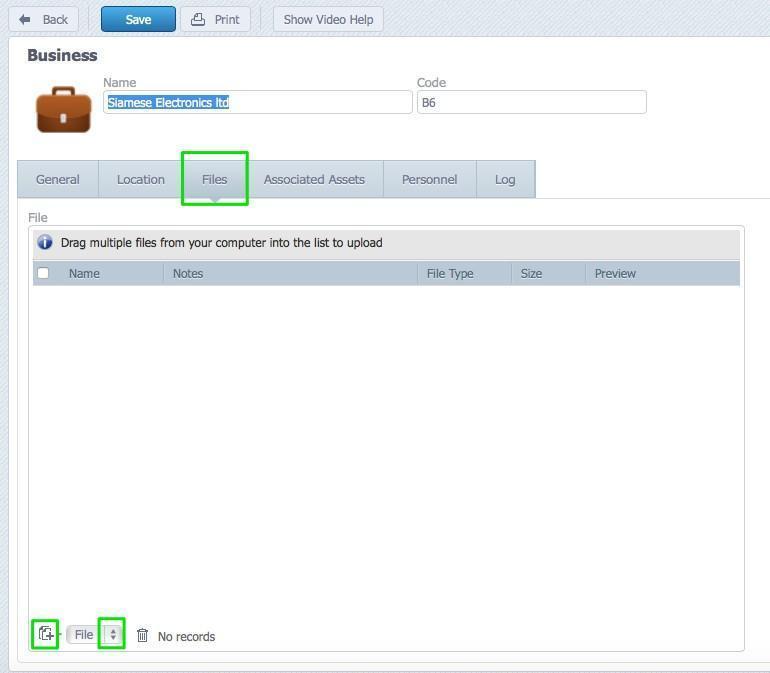
To associate files with the business, select the File tab. Drag and drop the files into the Files window.
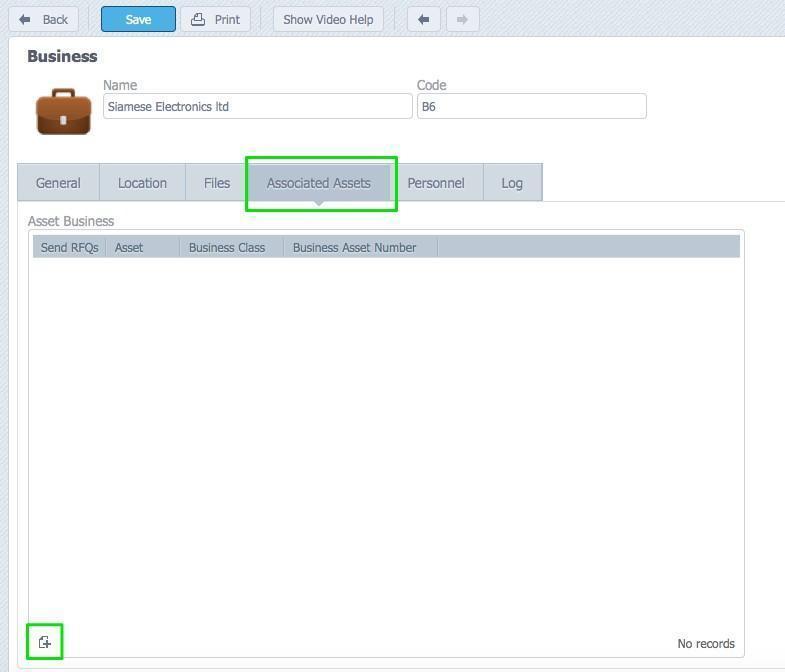
Associate a business with an asset select Associated Assets and click the New button
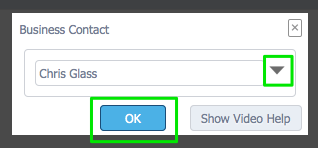
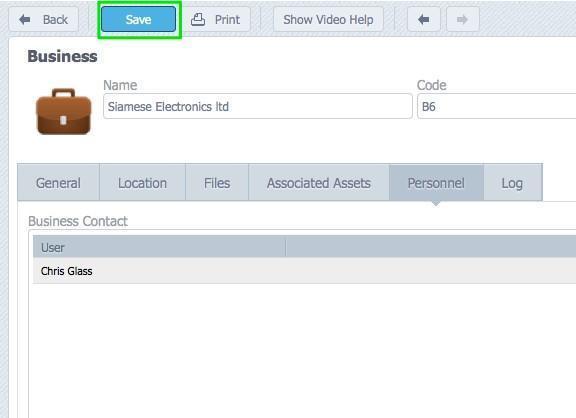
To assign personnel as a Business Contact, select Personnel and Click the New button
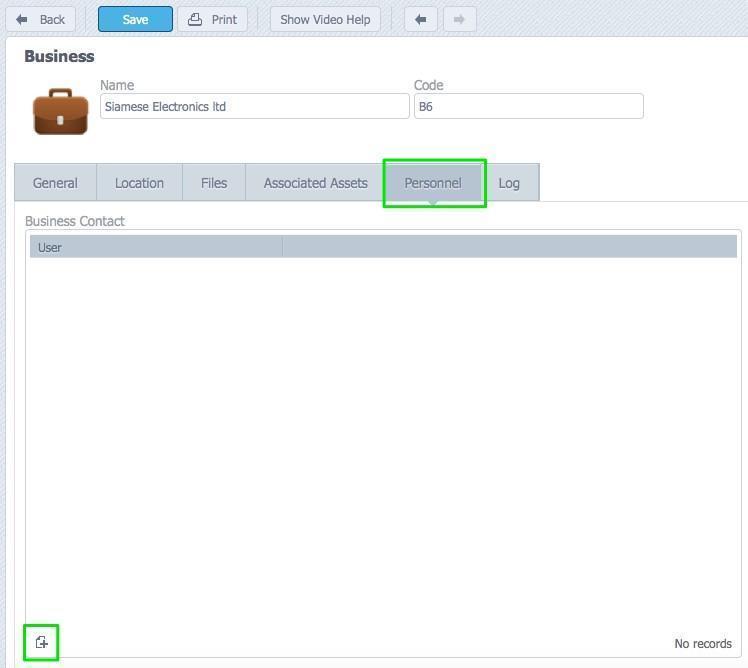
Select a user from the dropdown menu and click OK
When the business information is complete Click Save
Files
The files tab allows you to add any type of electronic documentation to a part. You can add files, hyperlinks and general notes.
Note: when adding a file attachment, you must have the appropriate application to open the attachment (i.e. do not add a CAD drawing if you do not have a CAD viewer installed on your computer). Also, when adding a hyperlink do not add a link to your local computer (i.e. “C:\Users\testuser\Documents\Owners Manual.pdf) as the link will fail. Hyperlinks must use a web address.
To add a File, click Files and drag and drop the file into the Files window. In the example below an image and a pdf manual have been attached.
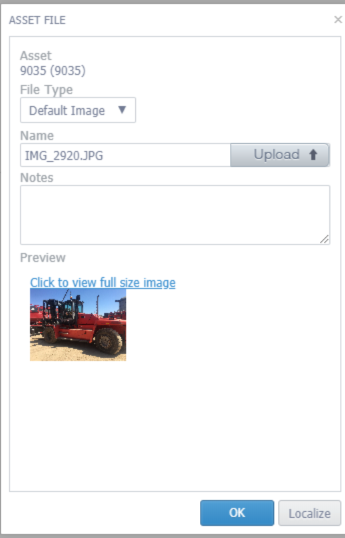
When adding an image file, the image will replace the default equipment image. If you want your new image to always be the image used for the asset record then you should click on the image file on the Files tab and change the file type to “Default Image”.
To add a hyperlink, click the dropdown and change the attachment type from “File” to “Link” then click the “Add” button. A new form will open prompting you to fill in a name, link address and a note (optional). Fill fields then click “OK”
Custom
The Custom tab allows you to create (and populate) custom fields for the part. Any custom fields added are associated to an Asset Category and will display for every asset that is assigned that category. ZenduMA supports the following custom field types:
To add custom fields, click the “Add Custom Field” button then populate the “Field form that opens, then click Ok
Once the field has been added, you will be able to populate it with the appropriate information.
Log
The log tab will display all work orders that the part has been assigned to
Maintenance
Task Groups
Task Groups are a great way of quickly populating work orders, scheduled maintenances, projects etc. Task groups are particularly useful if you have multiple similar assets which require the same work to be carried out, creating task groups and associating them to specific asset categories speeds up the process of creating work orders and scheduled maintenances and also cuts out the room for human error in terms of creating multi asset work orders and forgetting to add certain tasks for certain assets.
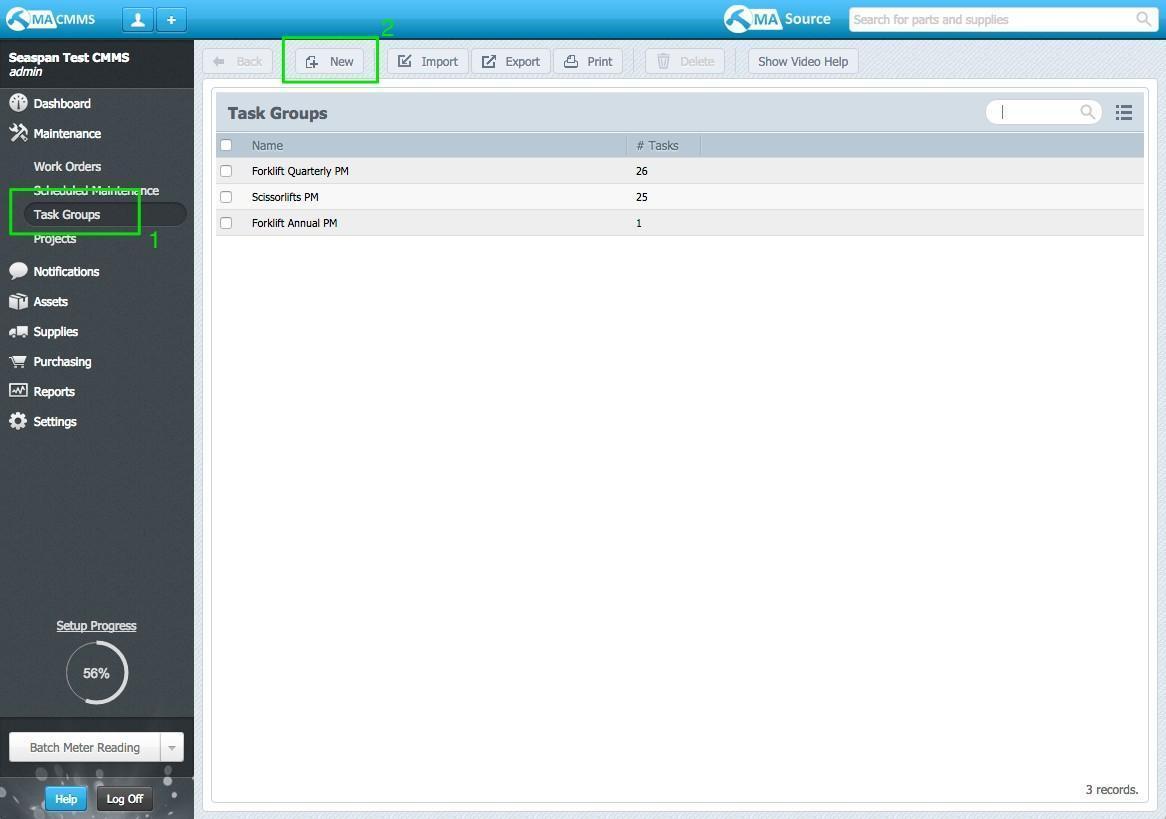
Create a New Task Group
Navigate to the Task Group menu item and click the New button on top of the page
From here you will name your task group and add your tasks.
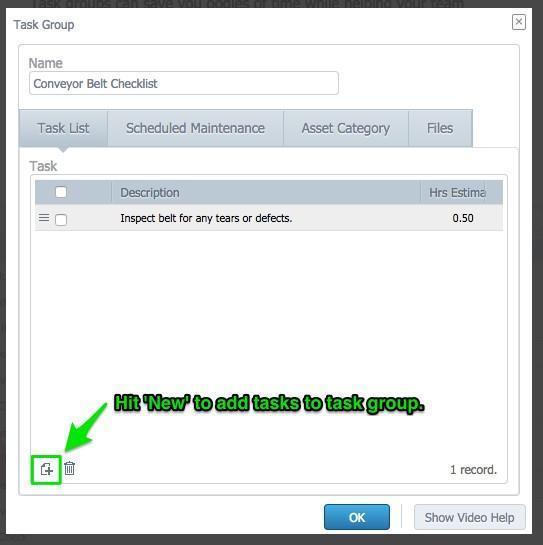
Click New brings up the following box where you enter your task details. You can choose to add a meter reading-based task, general task or a text result task.
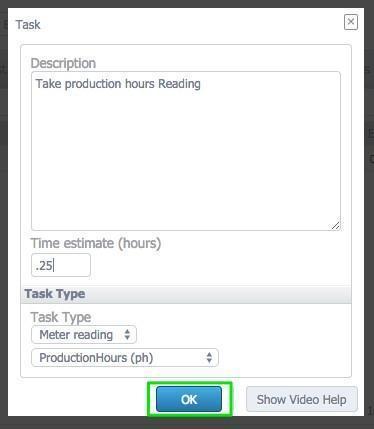
Once finished click OK. Your tasks will be displayed in the Task List tab.
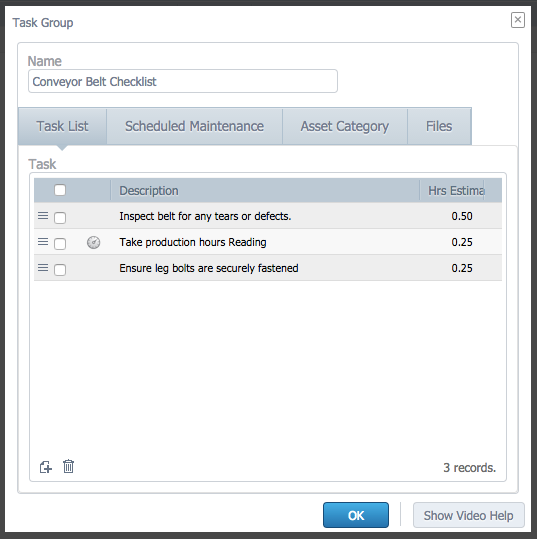
To delete any of the tasks you simply check them off and click the bin button.
Auto Assign Task Groups to Asset Categories
You can assign task groups to specific asset categories. This is an ideal way to auto assign safety or regulatory checks to a work order created on a particular asset type.
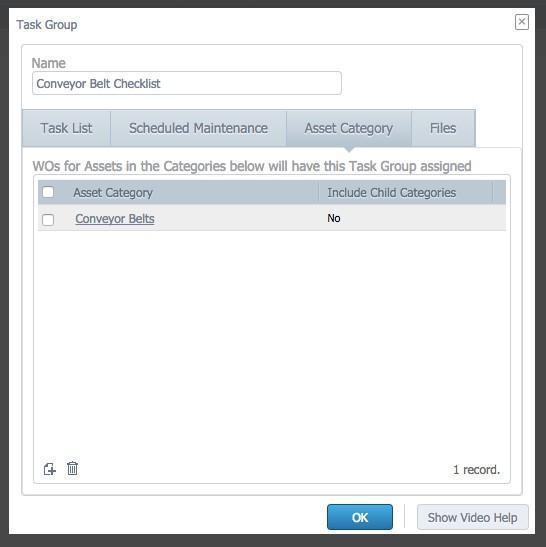
To do so, select the 'Asset Category' Tab and click the New button in the bottom corner.

You will be met with the following pop up box where you will then choose the asset category from the drop-down menu. You will notice we have unchecked ‘Include child asset categories’ this is because we only want to associate this task group to the Conveyor Belt. If you have child asset categories, you wish to associate your task group you simply check this button off and you are good to go.

This information will then be stored in the Asset Category tab as shown below.
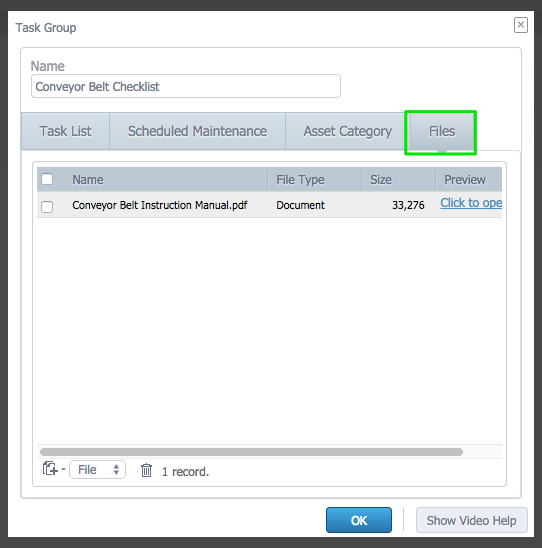
Add Files to Task Groups
You can add files to task groups in the same fashion you would anywhere else. You can simply drag and drop the files or search for them as normal. Any files attached to the task group will transfer to any work order or scheduled maintenance where the task group is used.
You can create as many task groups as you want following the steps outlined above
Scheduled Maintenance (SMs)
Scheduled Maintenance records are templates that generate Work Orders when defined criteria (called “Triggers”) are met. Triggers can be time, meter and/or event based
Create a Scheduled Maintenance
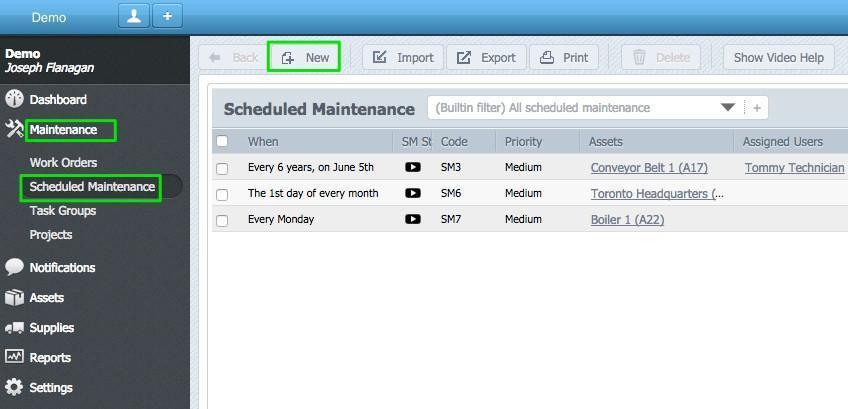
Select Scheduled Maintenance under Maintenance from the CMMS menu on the left-hand side and click New
SM Header
The Header is where you will input your Asset Code, Work Order Status, Maintenance Type, Priority and Completion Days. Click the Save button when finished in the header.
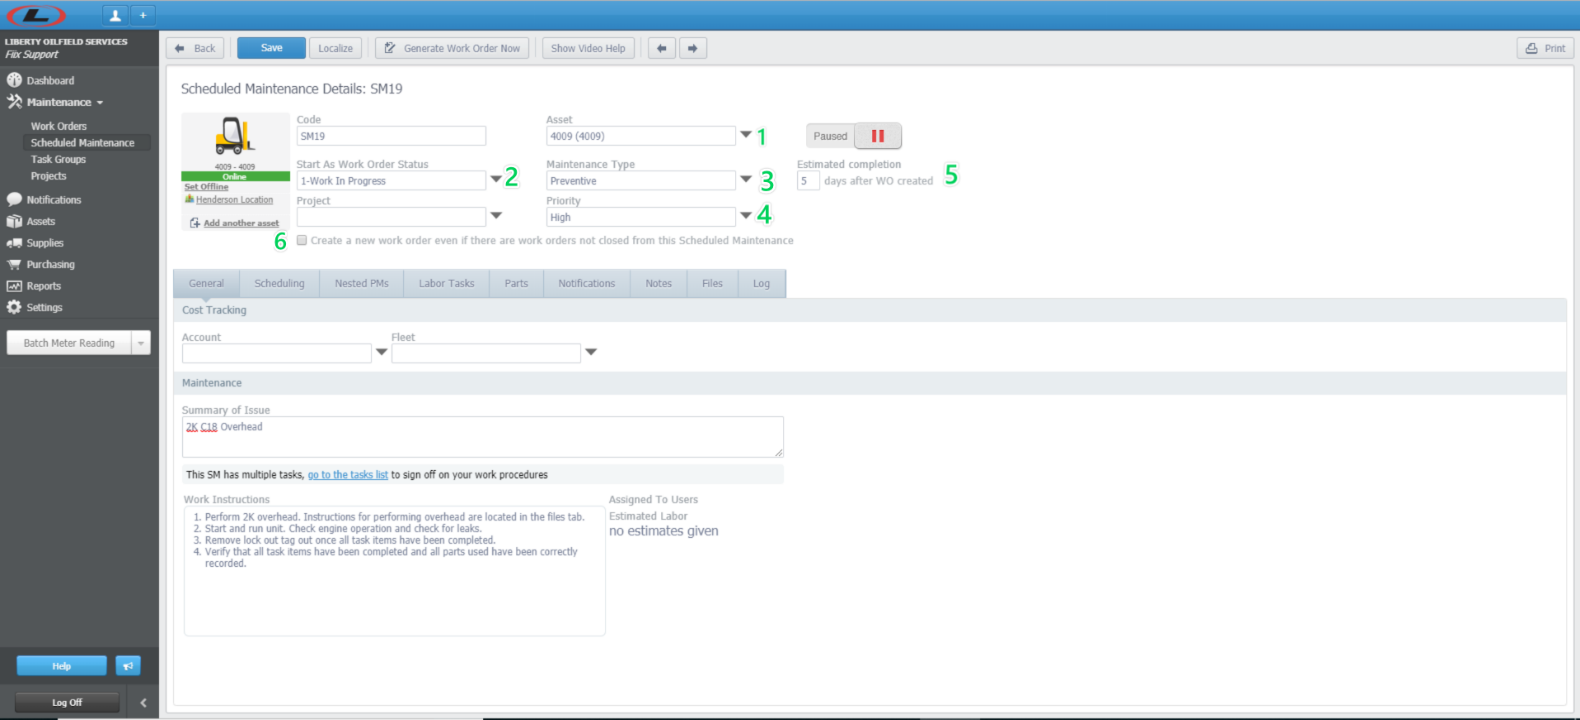
1. Asset – This is the equipment, building or tool that will have the PM performed against.
2. Work Order Status – Describes the current stage of the work order. In this instance the default work order status is 'Open'. Refer to Work Order Status (pg. 51) for definitions on status types.
3. Maintenance Type – Describes the type of work will be performing (i.e. electrical, inspection, upgrade etc.).
4. Priority – Defines the importance level of the work order as compared to other work (i.e. high, low etc.).
5. Estimated Completion – This is the window of opportunity to get the PM done. The value entered here will be added to the Date Created field of the Work Order and populate the Suggested Completion Date on the Work Order.
6. Create a new work order even if there are work orders not closed from this Scheduled Maintenance – Under certain conditions (defined in Scheduling below) ZenduMA will not by default create a new work per the schedule if there is an old work order still open against the same Scheduled Maintenance record. If you want to override, then click in this field.
General
The General tab allows you to define the Fleet that will be responsible for performing the work when a work order is generated as well as a Summary of Issue.
Summary of Issue – This field allows you to describe the issue, allowing you to give an overview of what needs to be done.
Work Instructions – This field will allow the user to define what work should be performed. If there is more than one step to be performed, then it is recommended that this field be left blank, instead using the Labor Tasks tab to define the steps (details below). If using Labor Tasks than this field will show any labor tasks associated with the work order.
Assigned to User – This field allows the user to define who should perform the work (a person or group). If there is more than one step to be performed, then it is recommended that this field be left blank, instead using the “Assigned To” field on the Labor Tasks tab. If using the Assigned To field on the Labor Tasks tab than this field will show any assignments associated with the work order.
Estimated Labor – This field allows the user to approximate the amount of labor time required to complete the tasks defined in the Work Instructions field. If there is more than one step to be performed, then it is recommended that this field be left blank, instead using the “Time Estimate” field on the Labor Tasks tab. If using the Time Estimate field on the Labor Tasks tab than this field will show a total estimated labor time associated with the work order.
Scheduling
The Scheduling tab determines when the SM item will create a work order. There are three types of triggers: Time based (e.g. every 6 months), Meter Reading based (eg. If temperature exceed 110 F) and Event based (e.g. A power outage occurs).
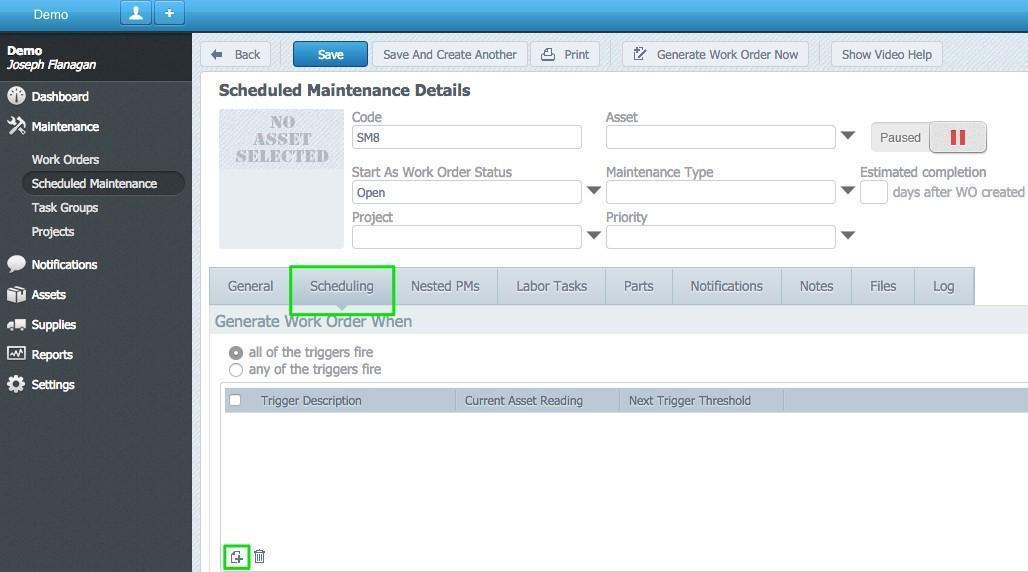
NOTE: Each SM Schedule can have unlimited triggers. When adding more than 1 trigger it is very important to select the appropriate option of either “all the triggers fire” or “any of the triggers fire”. If you want every trigger criterion to be met before your WO is generated, then you would select “all of the triggers fire” option. If you want any of the trigger criteria to be met before your WO is generated, then you would select “any of the triggers fire” option.
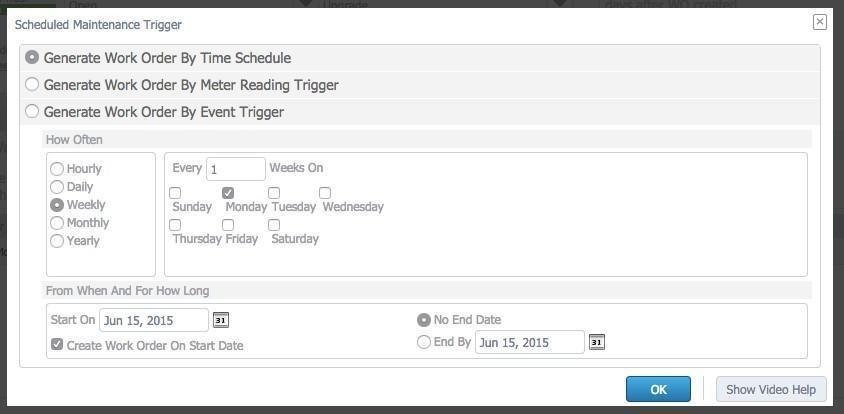
Click the Add [+] button on the bottom left side. Enter the relevant scheduled maintenance details in the pop-up window.
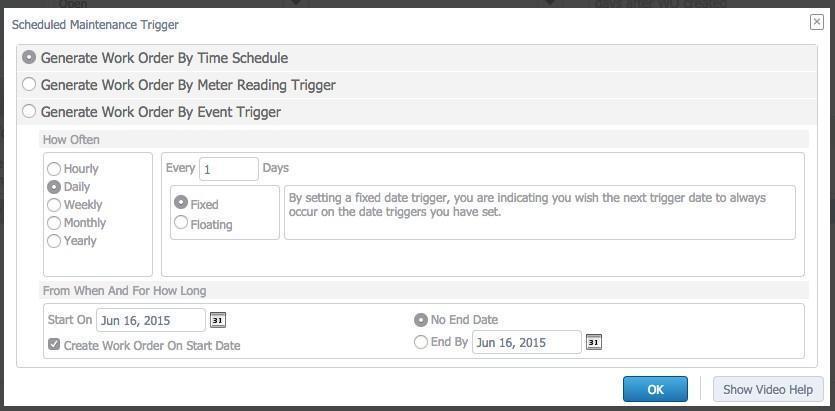
Generate Work Order By Time Schedule. This selection allows to set time based criteria (“trigger”) for when your SM should generate a WO.
How Often – select one of the following
Hourly – (based on 1 single day, 24 hour period). When selecting this option, the user would populate the “Every [ ] Hours field with the number of hours between release. For instance: if you wanted a WO to be generated at 6:00 AM, 12:00 PM and 6:00 PM, you would populate this field with a “6”. This selection can be used when a start of shift inspection is required
Daily - When selecting this option, the user would populate the “Every [ ] Days field with the number of days between release. For instance, if you wanted a bi-weekly WO to generate, you would populate the field with a “14”. It should be noted that if you use anything other than a multiplier of 7, then you will NOT be able to dictate the day of the week a WO will generate. Also, when selecting Daily, two additional options will be available to you:
Fixed – By selecting this option you are indicating that you want your WO’s to always generate based on your original schedule, regardless of when the previous work order was closed, thus your schedule is “fixed” on the original date. For example: You create a Daily Time Schedule trigger to be every 14 days and set the type to Fixed. If a WO is generated on the 1st of the month, then 14 days later a new WO will be generated REGARDLESS of the status of the previously generated WO.
Float – By selecting this option you are indicating that you want your WO’s to always generate based on the close date of a previous WO, thus your schedule will “float” out from the close date. For example: You create a Daily Time Schedule trigger to be every 14 days and set the type to Float. If a WO is generated on the 1st of the month and closes on the 10th of the month, then 14 days later (the 24th) a new WO will be generated.
Weekly – When selecting this option, the user would populate the “Every [ ] Weeks On” field with the number of weeks between release. Additionally, the user can select the day(s) of the week for which they would like a WO released. All Weekly schedule types are of a fixed type by default.
Monthly – When selecting this option, the user would populate the “Day [ ] of Every [ ] Months” fields with the date of the month and the interval of how many months should pass between releasing work orders. Also, when selecting Monthly, two additional options will be available to you:
Fixed – By selecting this option you are indicating that you want your WO’s to always generate based on your original schedule, regardless of when the previous work order was closed, thus your schedule is “fixed” on the original date. For example: You create a Monthly Time Schedule trigger to be the 1st of every third month and set the type to Fixed. If a WO is generated on the 1st of January, then 3 months later (April 1st) a new WO will be generated REGARDLESS of the status of the previously generated WO.
Float – By selecting this option you are indicating that you want your WO’s to always generate based on the close date of a previous WO, thus your schedule will “float” out from the close date. For example: You create a Monthly Time Schedule trigger to 1st of every third month and set the type to Float. If a WO is generated on the 1st of the month and closes on the 10th of the month, then 3 months later (April 10th) a new WO will be generated.
Yearly – When selecting this option the user would populate the “Every [ ] year(s), on [Month] [Day]” with the date of the month and the interval of how many years should pass between releasing work orders. Also, when selecting Yearly, two additional options will be available to you:
Fixed – By selecting this option you are indicating that you want your WO’s to always generate based on your original schedule, regardless of when the previous work order was closed, thus your schedule is “fixed” on the original date. For example: You create a Yearly Time Schedule trigger to be the 1st of June every 2 years and set the type to Fixed. If a WO is generated on the 1st of June, then 2 years later (June 1st) a new WO will be generated REGARDLESS of the status of the previously generated WO.
Float – By selecting this option you are indicating that you want your WO’s to always generate based on the close date of a previous WO, thus your schedule will “float” out from the close date. For example: You create a Yearly Time Schedule trigger to be the 1st of June every 2 years and set the type to Float. If a WO is generated on the 1st of the June and closes on the 10th of the month, then 2 years later (June 10th) a new WO will be generated.
From When and For How Long
Start On – This field should be populated with the date that you want the first WO to generate against this schedule trigger
Create Work Order on Start Date – This field should be checked to start generating WO’s on the date populated in the Start On field
No End Date – This field should be selected if you do not want to stop the WO’s from being generated at a certain date
End By – This field should be selected if you want the system to stop producing WO’s from this schedule on a given date
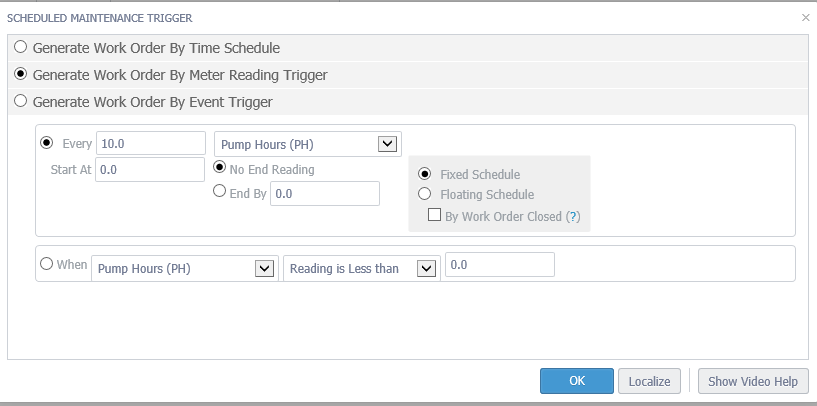
Generate Work Order By Meter Reading Trigger - This selection allows to set meter based criteria (“trigger”) for when your SM should generate a WO.
Frequency
Every [Meter Interval] [Meter Type] – These fields should be populated with the interval name of the meter for which your WO should be generated.
Start At – This field should be populated with the meter reading of when the desired service was scheduled to be performed previously.
For example: You want to change the oil in your car every 3,000 miles and performed the last service 24,000 miles. You would populate the Meter Interval with 3,000, the Meter Type with Engine Miles and the Start At with 21,000. ZenduMA will generate a new WO to change the oil when the vehicle reaches 24,000 miles.
No End Reading - This field should be selected if you do not want to stop the WO’s from being generated at a certain meter reading.
End By – This field should be selected if you want the system to stop producing WO’s from this schedule at a given meter reading.
Fixed Schedule – By selecting this option you are indicating that you want your WO’s to always generate based on your original schedule, regardless of when the previous work order was closed, thus your schedule is “fixed” on the original date. For example: You create a Meter Reading Schedule trigger to be every 3,000 miles and set the type to Fixed. If a WO is generated at 3,000 miles then 3,000 miles later (6,000 miles) a new WO will be generated REGARDLESS of the status of the previously generated WO.
Float Schedule – By selecting this option you are indicating that you want your WO’s to always generate based on the close date of a previous WO, thus your schedule will “float” out from the close date. For example: You create a Meter Reading Schedule trigger to be every 3,000 miles and set the type to Float. If a WO is generated at 3,000 miles and closes at 5,000 miles, then 3,000 miles later (8,000 miles) a new WO will be generated. NOTE: When selecting Float, the user should also select the “By Work Order Closed” field.
When [Meter Type] [Reading is Less/More than] [Meter Reading] – If the user would like to set a release trigger based on a meter condition being less than or greater than a set point, then this field should be selected. Populate the Meter Type with the appropriate type then select the less than / greater than option. Lastly populate the set point. For example: If you were to using a magnehelic gauge to measure static pressure drop across a filter rack and want a WO generated when the reading falls below .50 inch WC you would populate the Meter Type to “Magnehelic (in WC)”, “Reading is Less than” and .50 for the meter reading. When this condition is met, ZenduMA will generate a WO.
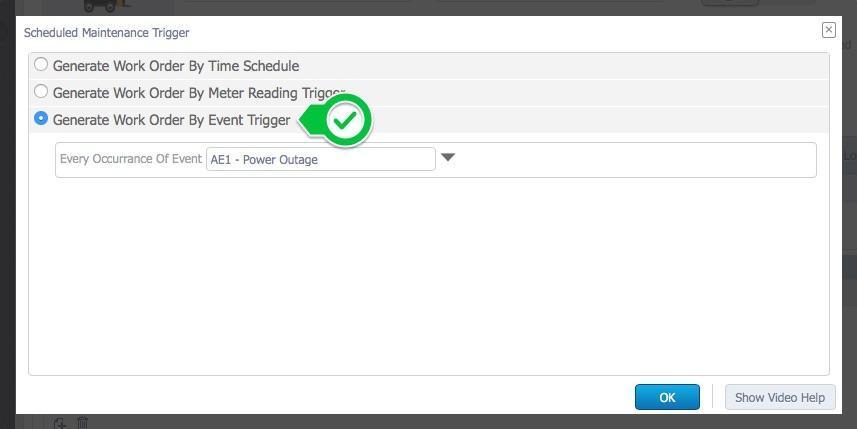
Generate Work Order by Event Trigger - You can set your scheduled maintenance to trigger at the occurrence of a specific event. Similar in some ways to a meter reading trigger, the event trigger can only be added to the asset through the Metering/Events tab of the asset. Unlike a meter reading trigger you will not be prompted about the impending work order. To set up an event based trigger you simply select the event trigger option, and choose your desired event from the drop down menu.
Nested PM’s
The Nested PM’s tab is used when you have several intervals of maintenance that you want performed and you would prefer that only one work order gets created, regardless of where you are in the interval cycle. For example: You perform a 500 hour inspection, a 1,000 hour service and a 2,000 hour service and would like to get one WO for each interval, with all appropriate tasks for the interval on the WO. The base (or Nest 1) SM should be created prior to adding any nesting. Instructions on creation of Nests defined below (see “Create A Time Based Nested PM” below)
Labor Tasks
The Labor Tasks tab is where you would add the steps, procedures that you want followed when work is performed. ZenduMA supports four task types: General, Text, Meter Reading and Inspection. When adding your first task, click on <enter task description> then follow instructions below. NOTE: If you populated the Work Instructions field on the General tab then the first task on this tab will be populated with the work instructions.
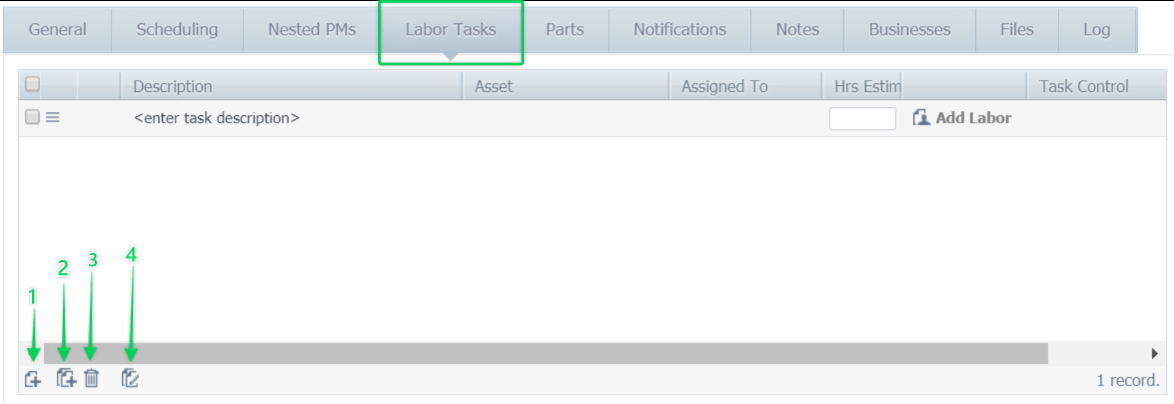
To add a new task, click on the “Add” button (1). The Scheduled Task form should open
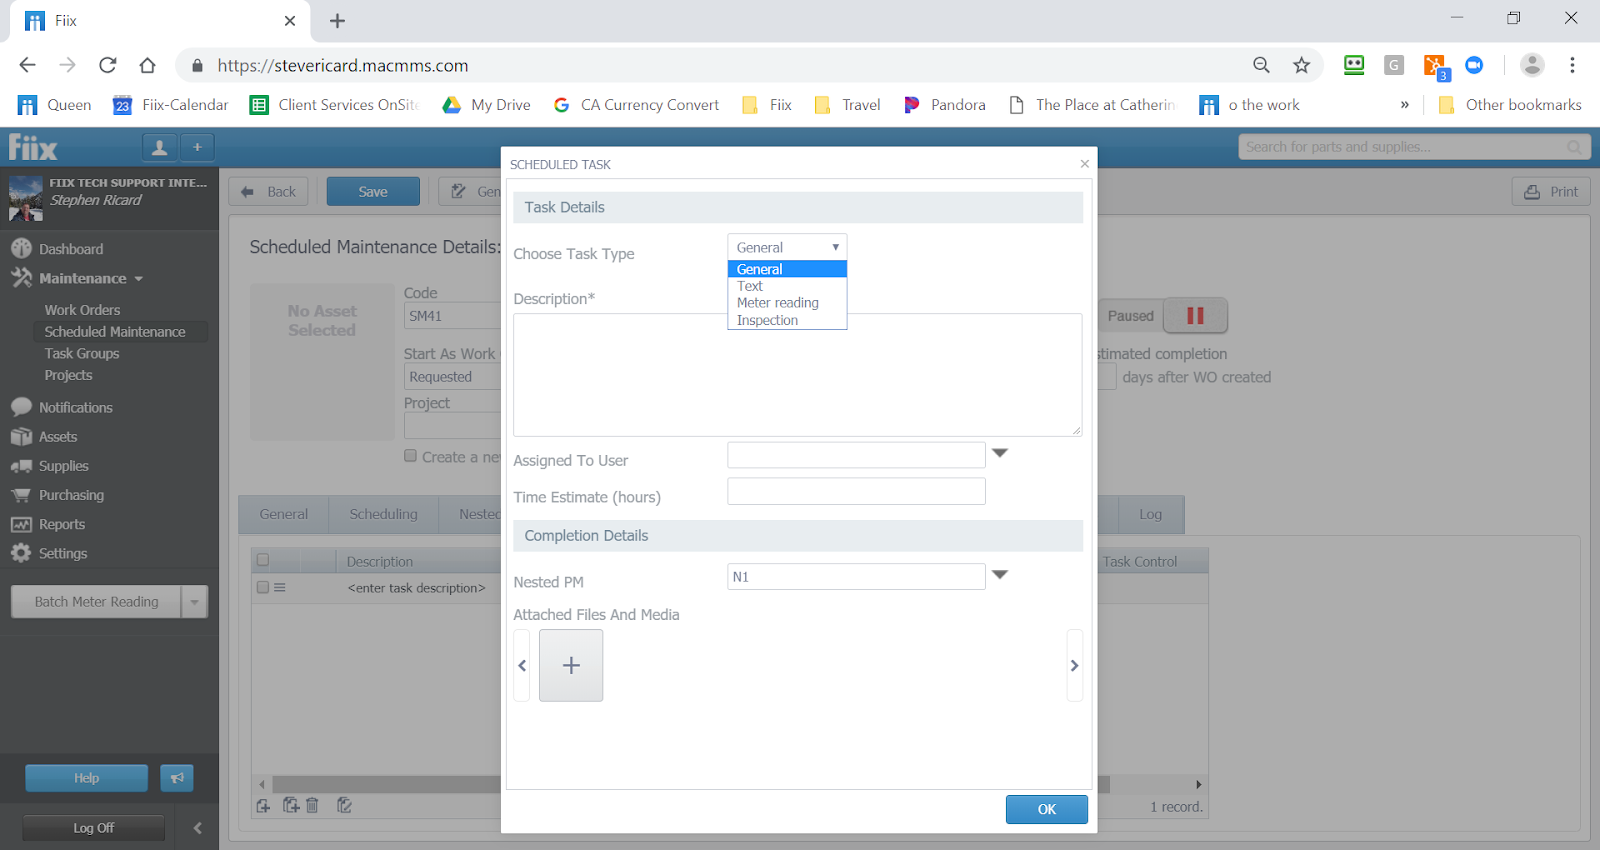
Select a Task Type:
General - A basic task that does not require any additional information, and that can be checked off once completed
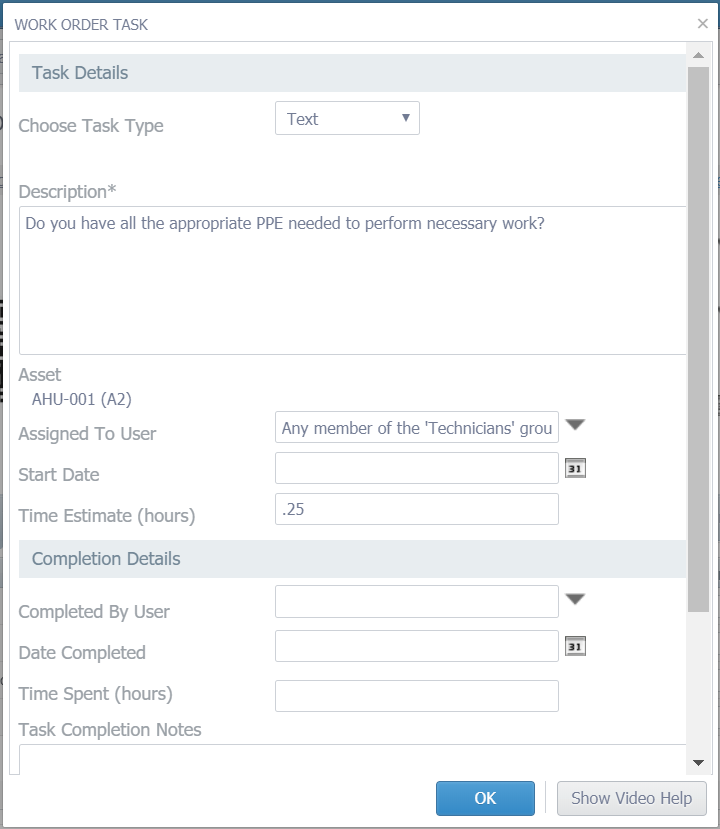
Text Result - Text Result creates an editable box below the Results column in the task list. This is useful for task items that may require additional information such as ‘Yes’ or ‘No’ entry, or specific codes.
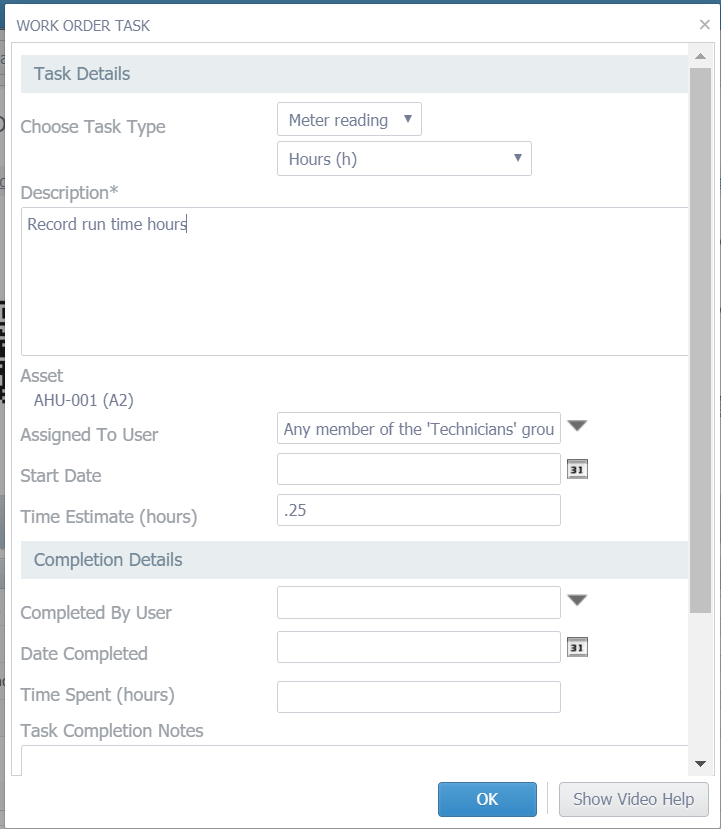
Meter Reading - Meter readings function in a similar way as text results, and create an editable field in the Result column. Meter readings can be customized to different units such as hours, meters, cycles, production hours etc, in the same way as other areas of the CMMS.
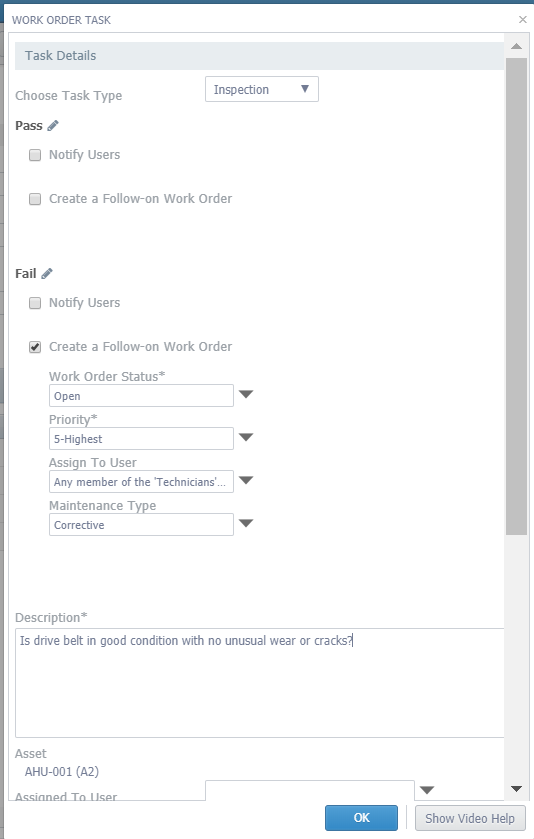
Inspection - gives you the ability to pass or fail a work order, and trigger a follow on notification or work order.
The screenshots below show how to create each type of task. By default, every task will be created as a general task. To change this, you simply create the task, and choose your task type at the top field in the pop up. When choosing a meter reading task, you will also have the option of choosing which type of unit you want to record, i.e Hours, Production Hours, Miles etc.
General task type
Meter Reading
Inspection Type
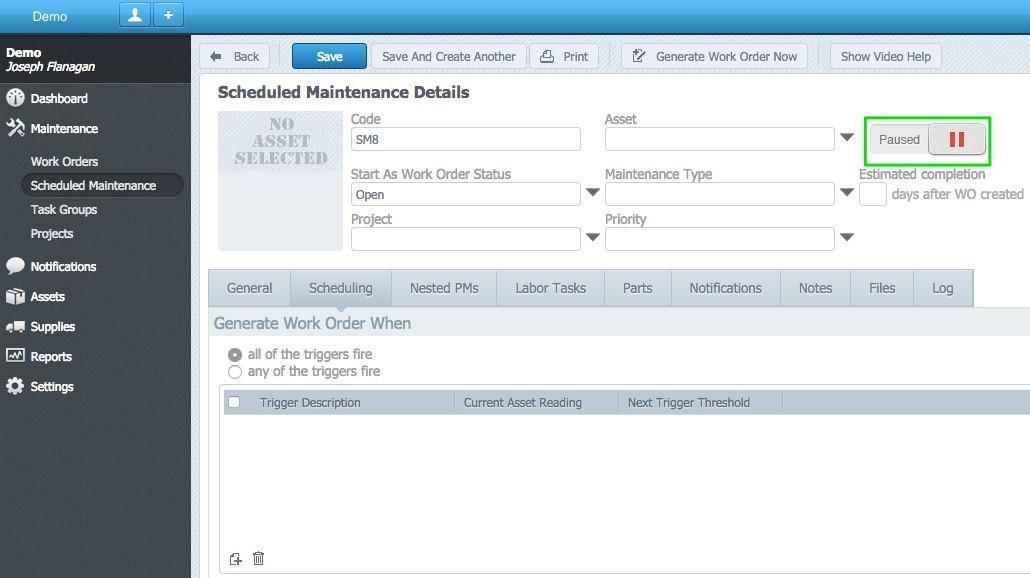
Click the Activate toggle to start the Scheduled Maintenance
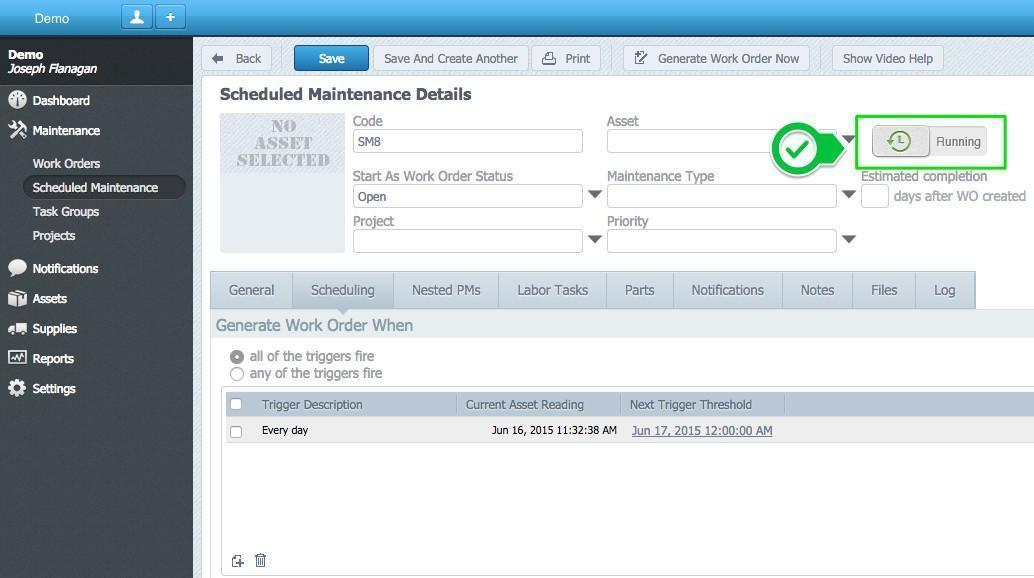
Now the Scheduled Maintenance is running, meaning that as soon as it detects that the triggers have been click, it will generate a work order for this Scheduled Maintenance.
Create A Time Based Nested PM
Nested Planned Maintenance, or Nested PMs, permits structured scheduling of maintenance events that are dependent on other events. To set up maintenance tasks that are periodic and tied to another event, a CMMS user is able to specify the parent event, the occurrence of which will trigger the other, child events at specific intervals like every other time, every x-‐number of occurrences etc.
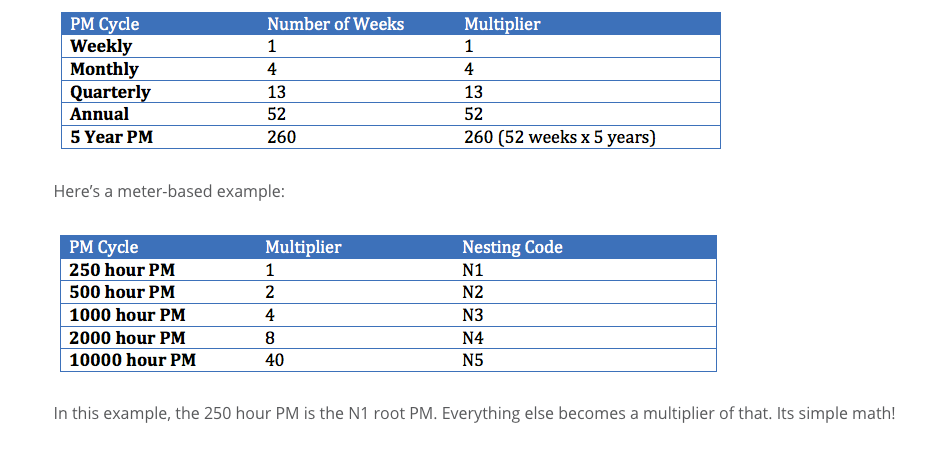
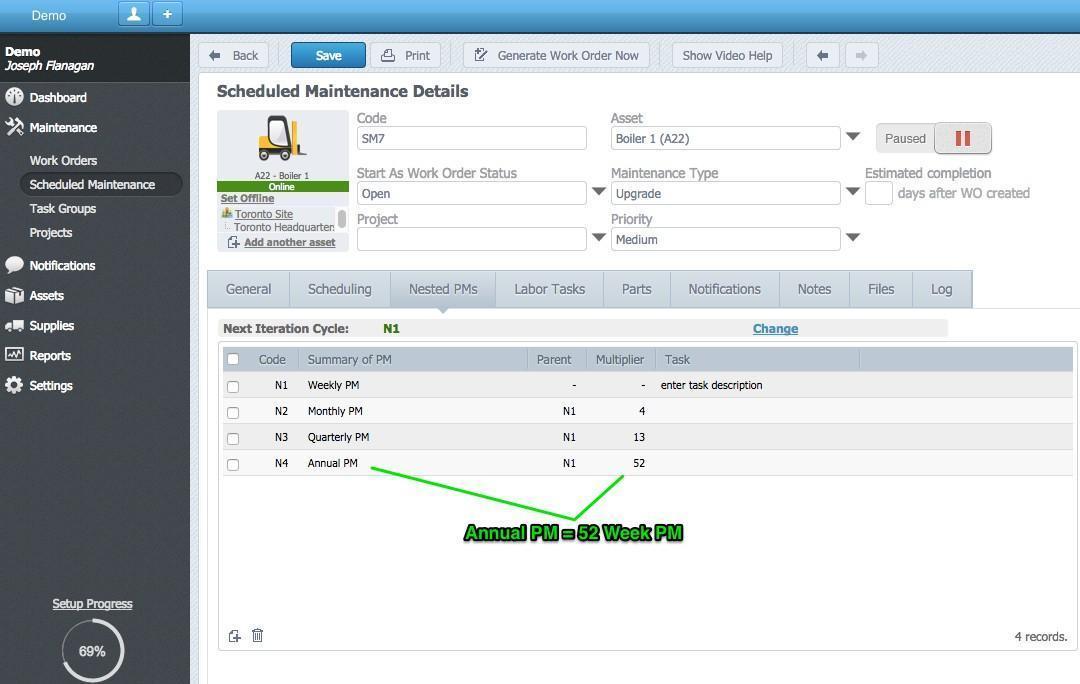
When setting up nested PM’s, each next PM activity is assigned a multiplier of the first PM cycle. For example, an annual PM is basically a 52 week, so it has a multiplier of 52 times. A monthly has a multiplier of 4
Set up a time-based Nested PM:
Follow the procedure to set up a regular scheduled maintenance. Configure your trigger to be the lowest interval in your nested PM
Next, Navigate to the Nested PM Tab in your scheduled maintenance.
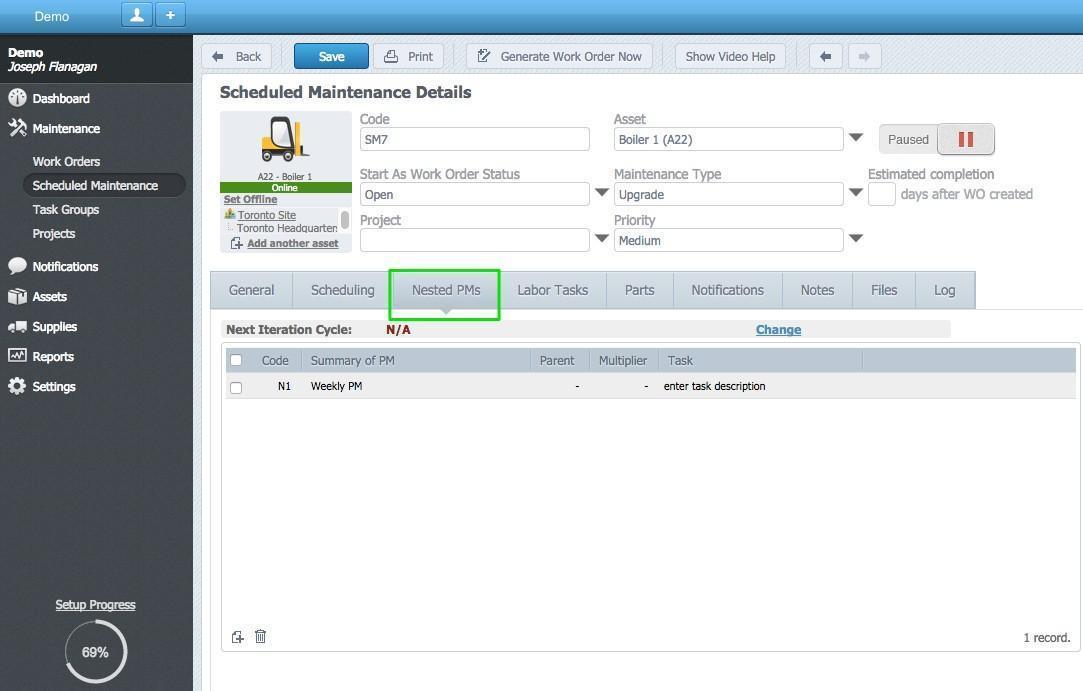
This is where you set up the Nested Events. Nested PM functionality assumes the organization includes all activities and tasks from more frequent cycles into less frequent cycles. For example, monthly tasks are included in the annual PM task list.
By clicking the New button, you will be presented with a window for Nested PM Configuration:
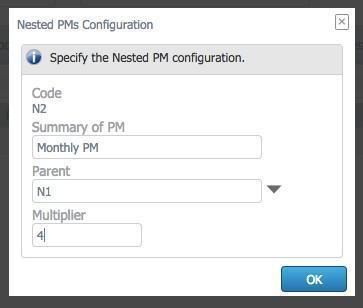
The N1 code is always your root cycle. Everything else is a multiplier of that. In the above window, we have called our root PM weekly PM.
In this example, we are going to add a monthly PM. Ordinarily months can have up to 31 days but in this case, we are going to perform the monthly PM every 4 weeks (28 days).

Repeat the process for other cycles -‐ quarterly, annual etc.
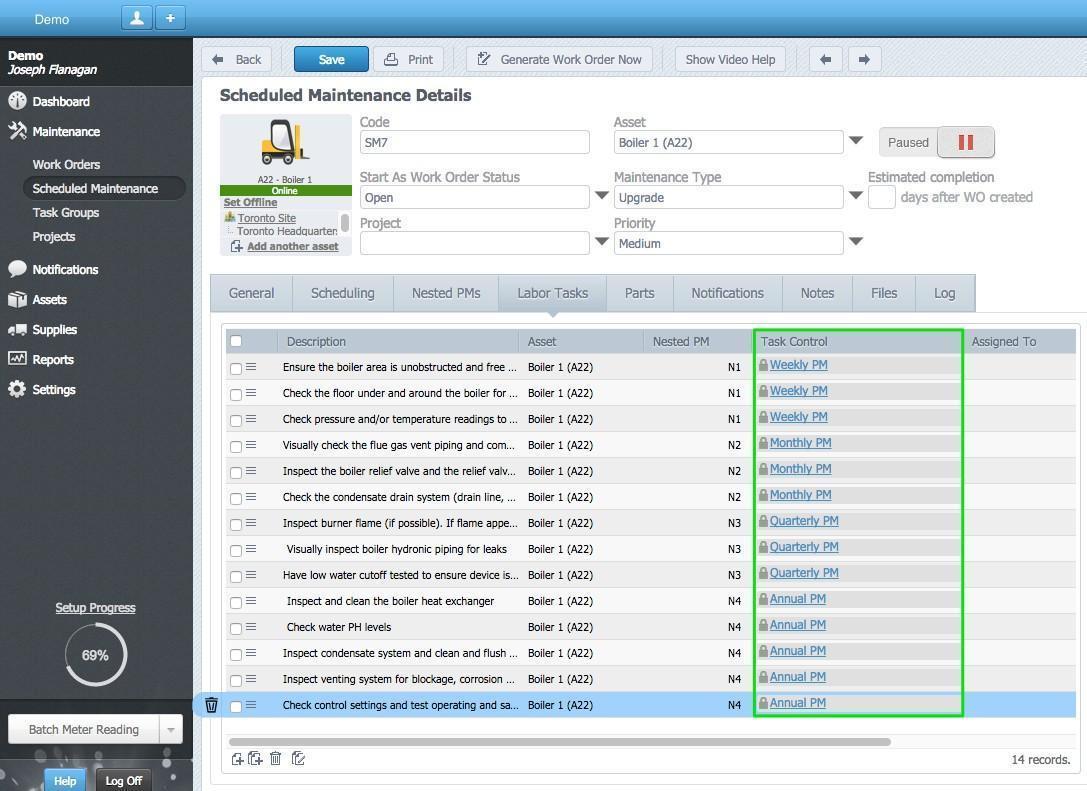
Navigate to the labor task screen and assign your tasks to each cycle:
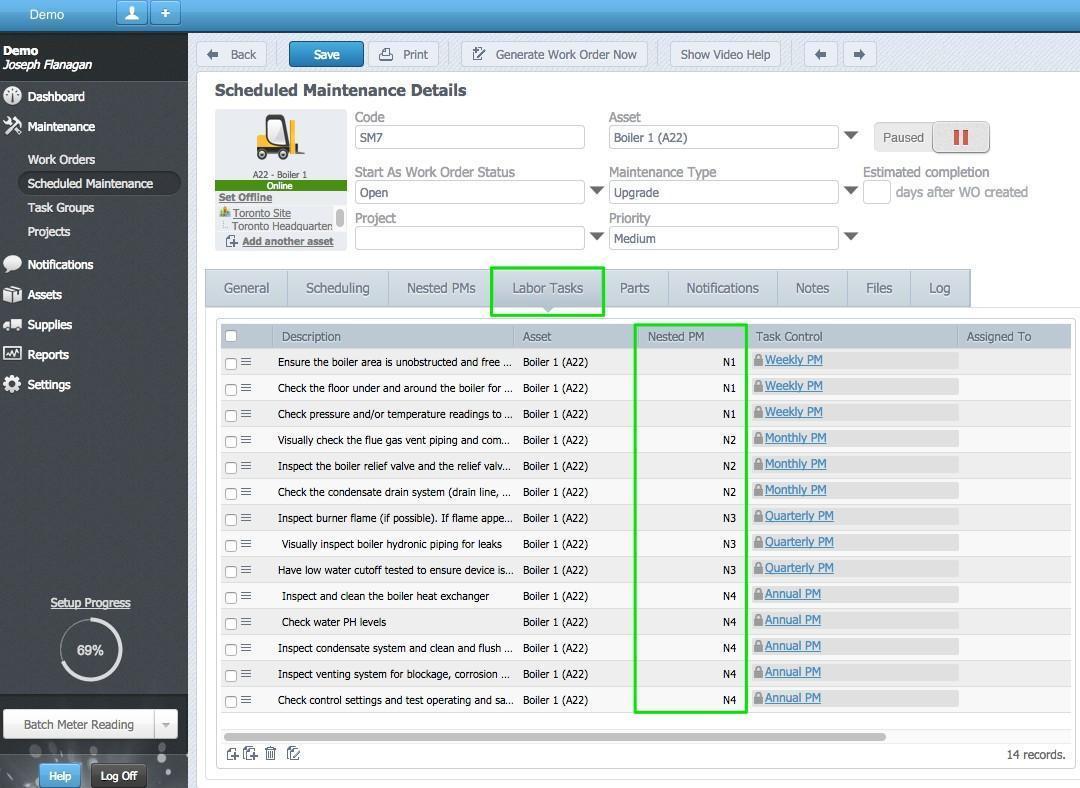
In this example, task groups were created to simplify the process for each step of the nested PM.
Next, the Nested PM start point needs to be configured. If the scheduled maintenance is triggered now, it will trigger at the start of the cycle which is a weekly PM. To do this we switch back to the Nested PMs tab.

Let's say the next PM is the 3rd Quarterly PM. The starting iteration needs to be adjusted to the 39th week of the cycle (3rd quarterly pm happens on the 39th week)
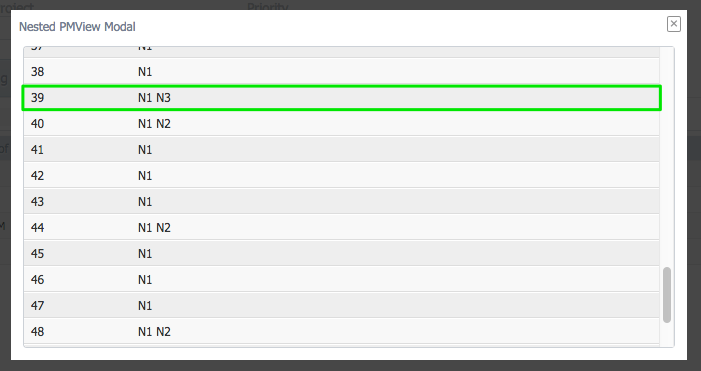
Click save
The Time-Based Nested PM is complete. Activate as normal
Work Orders
If the Asset module is considered the “heart” of ZenduMA, then the Work Order module should be considered the “brain” of ZenduMA. The work order gathers information, processes it and sends that information out. A work order may be maintenance, repair or work requests on buildings, facilities or equipment assets. They should contain asset information, the tasks to be performed, parts needed, date and time, and the personnel that should be involved.
Work Order Status
To determine where the work order sits in its lifecycle ZenduMA utilizes a field called “Work Order Status”. There are three phases (called “Controls”) within the status group that a work order could be in:
Pending – no work to be performed. A coordinator, lead, manager or supervisor must review prior to moving out of this stage
Active – this work order is open and can (or is) be worked on.
Closed – this work order has been completed, no further work should be performed
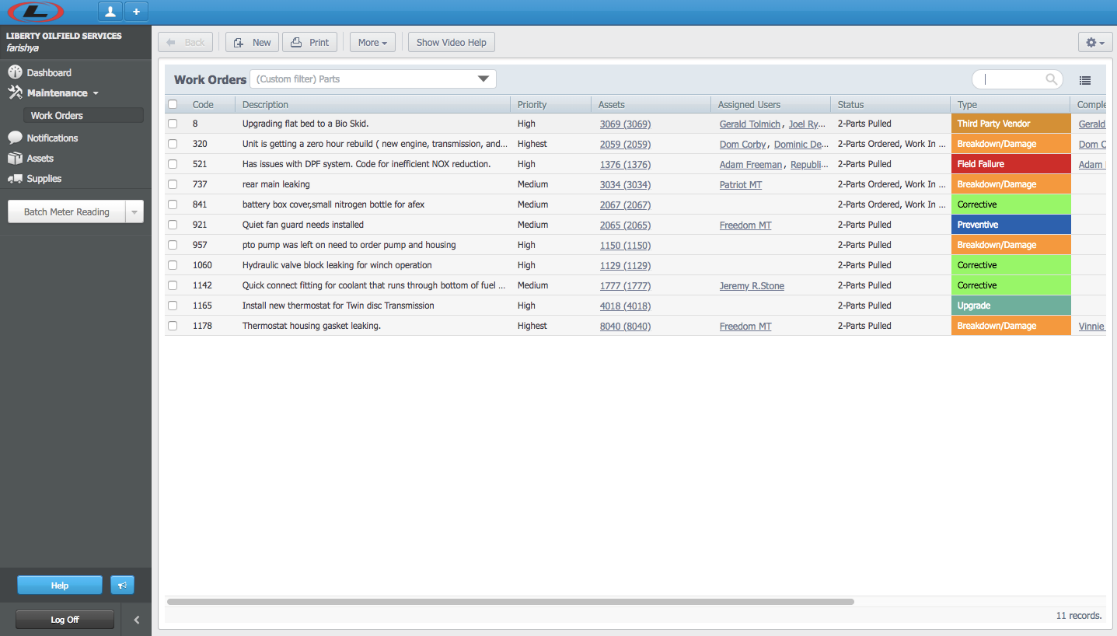
Viewing Work Orders
To view the work order list, expand “Maintenance” from the main menu then click on “Work Orders” (1)
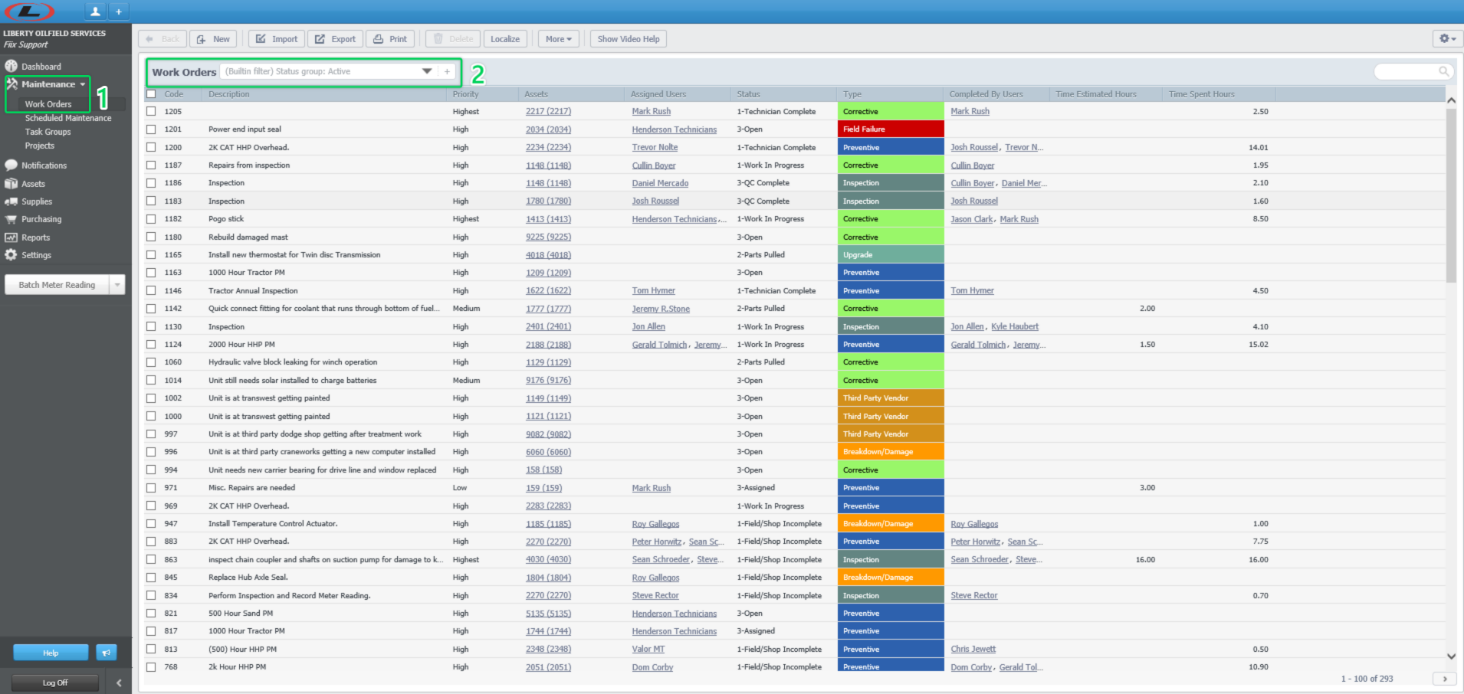
By default, the system will show you all the “Active” work orders (as viewable in the filter) (2). To view Old Work Orders, you can simply change the filter drop down to, as seen in the image below:
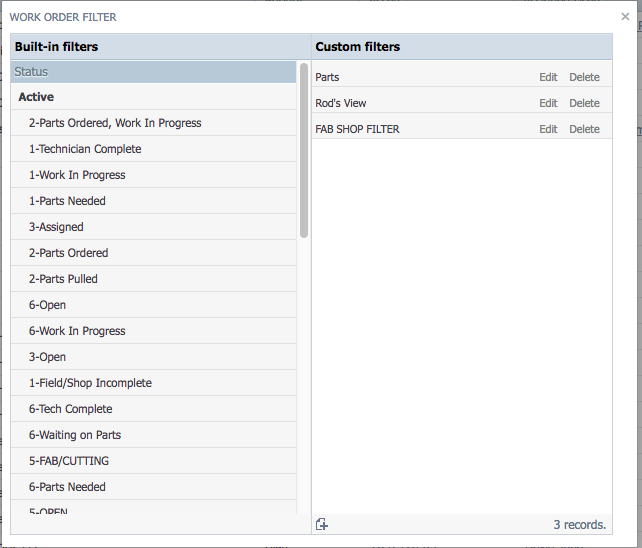
Built-in-Filters:
You will notice that there are built-in filters that come with the software to be able to distinguish between all of the work orders in different statuses within the Active, Draft, Requested and Closed states.
Custom Filters:
Users have the ability to create custom filters as per their specific requirements.
Adding a New Custom Filter: You will notice a small “add” button at the bottom of the Custom Filters page that looks like this:
Click on the “add button” to take you to a page that looks the image below:
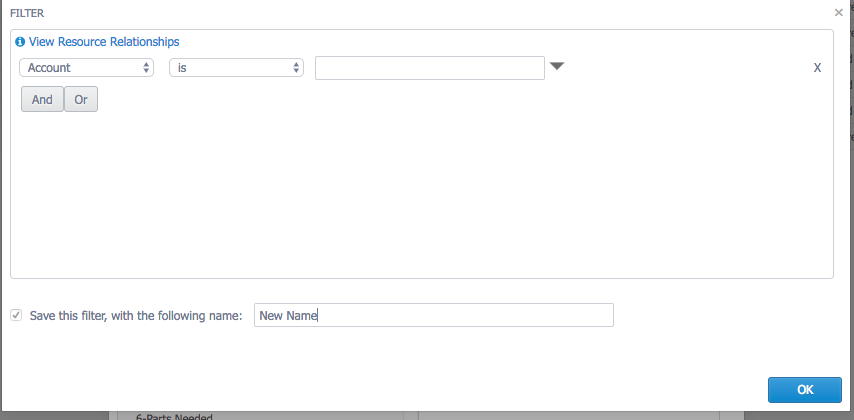
You will notice that you can create and/or statement(s) using the dropdown.
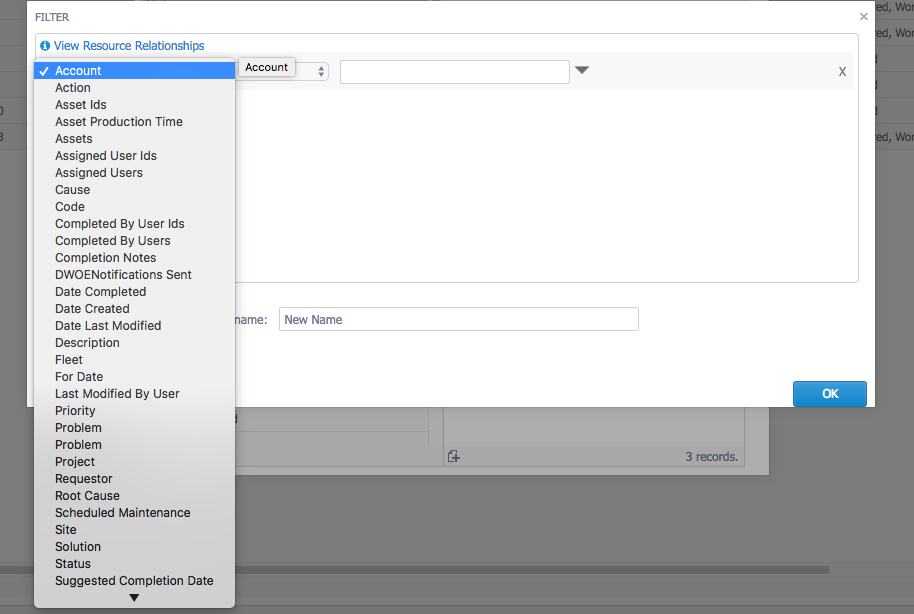
As an example, you can choose “Assets” in the first field and chose “Contains Text” and write “belt”.
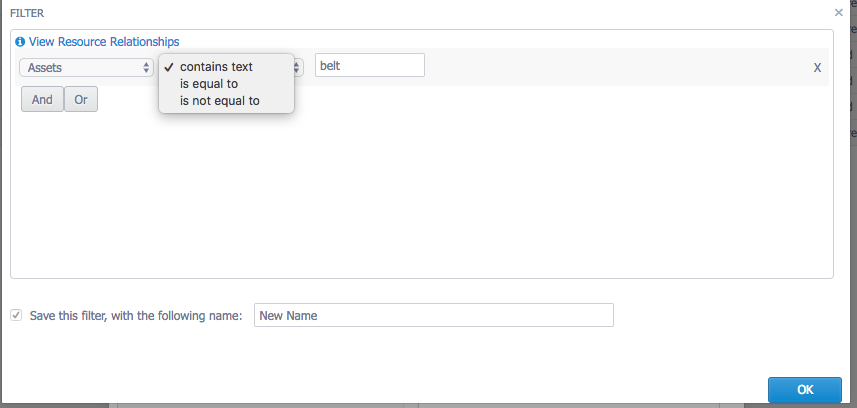
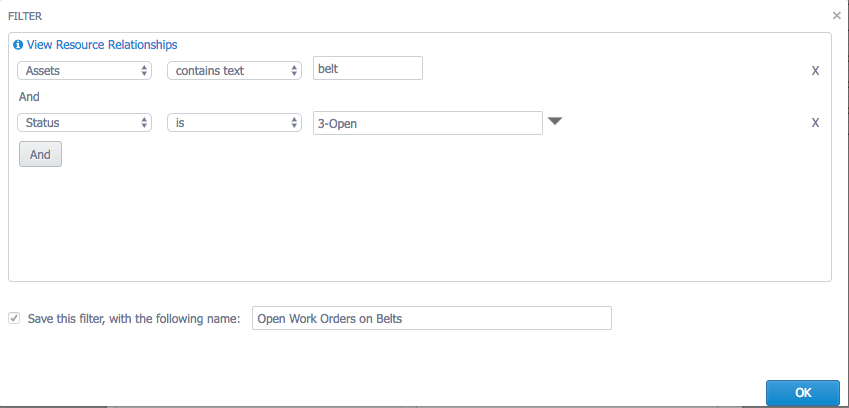
You can then modify the custom filter by clicking and/or to add more statements if necessary.
For the purpose of this example, we have clicked the “and” button to specify that we would like the text to contain the word “belts” but the status has to be “open”. Lastly, you also want to make sure that we give the custom filter a concise and logical name.
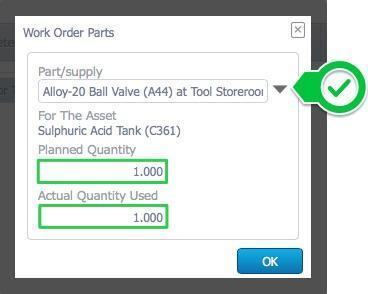
Creating a New Work Order
In the Maintenance module, simply click on the “New” Button at the top left-hand corner.
You will then be taken to a page that looks like this:
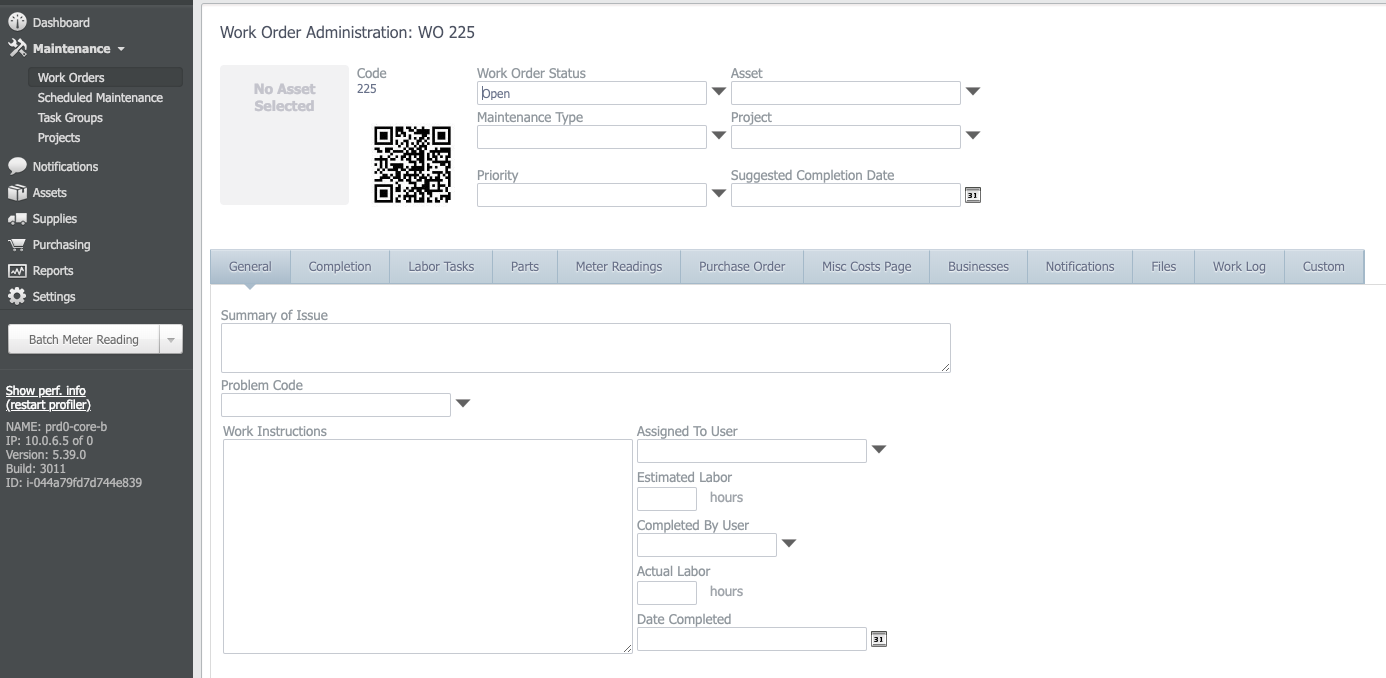
Asset
The Equipment/Facility/Tool that the work order needs work to be done on. This should be one of the first things getting filled out on a work order.

Maintenance Type
This indicates what kind of work needs to be performed on this work order.
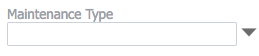
List of Maintenance Types are:
Work Order Status
Fill out the work Status as per the options that are available.

Priority
Indicate what the priority of the Work Order is, taking into account whether it’s a complete field failure or a simple fix that can be done while being in the field.

Suggested Completion Date
If the work order needs to be done before a specific date/time, this is where you can indicate that on the Work Order.
Summary of Issue
Populate this field with a description of the issue.
Work Instructions
If there is a single step that you want the technician to perform then populate this field with those instructions. If there are multiple steps to be performed, then those steps should be added on the Labor Tasks tab
Assigned to User
If you would like to assign the work to a specific group or technician, populate this field with the respective group/person
Estimated Labor
Use this field to estimate how much labor time will be required to complete the work.
Click Save when done.
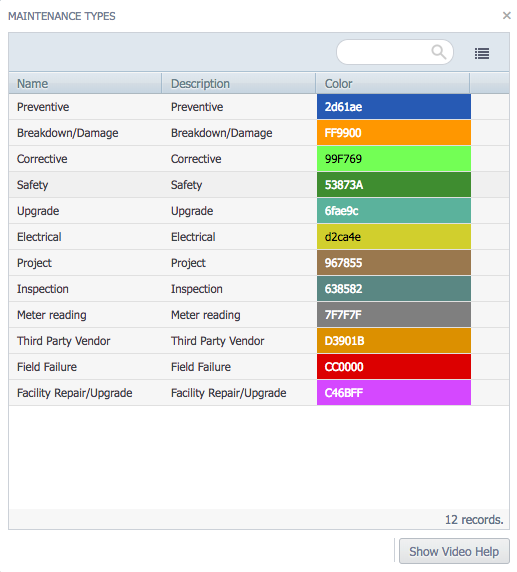
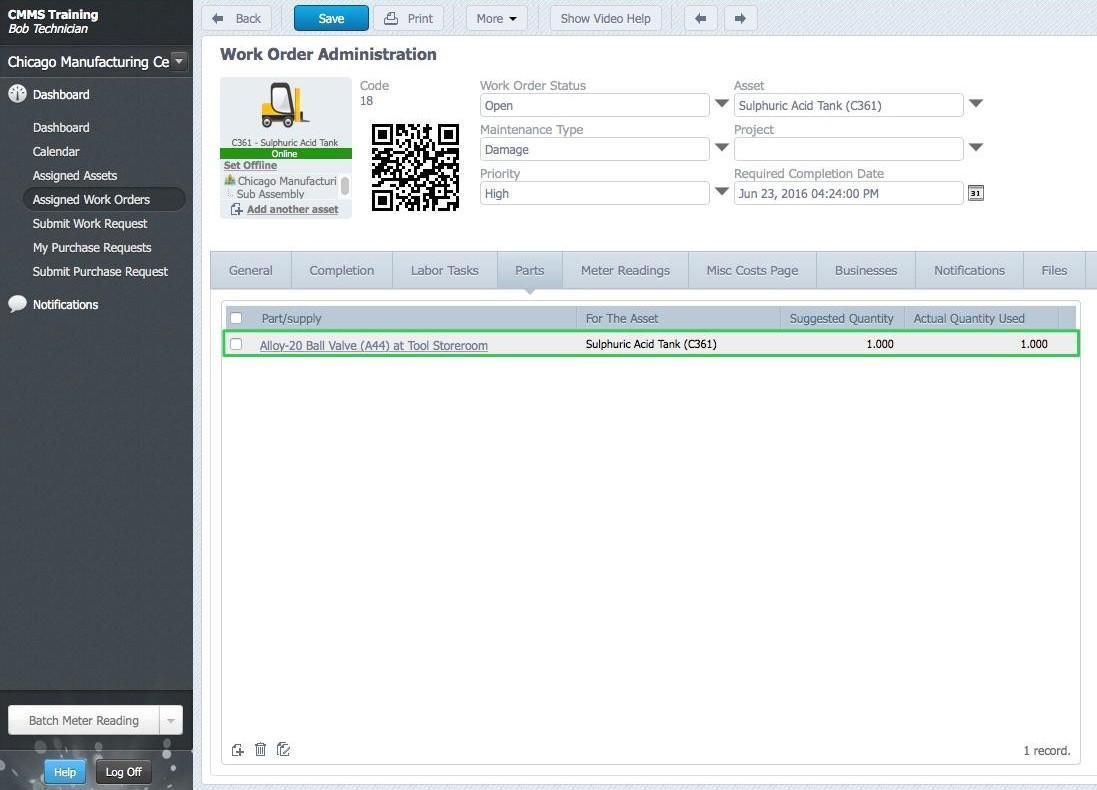
Adding Parts to a Work Order
This procedure will demonstrate how to add parts to work orders and then consume parts stock from inventory. Note:- Users who have permission to add Parts/Supplies, also have permission to remove Parts/Supplies from a Work Order.
To add parts, click Parts and New

Select the part from the drop-down-menu, add a Planned Quantity (optional), an Actual Quantity Used, and click OK.
Adding the Actual Quantity Used removes that value from the stock inventory.
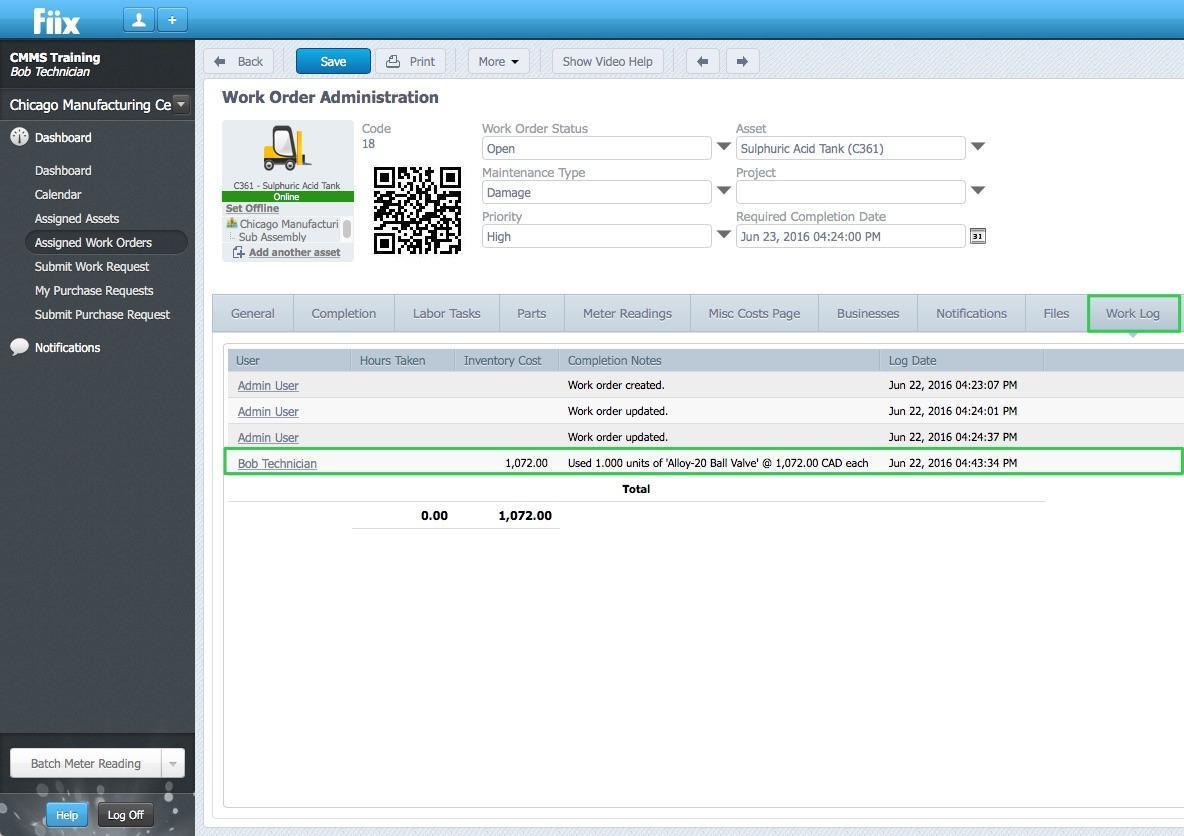
Select the Work Log tab to view the parts consumption for the work order.
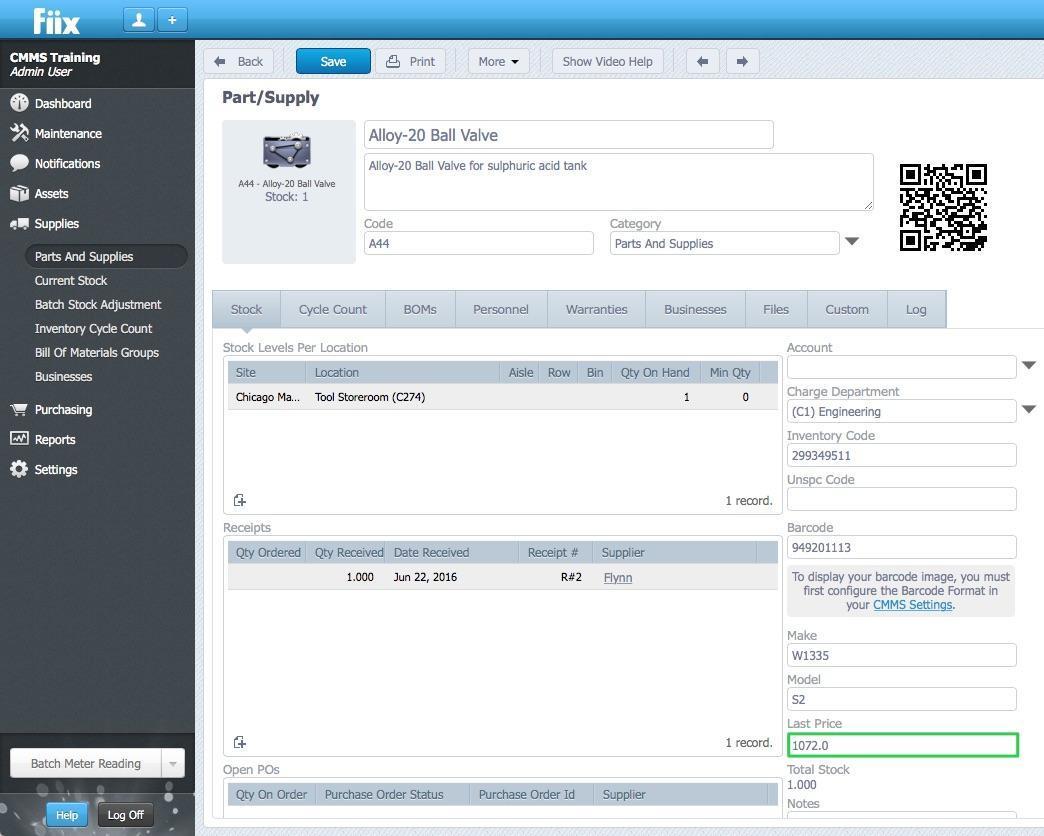
Ensuring Parts Costs appear on Work Orders
To ensure that parts costs are billed to the repair, make sure the Last Price field for the part is populated.
Log Meter Readings
This procedure has been specifically built for users logging meter readings on a regular basis. For example, the pressure on each fire extinguisher is recorded every month on every fire extinguisher in the plant. These meter readings may trigger scheduled maintenance work orders when certain conditions are met. There are a number of ways to do this, which are explored in detail in this procedure.
Method 1 – Meter Reading Tab on Work Orders
Open the Work Order Meter Reading Tab
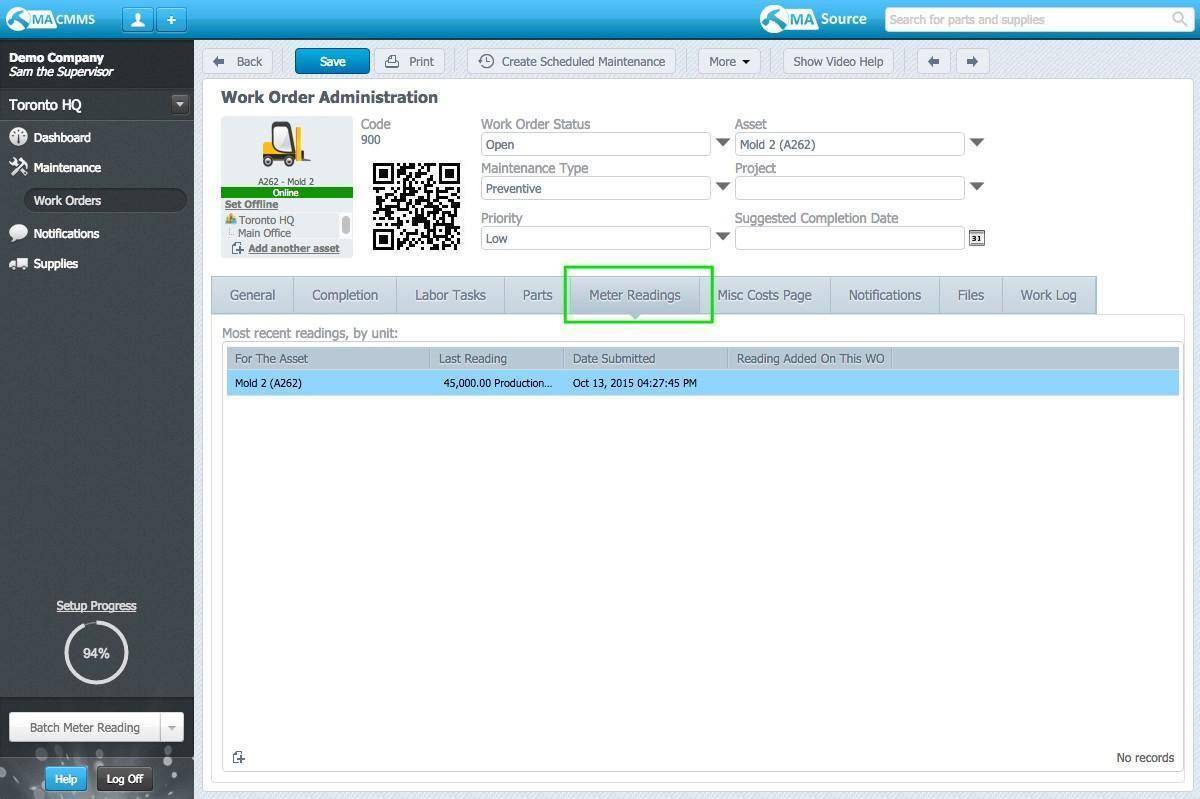
Click on the existing meter being recorded on the asset. In this case, its production hours
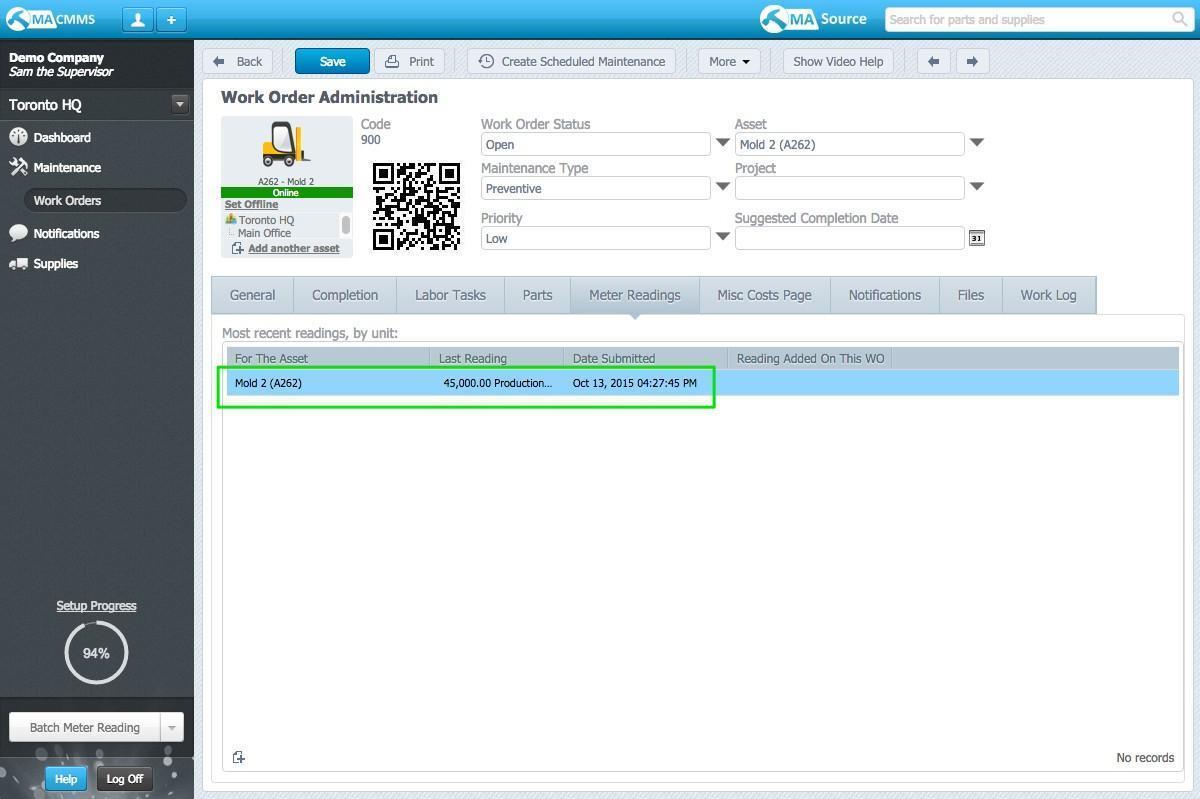
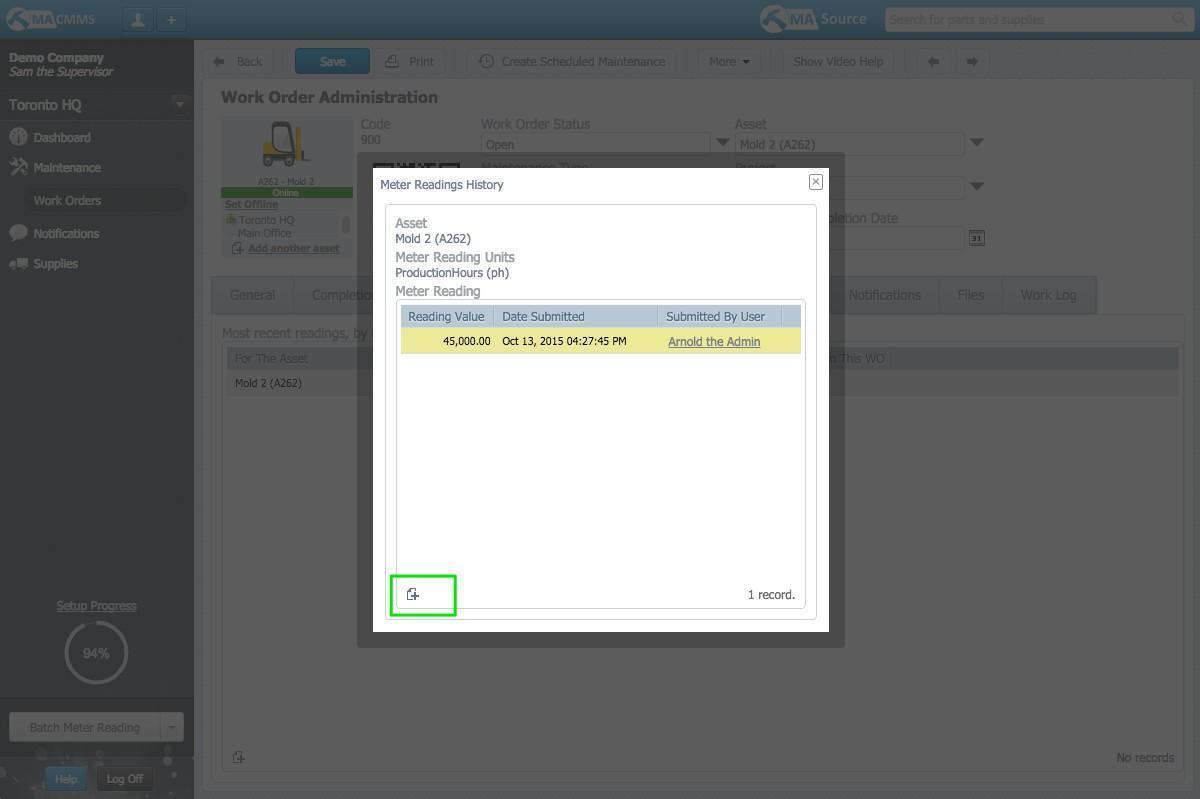
Click into the meter. You’ll get the following pop-‐up window. Click the add icon in the lower left-hand side to add a new meter reading.
Record the new meter reading and click OK to save
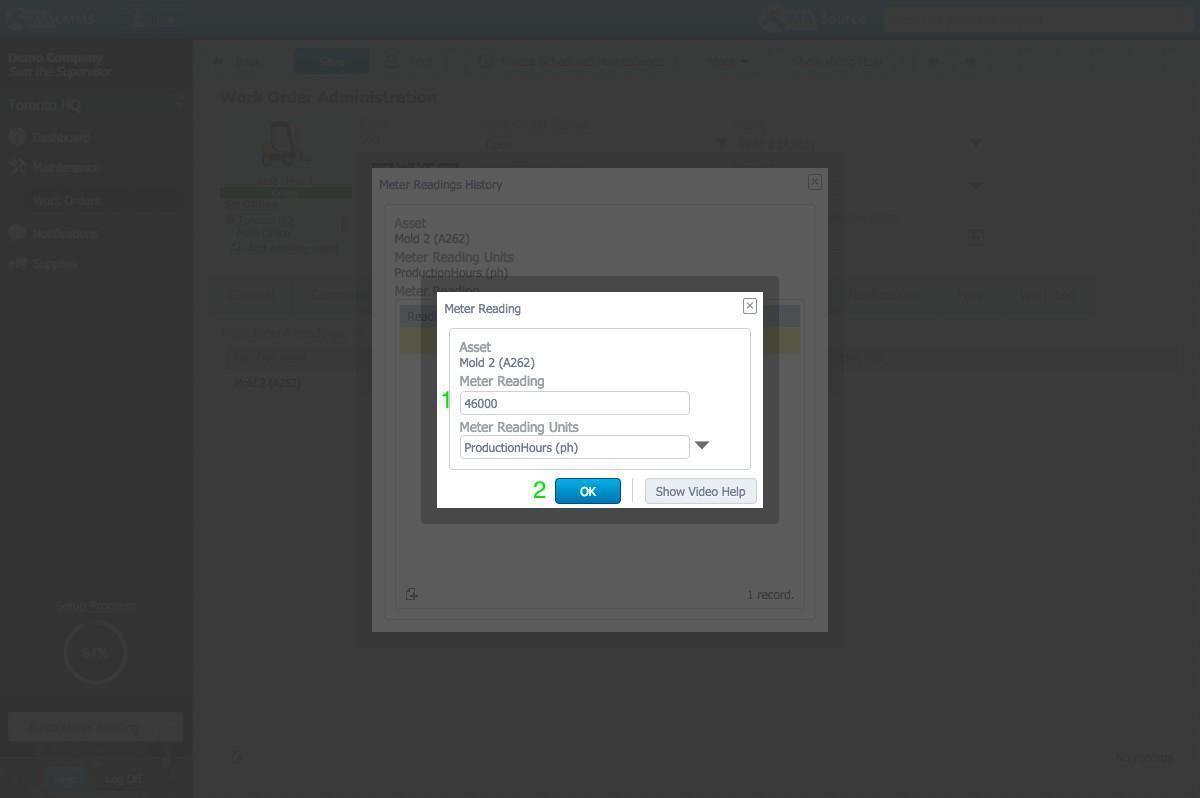
The meter reading has now been saved to the asset record.
Method 2 – Meter Reading Task
Multi Asset Scheduled Maintenance works makes recording meter readings on the mobile app a breeze.
Open the Task tab of the work order
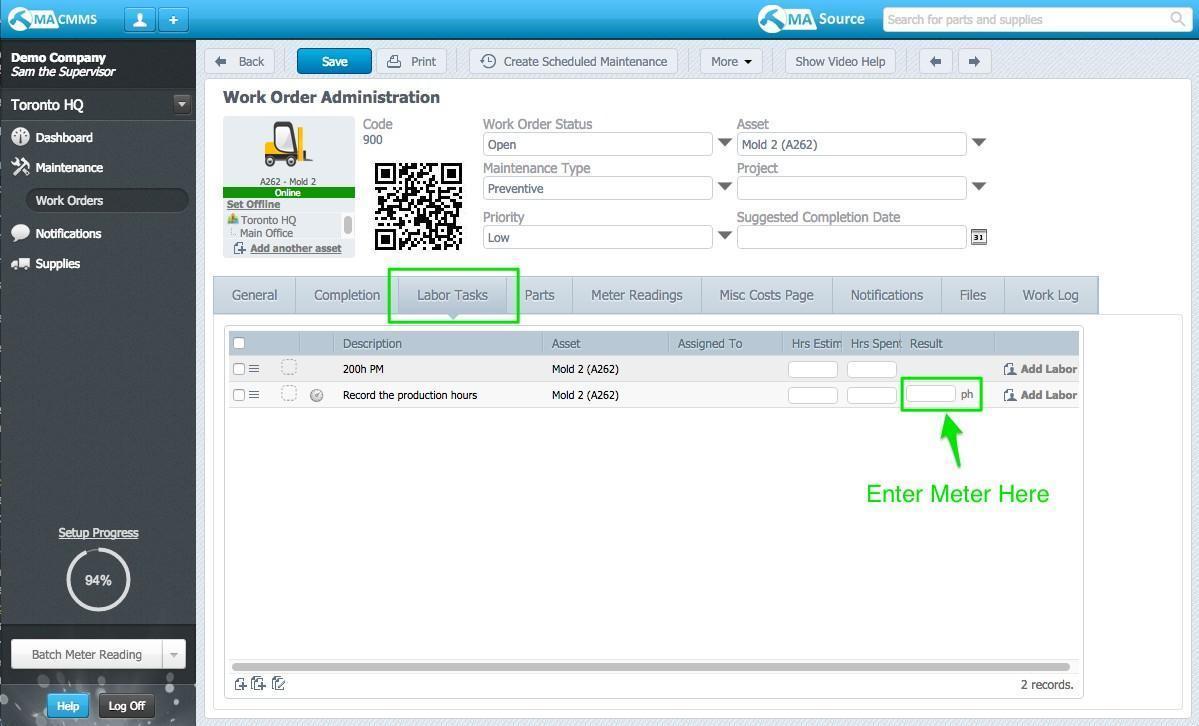
Record the meter reading in the task
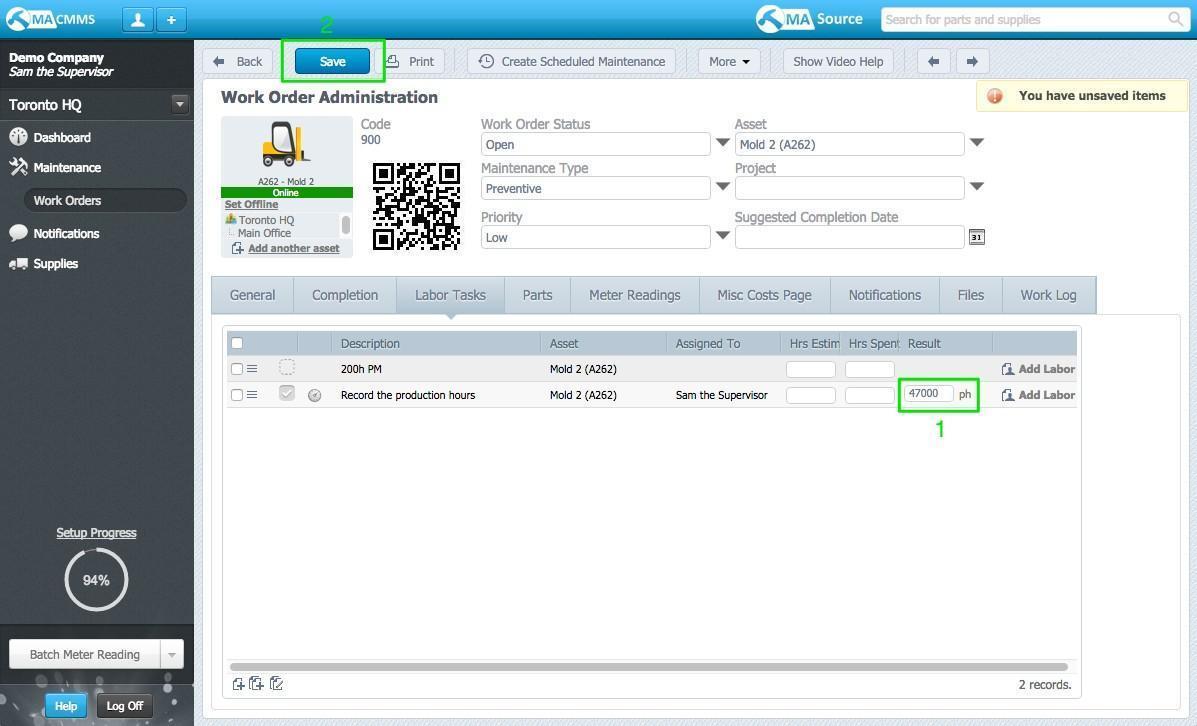
Click save
Method 3 -‐ Batch Meter Readings
You can use the Batch Meter Reading function in order to update multiple meter readings for multiple assets at the same time.
Click on the Batch Meter Reading button, at the bottom of the left toolbar.
This opens a window, Batch Metering
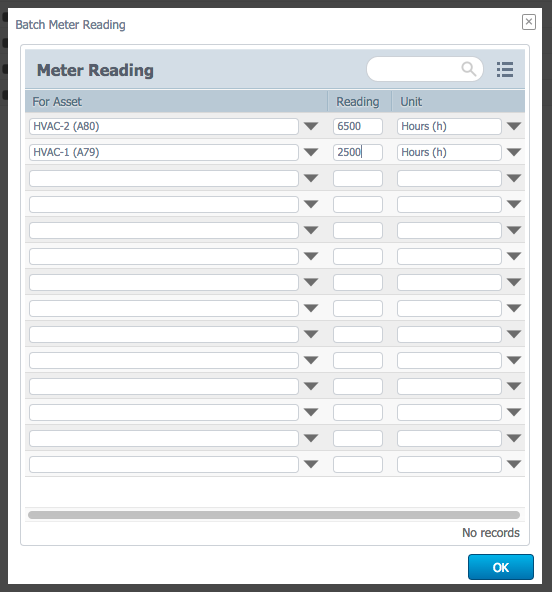
Select your assets, input your meter reading and units, then click OK to save. All meter readings will be updated accordingly
Reporting
Run a Report
This procedure will walk you through the process involved in running one of the standard reports in your
CMMS
Select Reports and choose a report from the list. Tip: Use the search bar and filter bar to narrow results

Under the Definition tab the user can find information about the report. If the report is satisfactory select Run to proceed

Select the report format (PDF, Excel Spreadsheet or CSV) and any other fields from the dropdown menus
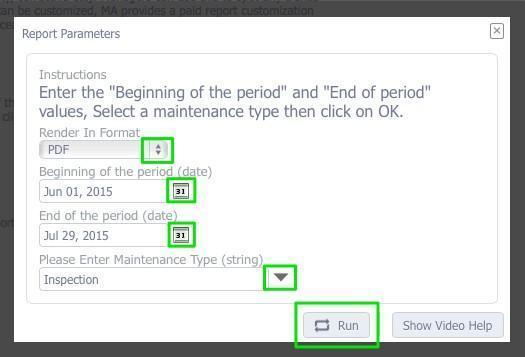
Select your report parameters and click RUN to execute.
Note: Pop-ups must not be blocked on your internet browser to run reports. Blocking pop-ups is the #1 reason why selecting Run does not generate a report. Pop-up settings can be changed under the internet browser settings/preferences.
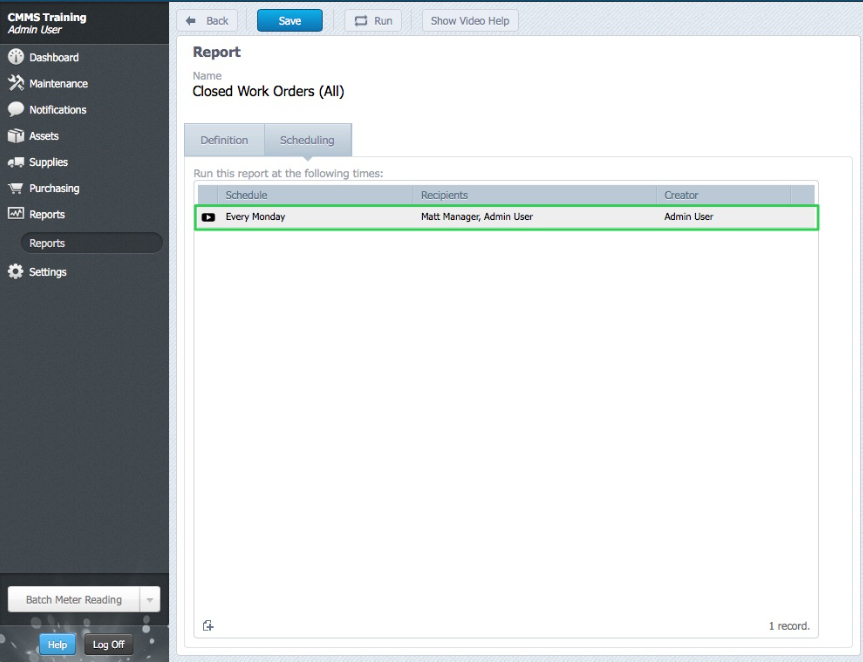
Create a Scheduled Report
This procedure will walk you through the process of creating a scheduled report. Scheduled reports are automatically emailed to CMMS users email inbox, at intervals defined by the report schedule.
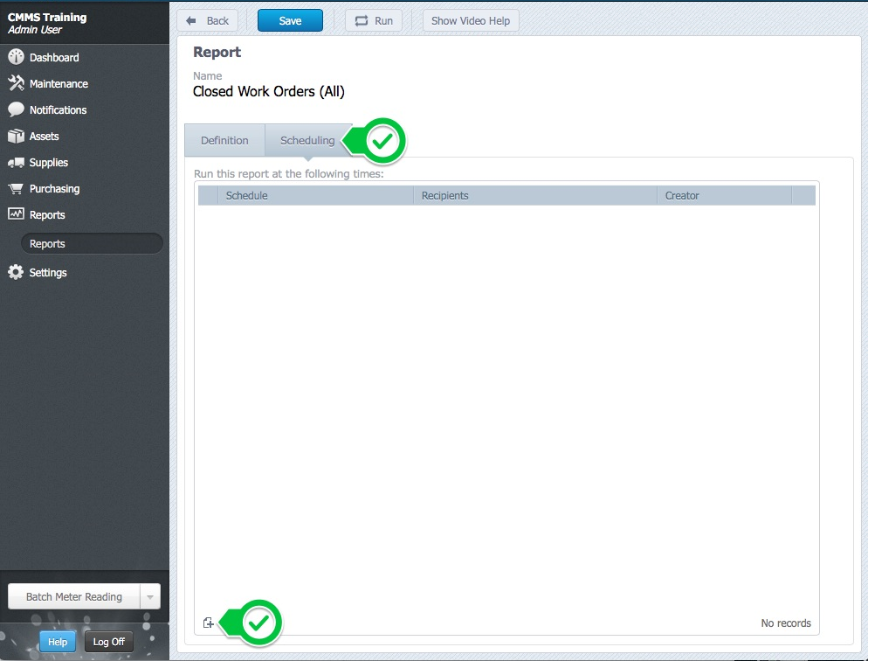
To create a scheduled report, click Reports, and select a report

Click Scheduling, and New
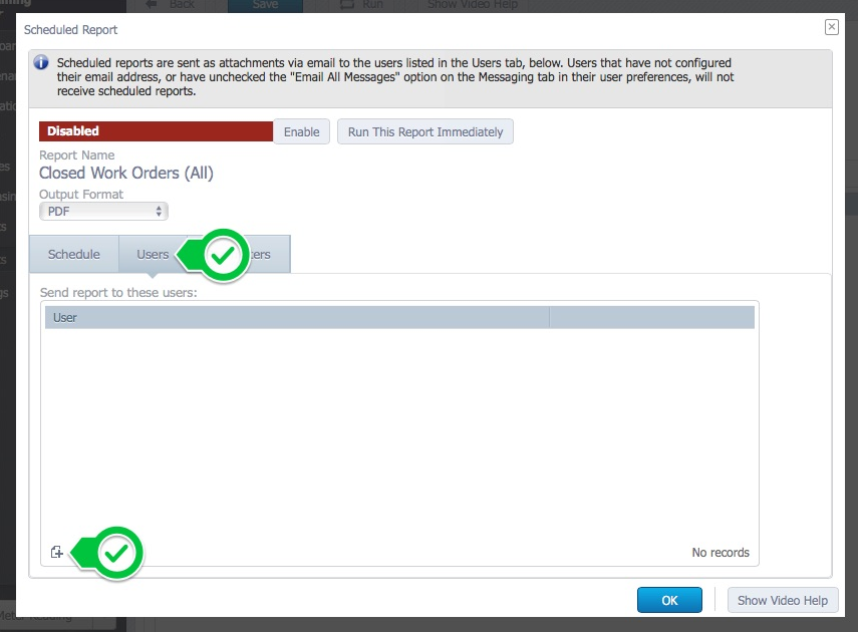
The Schedule tab is selected by default. This tab is used to define the report schedule, and select how the report format will be rendered.
Select a report Output Format from the dropdown menu, and select a setting from the How Often section. Choose a Start On date to define when the report schedule will begin its cycle. Finally, select an end date. The end date options are No End Date, End After x Occurences, or End By a date.

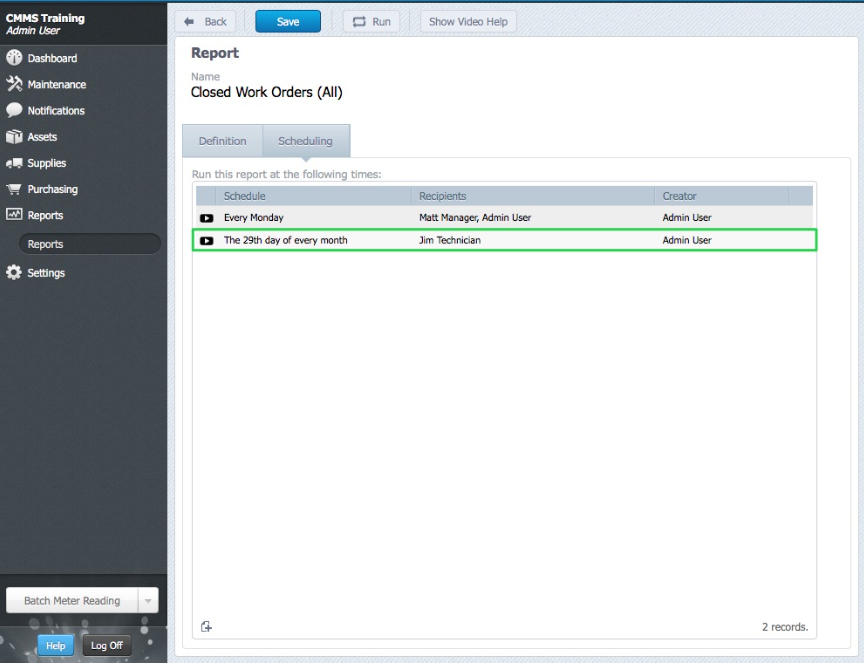
To assign the report to a user, click Users, and New
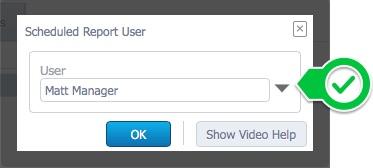
Select an active, or inactive user from the dropdown menu, and click OK
Repeat step 5 until all of the users are assigned to the schedule report
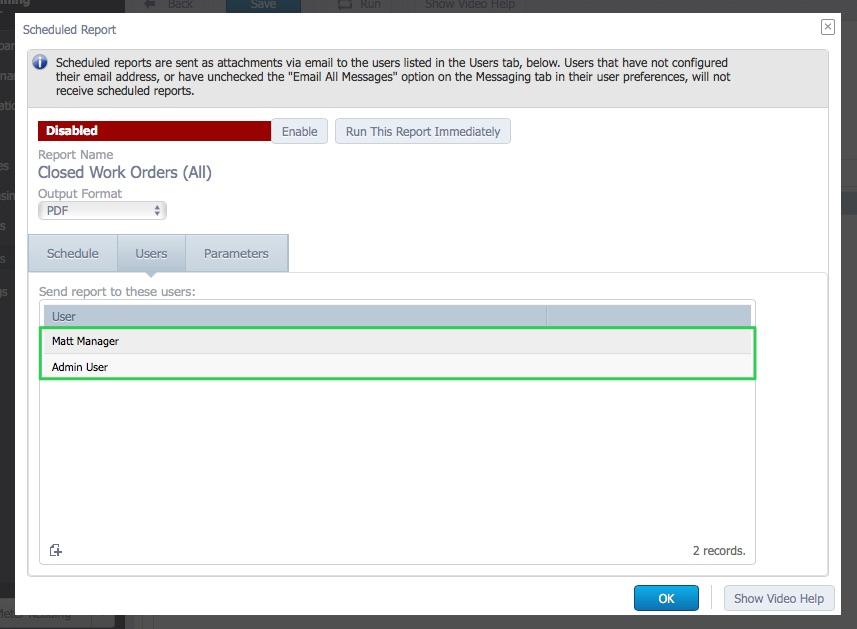
7. Click Parameters to configure the report output. Click the Report Preset Parameter names to edit the values
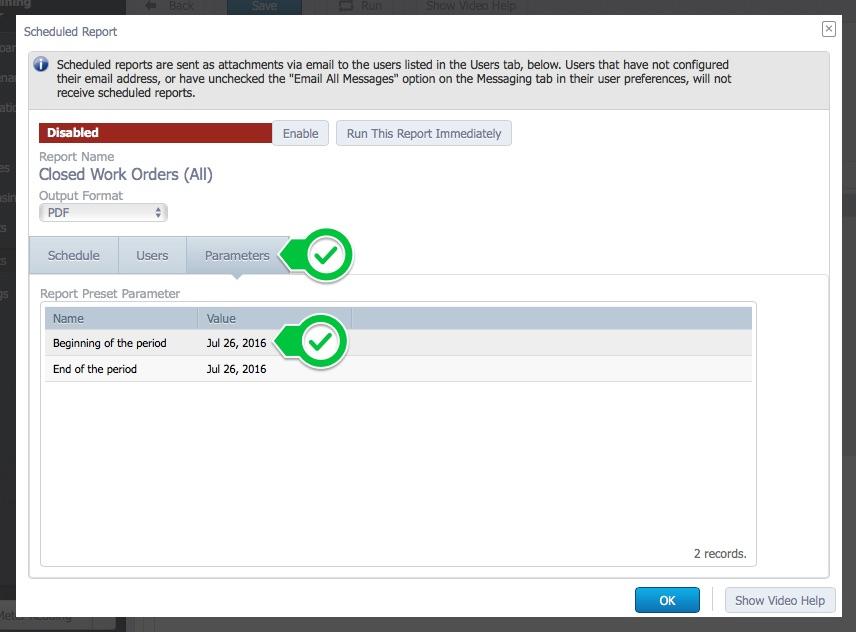
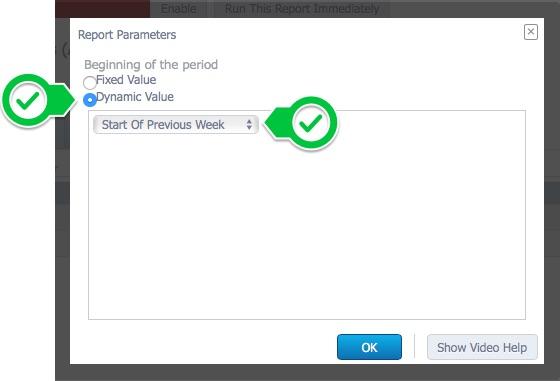
8. To enter a value that does not change, select Fixed Value, select a value, and click OK. To enter a value that does change, select Dynamic Value, a value from the dropdown menu, and click OK.
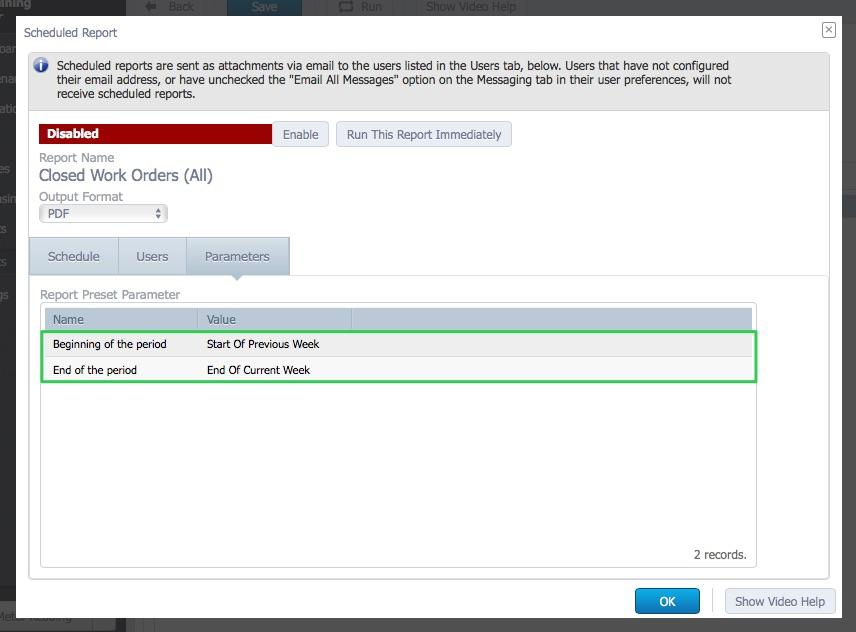
9. Repeat step 8 for the other Report Preset Parameter.
10. Click Enable, to activate the scheduling, and OK to save
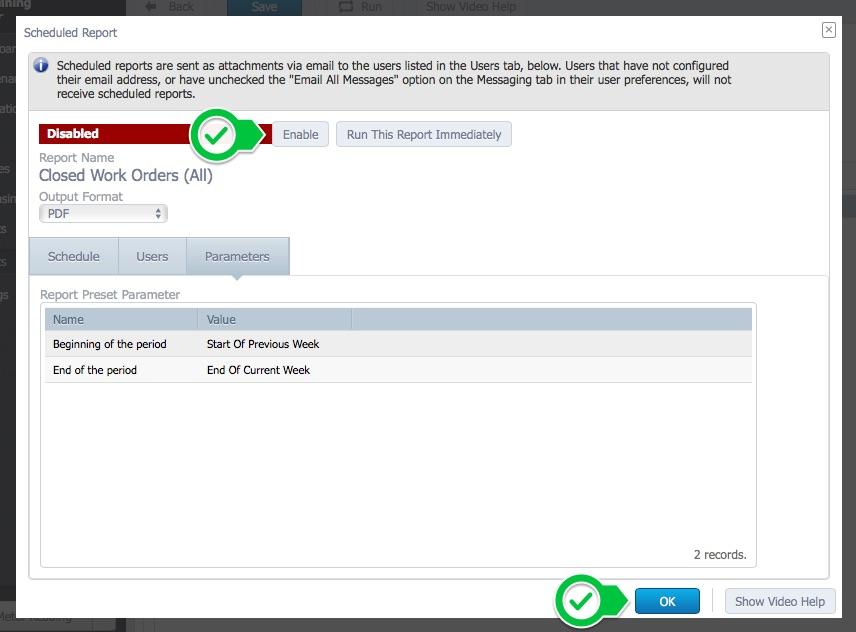
11. The report schedule is now active
12. Follow steps 2-11 to add another schedule
Settings
Users
The Users section of ZenduMA is where you identify those people who you want to have some interaction with ZenduMA. Users fall into one of two categories:
Active – an active user is a person who can log into ZenduMA and, depending on security permissions, can view, modify, create and delete records. An active user can receive notifications from ZenduMA and does require a user license
Inactive – an inactive user is a person who can receive notifications from ZenduMA; however, these users cannot login. Therefore, an inactive user will not be able to view, modify, create or delete records. An inactive user does not require a user license.
Locale Preferences
Default Login Location – this field identifies where the user is brought when they first login to the software. Choices are:
Dashboard – provides an overview of current system status. A variety of metric widgets are available depending on the Dashboard Permissions that the user has
Work Orders Assigned To Me – a list of work orders assigned to either the user directly or assigned to any user groups that the user belongs to
Message Center Inbox – the Notifications inbox which will display any notifications the user has received (NOTE: the Notifications inbox will only contain notifications if the “Internal Mail All Messages” checkbox is selected on the Messaging tab).
Work Orders – a list of all work orders, regardless who is assigned
Security and Access
User Name – this field uniquely identifies the user and will be used (for “active” users) to login to ZenduMA.
NOTE: User Name is a case-sensitive field.
Following fields are only available after activating record:
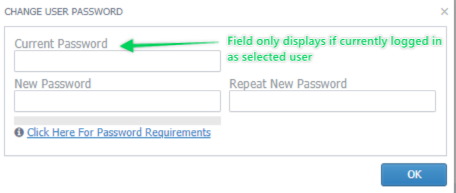
Change Password – Clicking this button will allow you to change the password for the selected user. If the user has their own record open then they will be prompted for current password as well as new password and confirmation of password.
Force password change on next login – Checking this box will require that when the selected user logs into ZenduMA they will be required to change their password.
Session timeout (in seconds) – By default a user will be timed out of ZenduMA after 15 minutes of inactivity. Leaving this field blank will use the default, changing the value will update setting on a per user basis.
NOTE: Session timeout cannot be set to less than 900 seconds (15 minutes). Maximum allowed value is 999999 (277 days)
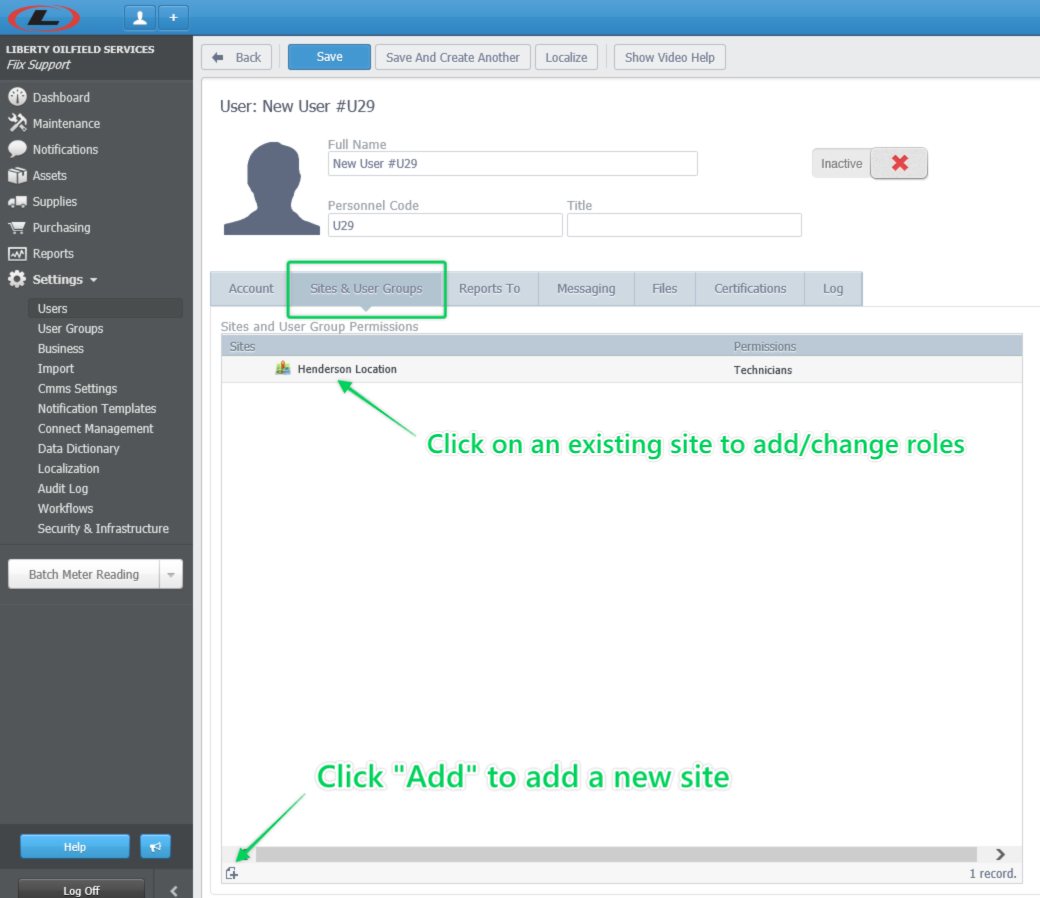
Sites and User Groups
The Sites and User Groups tab is where you define which locations (“Sites”) the user should be able to access and which ZenduMA role(s) (“User Groups”) they fill at those locations. Note that User Groups can be used to define security permissions within ZenduMA and also when assigning work to a group rather than just an individual. Also, if you assign a user to multiple User Groups then the group with the least restrictive user rights for a module will take precedence.
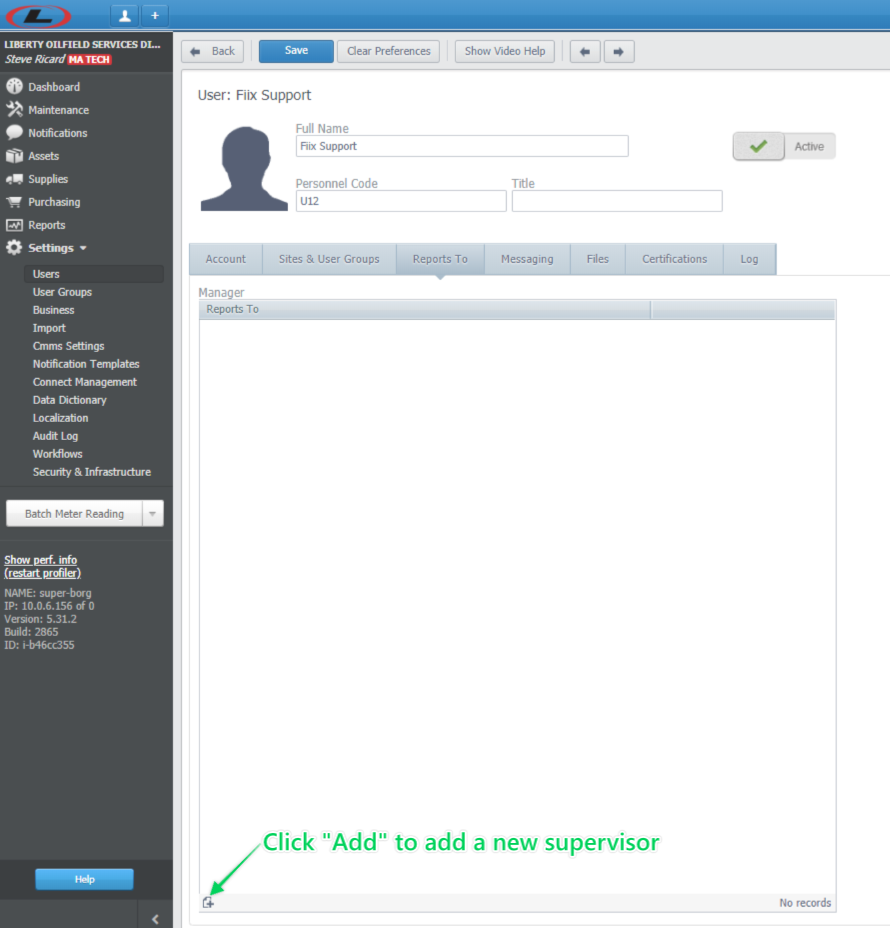
Reports To
This tab is used to identify who this person reports to for two purposes:
When populated the supervisor can filter work orders on the dashboard to those people who report to the supervisor
When populated the supervisor will receive notifications when a certification associated to the user is due to expire 30 days prior to expiration.
Messaging
This tab is used to define when, how and why notifications should be sent to the user
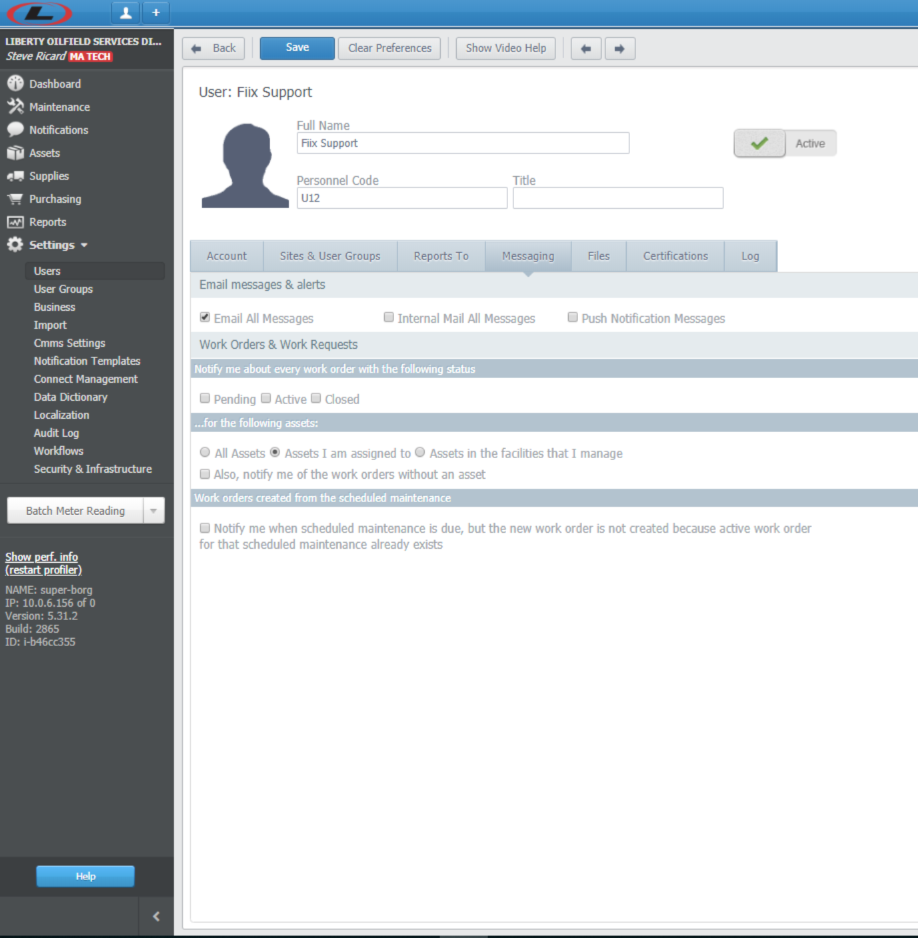
Email messages & alerts
This section is used to determine “how” the user will receive notifications from ZenduMA. Any combination of selections can be made in this section
Email – select this checkbox if the user wants to receive notifications to the email address that was populated on the “Account” tab
Internal Mail All Messages – select this checkbox if the user wants to receive notifications to the Inbox with Notifications (on the main menu bar)
Push Notification Messages – select this checkbox if the user wants to receive push notifications to their mobile device.
NOTE: In order to receive push notifications to a mobile device (Android/iOS compatible devices) the user must have ZenduMA Mobile installed on their device.
Work Orders & Work Requests
This section is used to determine “when” and “why” notifications should be sent to the user
Notify me about every work order with the following status
Any combination of selections can be made in this section
Pending – Work Orders that are on hold, possibly waiting review before being released for work to begin.
Active – Work Orders that are currently being worked on
Closed – Work Orders that have been completed and switched to a finished status
...for the following assets:
All Assets – Depending on selection(s) above, a notification will be sent for work orders that have been created against any asset in the system
Asset I am assigned to - – Depending on selection(s) above, a notification will be sent for work orders that have been created against equipment assets (and their children) this user has been specifically associated to on the Personnel tab of the asset record
Assets in the facilities that I manage - Depending on selection(s) above, a notification will be sent for work orders that have been created against location assets (and their children, including equipment assets) this user has been specifically associated to on the Personnel tab of the asset record
Also, notify me of the work orders without an asset – It is possible to create work orders in ZenduMA without an asset being associated to the work order. If this happens and the user would like to receive notifications, then this checkbox should be selected
Work orders created from the scheduled maintenance
Notify me when scheduled maintenance is due, but the new work order is not created because active work order for that scheduled maintenance already exists – In certain circumstances ZenduMA will suppress a SM from generating the next scheduled work order if there is already an open SM generated work order. If that occurrence does happen and the user would like to receive a notification, then this checkbox should be selected.
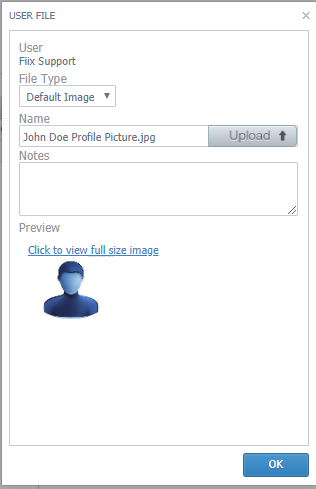
Files
The files tab allows you to add any type of electronic documentation to a user record. You can add files, hyperlinks and general notes.
Note: when adding a file attachment, you must have the appropriate application to open the attachment (i.e. do not add a CAD drawing if you do not have a CAD viewer installed on your computer). Also, when adding a hyperlink do not add a link to your local computer (i.e. “C:\Users\testuser\Documents\Owners Manual.pdf) as the link will fail. Hyperlinks must use a web address.
To add a File, click Files and drag and drop the file into the Files window. In the example below an image and a pdf manual have been attached.
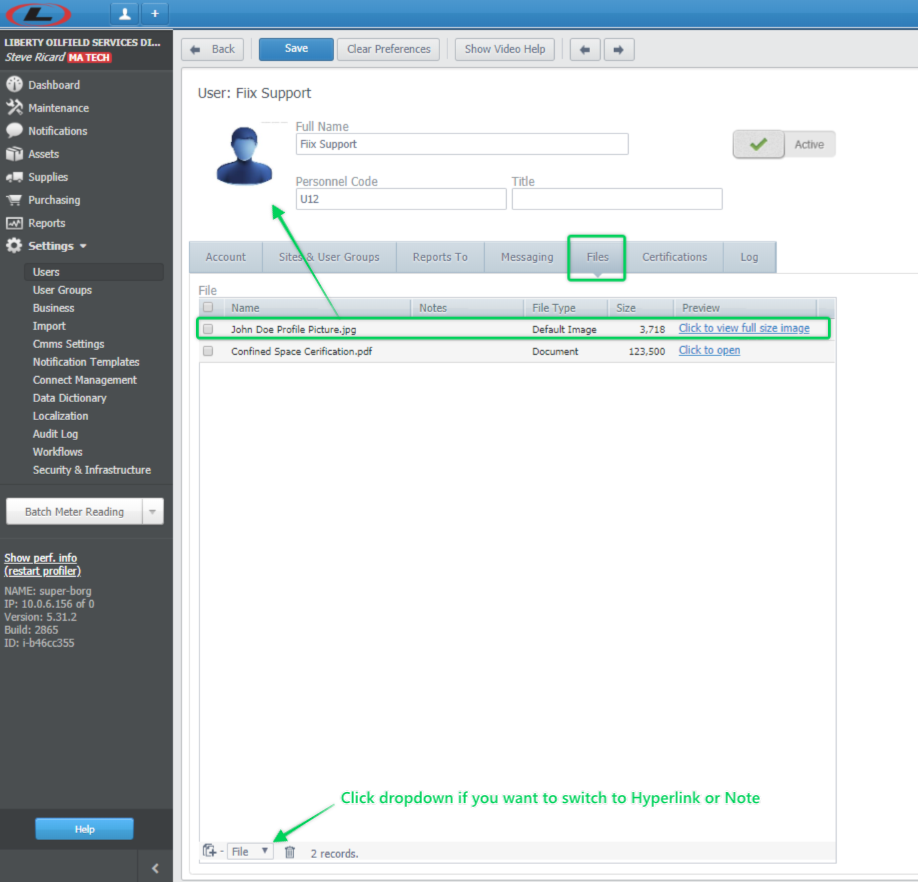
When adding an image file, the image will replace the default user image. If you want your new image to always be the image used for the user record, then you should click on the image file on the Files tab and change the file type to “Default Image”
To add a hyperlink, click the dropdown and change the attachment type from “File” to “Link” then click the “Add” button. A new form will open prompting you to fill in a name, link address and a note (optional). Fill fields then click “OK”
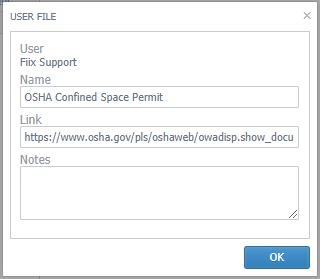
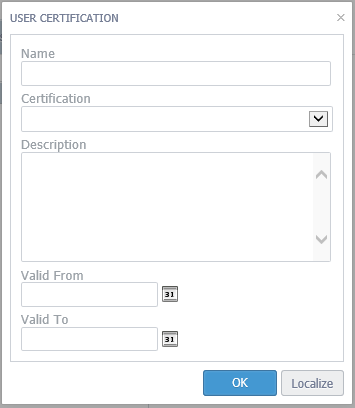
Certifications
The Certifications tab allows you to track all training, licensing, certifications, commendations, reviews, etc. along with the date received and an expiry date (if one exists)
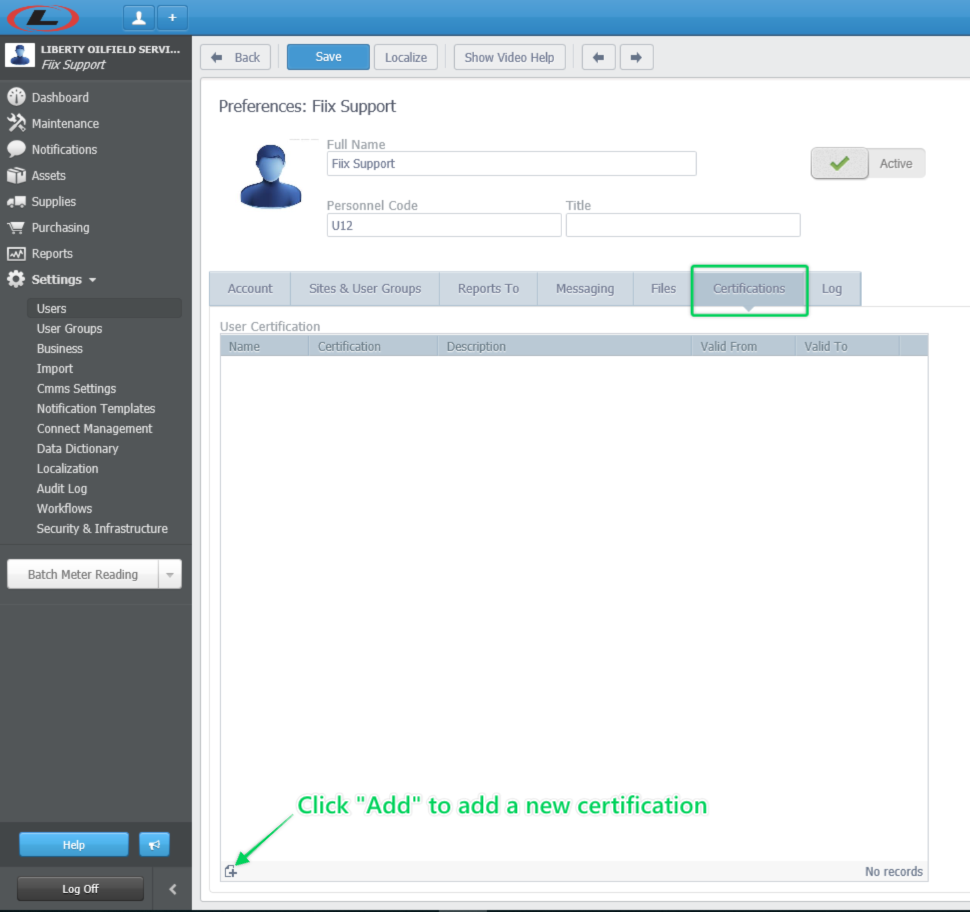
Once the add button is clicked, a form will open asking you to populate the name of the certification (i.e.: “2018 Confined Space”, “2018 Performance Review”, etc.), a certification type (i.e.: “OSHA – Construction Safety & Health Certificate”, “HR Annual Reviews”, etc.), a date received and a date the certification is valid to.
NOTE: If the certification type you want to select does not exist in the dropdown, you must go to Setting/CMMS Settings/ Lookup Tables/ Certifications to add it to the picklist
Log
The Log tab shows you the work orders that have been assigned to the selected user, as well as any assets that the user has been assigned to (Asset/Personnel tab)

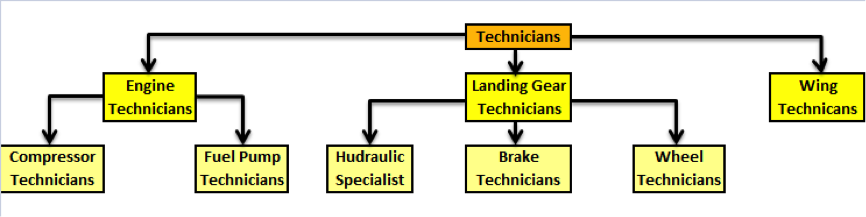
User Groups
User groups can be defined as a set of individuals who focus on particular tasks. For large organizations, it is advised to set up user sub groups that mirror roles and responsibilities. User sub groups makes your CMMS more efficient when allocating tasks and sending email notifications. The example below demonstrates how technicians can be broken down into sub groups at an airline maintenance facility.
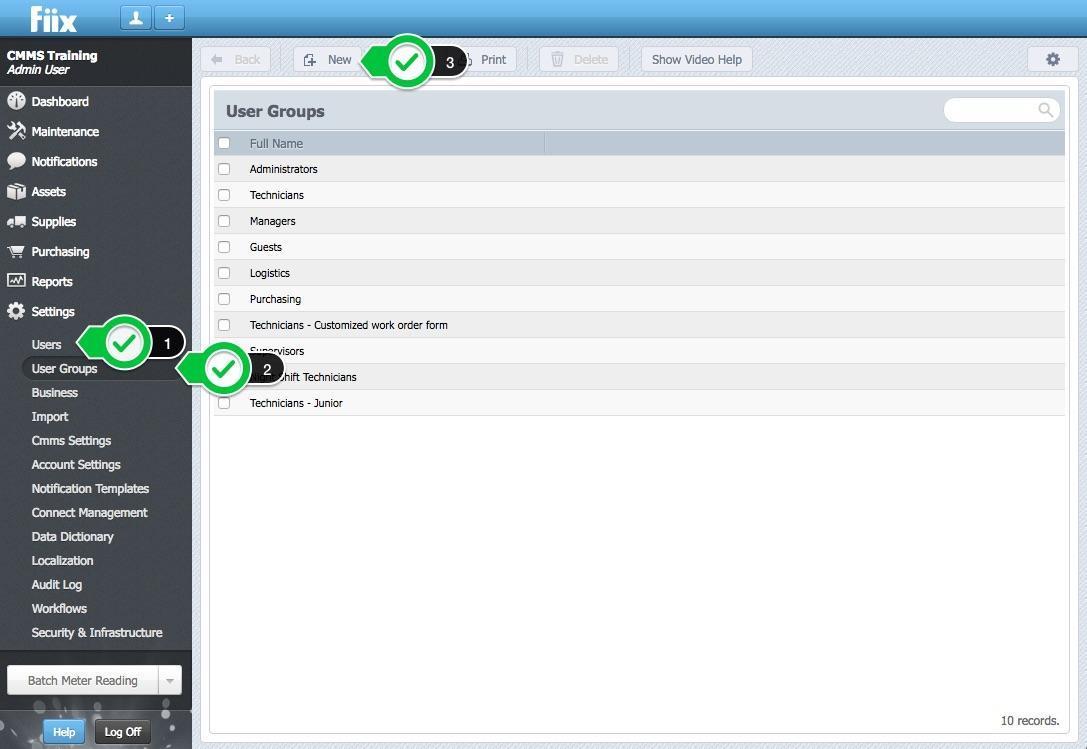
Creating a New User Group
TIP - Creating a new user group can take time due to the number of menu and page permission options. To save time, work from a user group that is close to what you need and use the copy function. For example, if you want to create a user group with slightly less access than managers, copy the managers group, rename it, and then remove the items you don't want this group to have. It is a lot quicker than starting from scratch!
Select Settings, User Groups and New
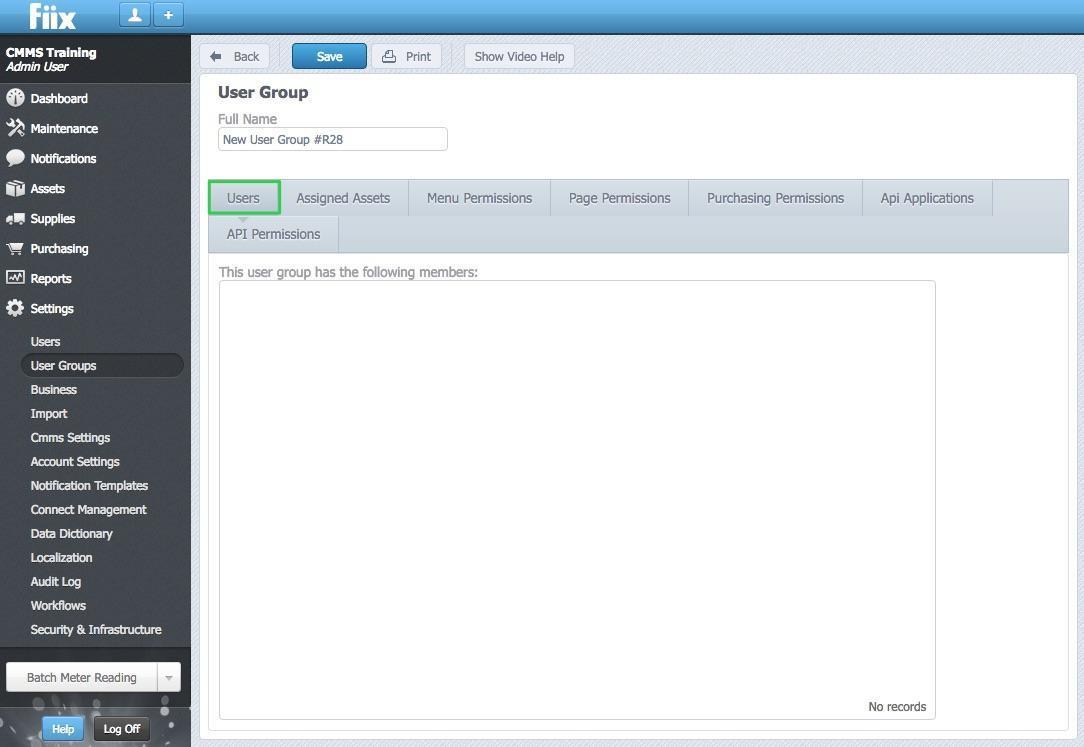
Users Tab
The Users tab will show any users who you assign to your newly created group. As this is a new group there are currently no users to display. You will add users to your new group through the individual's user account. More information on assigning users to specific groups can be found here.
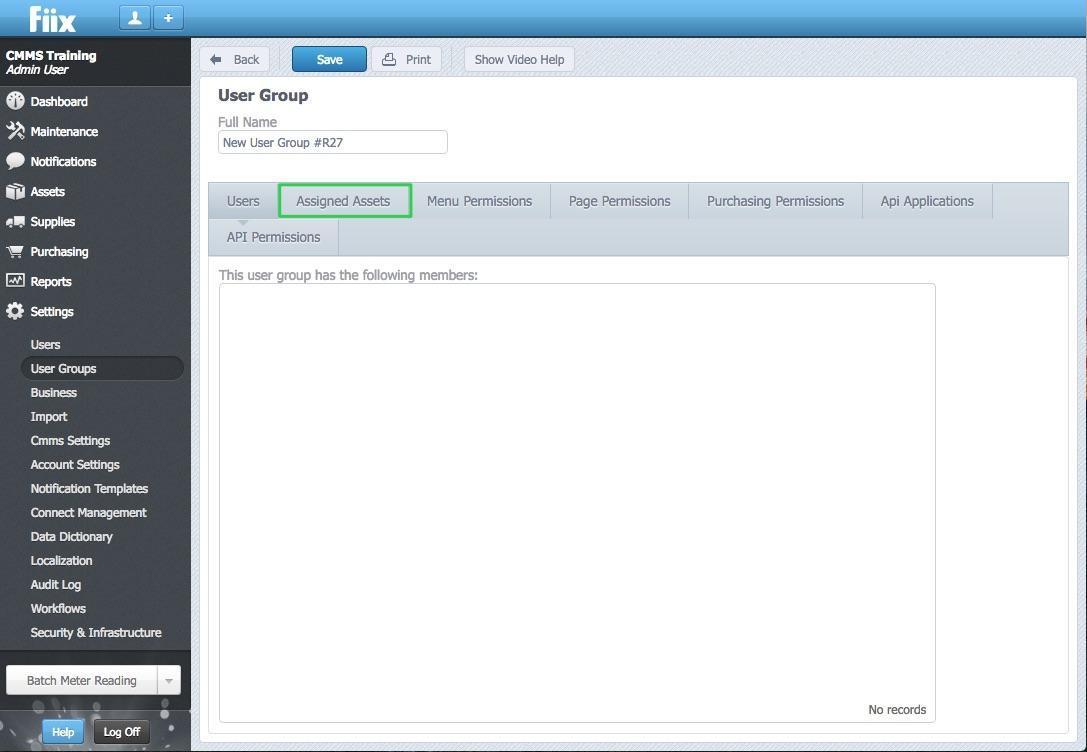
Assigned Assets
The Assigned Assets tab will show any assets in which the user group is assigned to. To assign a user group to assets you will need to assign them through the actual assets, more information on this can be found here
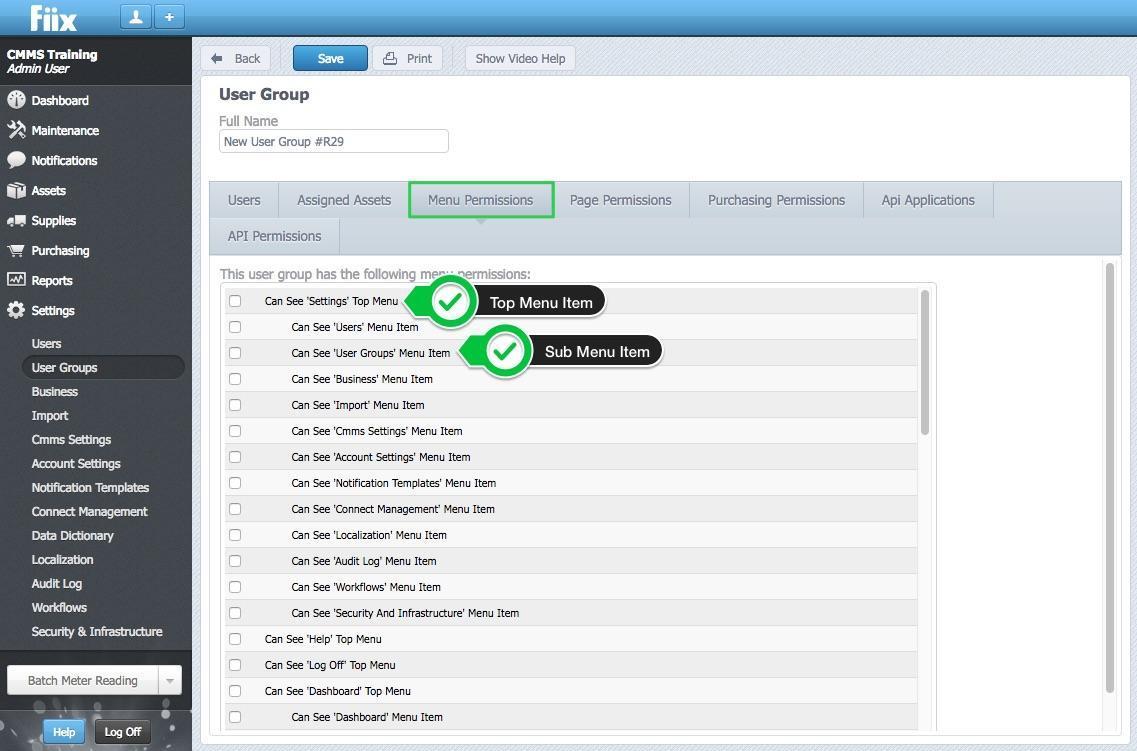
Menu Permissions
This determines what the users can see in the in the left menu. For some users such as shift supervisors, it may be advantageous to give them permission to add new equipment, staff or parts to the system. For groups like Human Resources for example, they only need access to the Add New Users tab. Each of the headings in the Menu Permissions tab reflect an option listed on the left, however just selecting the top menu item for Dashboard for example will not allow access to the items such as calendar etc. that are listed below the Dashboard once it has been expanded. In the attached screenshot the Settings Menu Item is highlighted.
You will notice the indented menu items below settings. Choosing the top menu item will not allow access to the sub menu items, you will need to select the desired options from the list. This principle is the same for all menu Items, Dashboard Maintenance etc. You will have to set these according to your specific requirements. You will need to set your page permissions accordingly too. These page permissions will be covered below.
Page Permissions
Page permissions go into the finer details of what the users can do when on particular pages. There are a large number of Page Permissions so extreme time and care is needed when setting these permissions.

Below is a screenshot showing the Work Orders page permissions as an example. You will need to select the required options and click Save.

This process will need to be replicated for every page you want to give your team access to. This can be quite time consuming but is a necessary step to ensure your team only have access to the pages you want and can only carry out the actions you have defined.
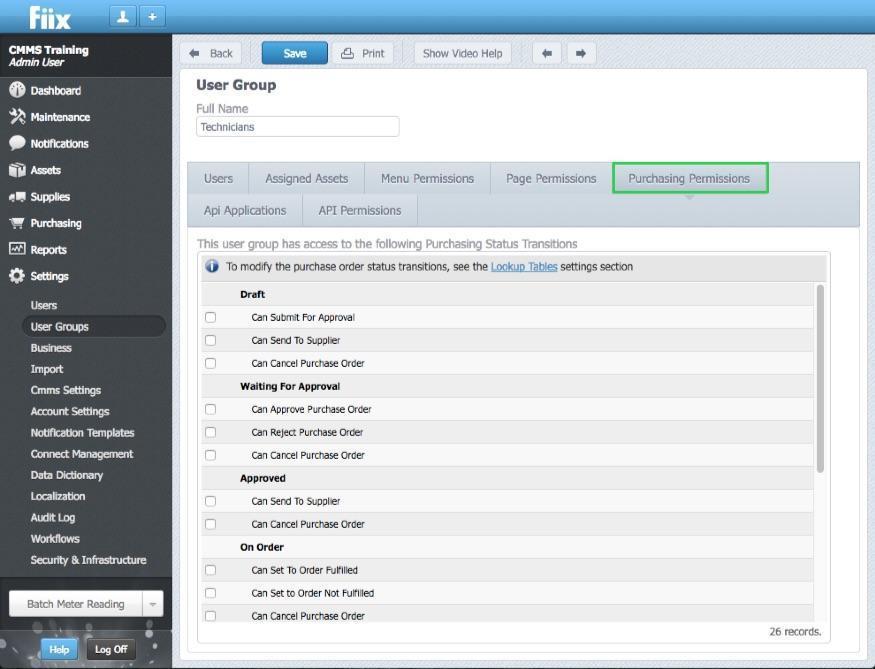
Purchasing Permissions
The Purchasing Permissions allow you to define what actions your team can take when it comes to the transition of purchase order status. You will need to set these specific to your needs. If you do not want the group to have any purchasing powers you can simply leave this tab as it is.
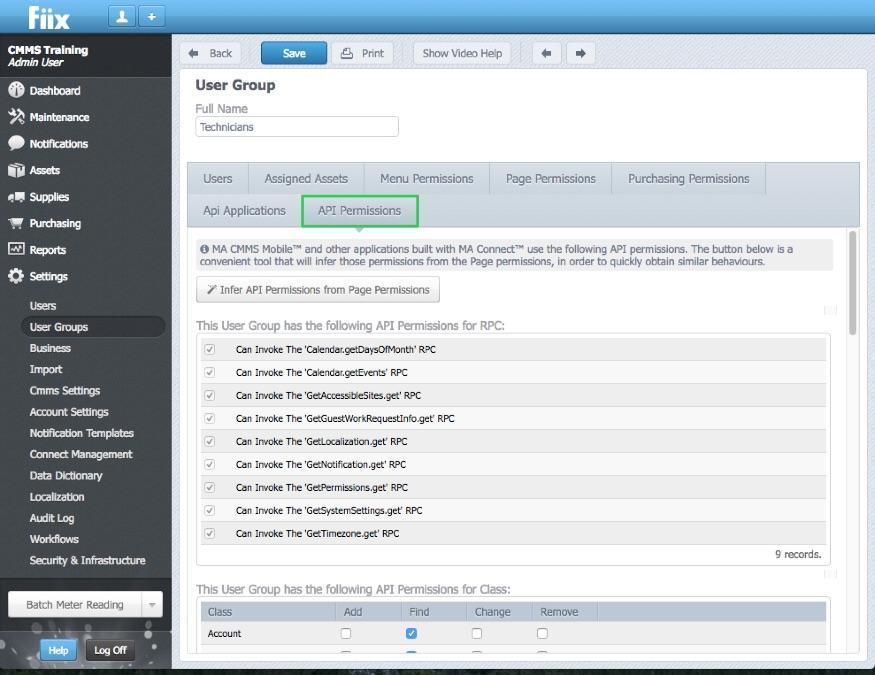
Api Permissions
The Api Permissions tab defines what permissions users have while using the mobile app. If you want your team to have the same permissions on mobile as they do on the desktop version of the CMMS you can simply click Infer Page Permissions From Page Permissions as highlighted in the attached screenshot. Certain permissions are predefined here and cannot be changed or removed. It is important to remember that not all features & functionality available to you on the desktop are available on mobile.
Tip: If you have an existing Group set up whose permissions will be similar to that of the new group you want to create you can save time by duplicating the existing group and modifying the permission
Import Data into MA CMMS
Overview
To correctly import your data into MA CMMS, follow this order of execution:
1. Create your Custom Fields
2. Import Users
3. Import Business
4. Import Assets
5. Import Parts
6. Import Task Groups
7. Import PMs
8. Import old Work Orders
9. Import Meter Readings
10. Import Asset Events
The procedure to import data into the CMMS is the same for all objects. This training manual outlines how to import assets but the same process applies to all other objects.
Import Assets
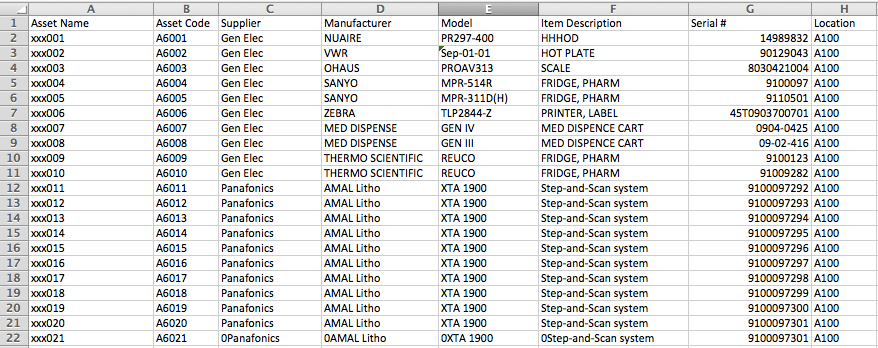
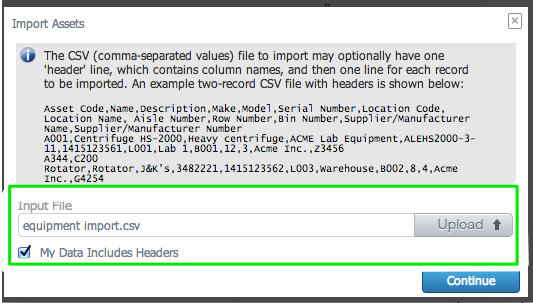
Assets can be imported from older CMMS packages using CSV files only (comma-‐separated values). The CSV file to import assets should have one 'header' line, which contains column names, and then one line for each asset to be imported.
1. Select Save as CSV file when closing in Excel. This is an example:
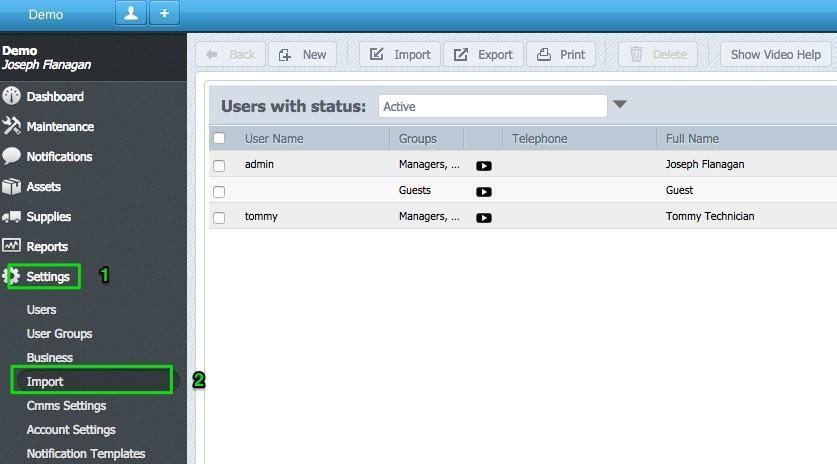
2. Navigate to Settings -‐ Import as shown below.
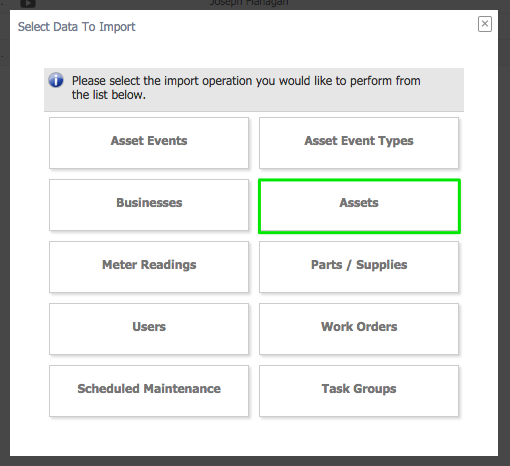
3. Select Import to bring up the following box. From here you will click Assets to start the asset import.
4. Click into the Input File box to locate your file on your drive. Click Continue when the file has been selected.
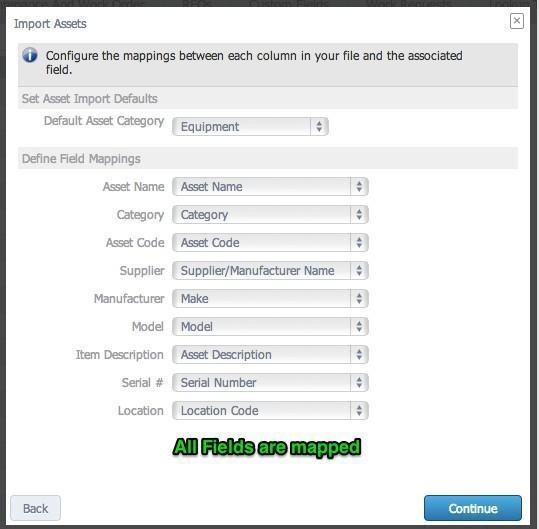
5. Select the appropriate Default Asset Category from the drop down menu. This is the category that the assets will be imported to. For example, if you were importing rubber parts, you could create a category called rubber parts and import the parts to that category.
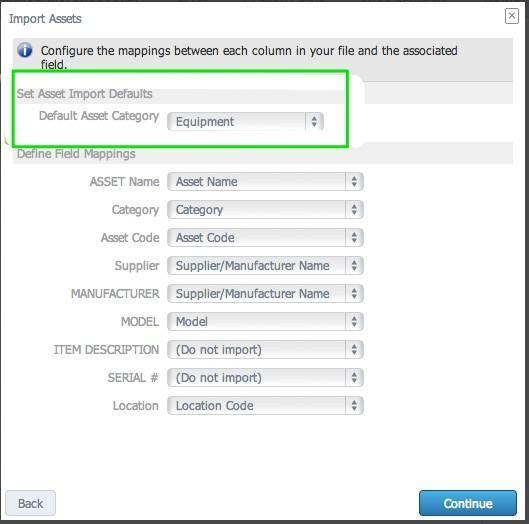
6. Define the field mappings by matching the header item in the file to the corresponding item from the drop down menu. The fields on the left are from the CSV file, the fields on the right are in the CMMS.
7. In this case, Item Description in the CSV file corresponds to Asset Description in the CMMS.
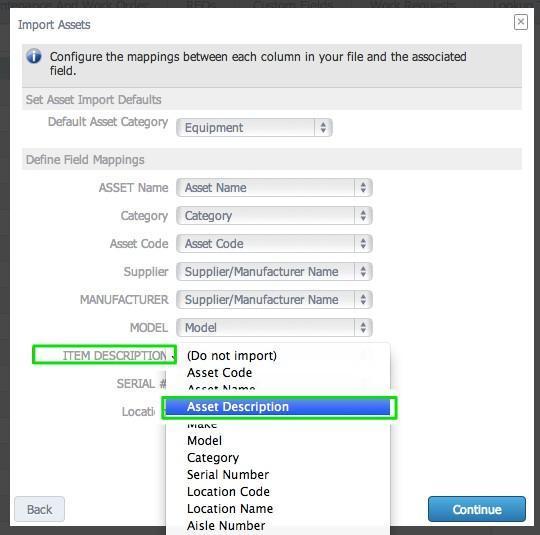
Note 1: (Do Not Import) means the import tool could not match the column to a field in the CMMS. You can choose to map those fields manually, or not import them.
Note 2: It is possible to import to many asset categories at a time, but this can complicate the import, so it is recommended that you import one category at a time. For example, in this CSV file, we have a column called Category. Different assets in the file are from different categories.
In this case, we will have assets imported into 4 categories -‐ Etch, Fusion, HVAC and Trucks.
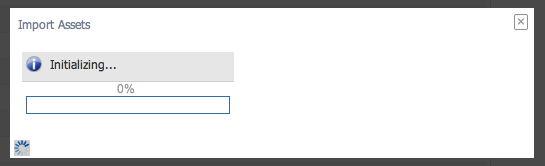
8. When all the fields are mapped, click Continue to commence the import.
9. The Import will commence and the CMMS will start looking for errors in the file.
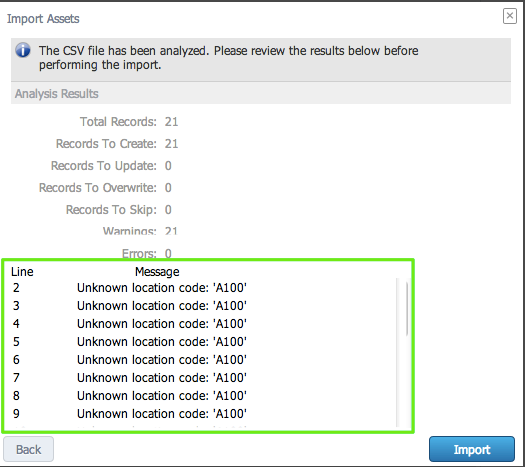
10. If your file has errors or warnings, you will see the details in the import screen. In this case, we have not set up our locations so the CMMS will not assign the newly imported equipment assets to locations. In this case, we must go back into the CMMS and correct this before importing.
11. Click Import to officially import the data into the CMMS.
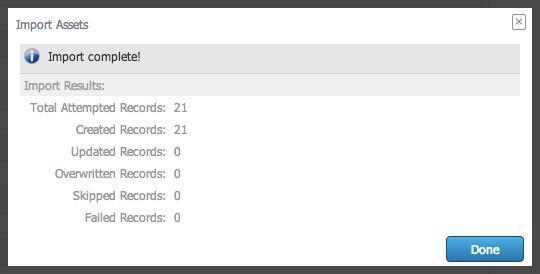
12. When done, click Assets from the top menu and check your work.
CMMS Settings
The CMMS Settings section of the software is where global settings will be configured. The settings here are typically configured once and rarely adjusted again.
System
The System tab is where you will configure your currency, time zone, branding and some security settings.
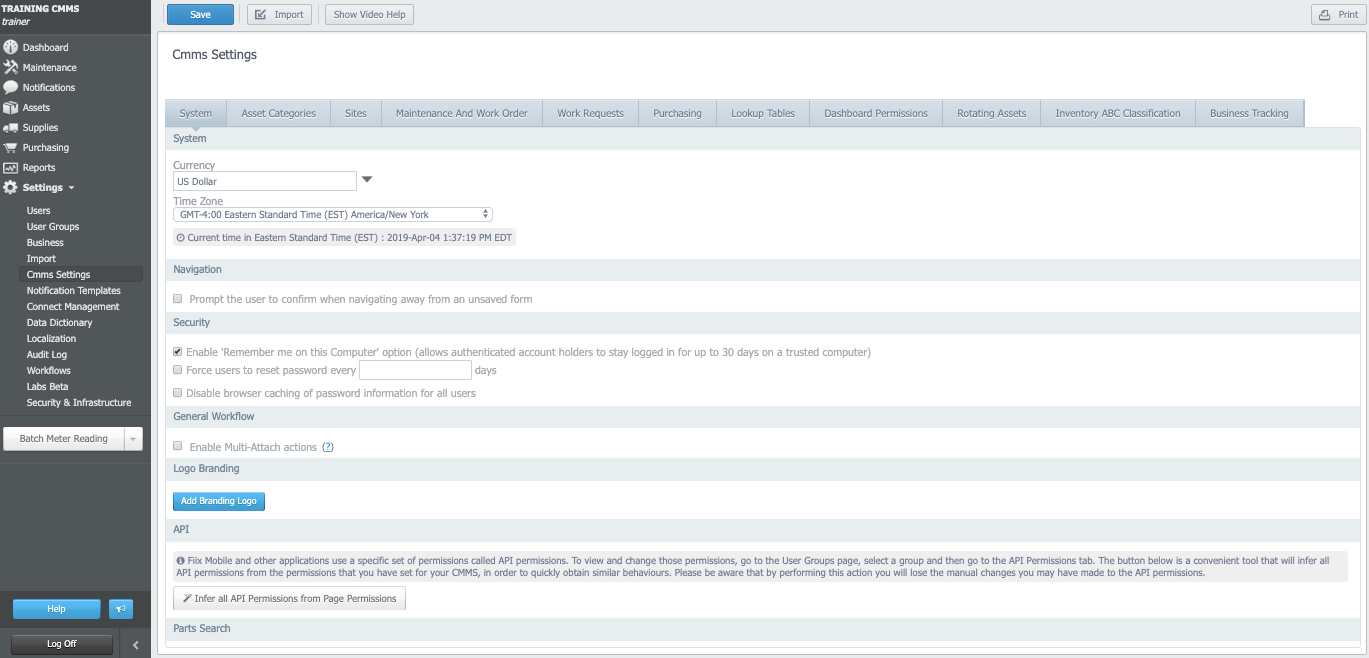
System
Currency – the monetary denomination that will be applied to all financial transactions in ZenduMA.
Time Zone – the geographic region where your main site is located.
Navigation
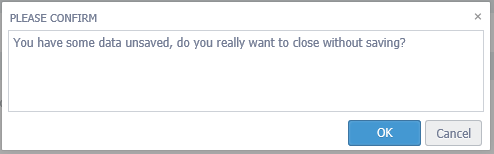
Prompt the user to confirm when navigating away from an unsaved form – with a checkmark in this field, the user will receive a popup warning if they have made changes to a record, try to navigate away from the record and have not clicked save. Clicking OK on this prompt will allow the user to leave the record without saving changes. Clicking Cancel of this prompt will return the user to the record where they can review changes and save if necessary.
Security
Enable 'Remember me on this Computer' option (allows authenticated account holders to stay logged in for up to 30 days on a trusted computer) – if this checkbox is selected then a user’s browser will “remember” the user login and password, not requiring the user to login each time ZenduMA is launched. This field should not have a check in the box
Force users to reset password every [ ] days – if populated, user will be forced to change their ZenduMA password every “X” number of days, where X is the value populated in the field. This field should not have a check in the box
Disable browser caching of password information for all users – if this checkbox is selected then the users browser will not be allowed to auto-populate with a user id and password, users will need to manually login each time they launch ZenduMA. This checkbox should be selected
General Workflow
Enable Multi-Attach actions – if this checkbox is selected the user will be able to select multiple assets or parts when presented with an asset or part search form instead of having to select one item at a time. This checkbox should be selected
Logo Branding
Add (Edit) Branding Logo – Clicking this button will allow the user to upload an image file (.png ONLY) that they would like to have appear as their company logo on the login pages and all reports.
Asset Categories
Asset Categories are used to group similar records together for the purpose of reporting, sorting and custom field usage. You can add as many asset categories as you please. It is important to choose the correct parent category when creating new categories (you will have to decide which category to use as the parent category based on your own personal needs). To create custom asset categories click the “Add” button.
In the example above, a new category called “National Deliveries” is being created with a parent of “Delivery trucks”. After clicking “OK” you should now see your new subcategory directly below your Delivery truck category
These new categories will now be available for you to choose from when creating new assets.
Sites
The sites tab allows the user to identify facilities as a site, instead of just a location within a site. Once a site is created, Users and User Groups can be assigned to that site. To add a site, you must first create the location within the asset module (see Assets above) then click the “Add” button
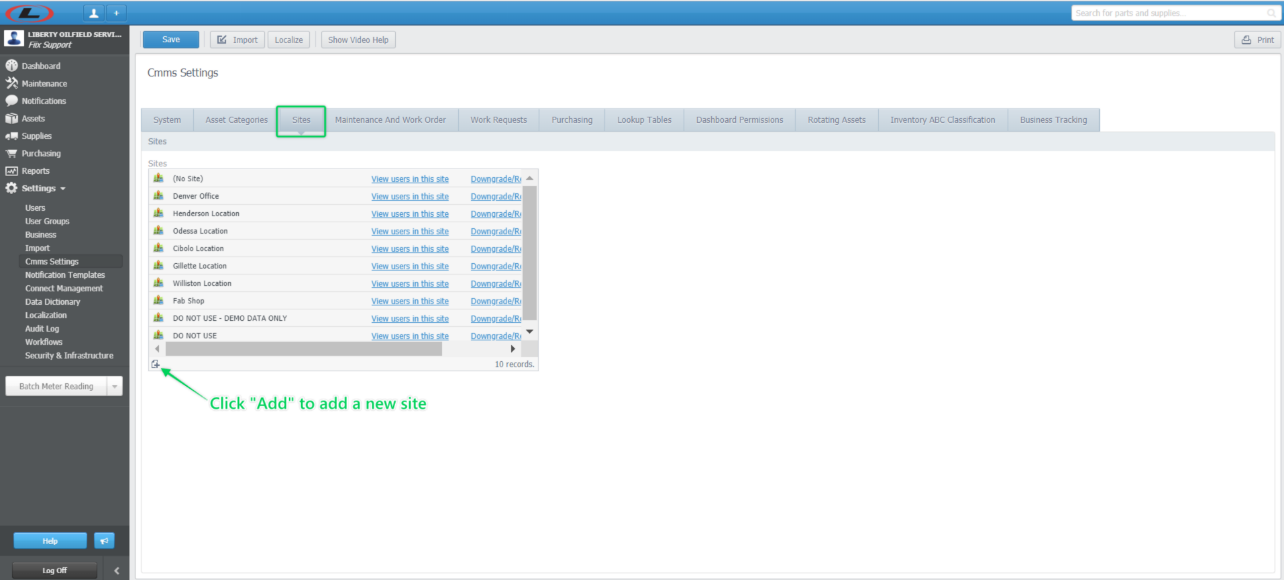
On the Add Site popup form, click the dropdown and select the location that you wish to promote to a site then click “OK”

After adding the site, be sure to go back to Users and assign users to the site.
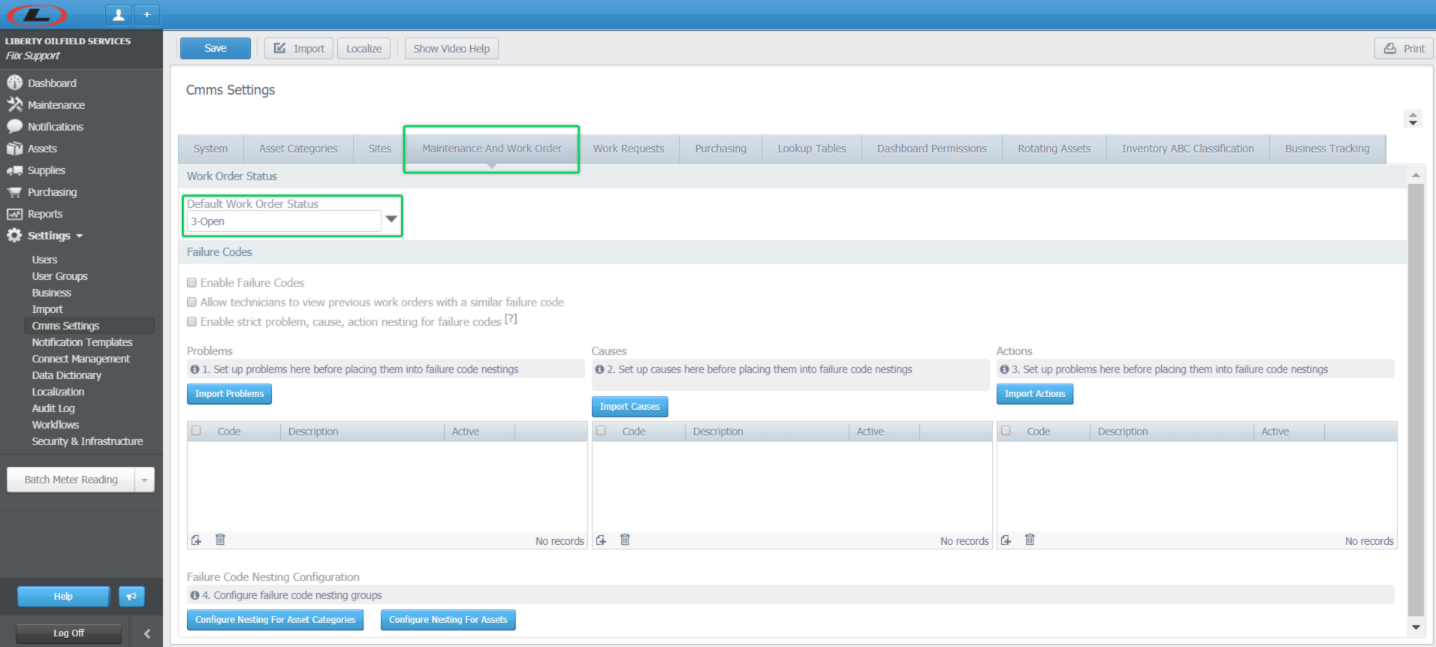
Maintenance and Work Order
This tab allows you to define which status will populate (by default) a work order when you click the new button in the work order module.
Work Requests
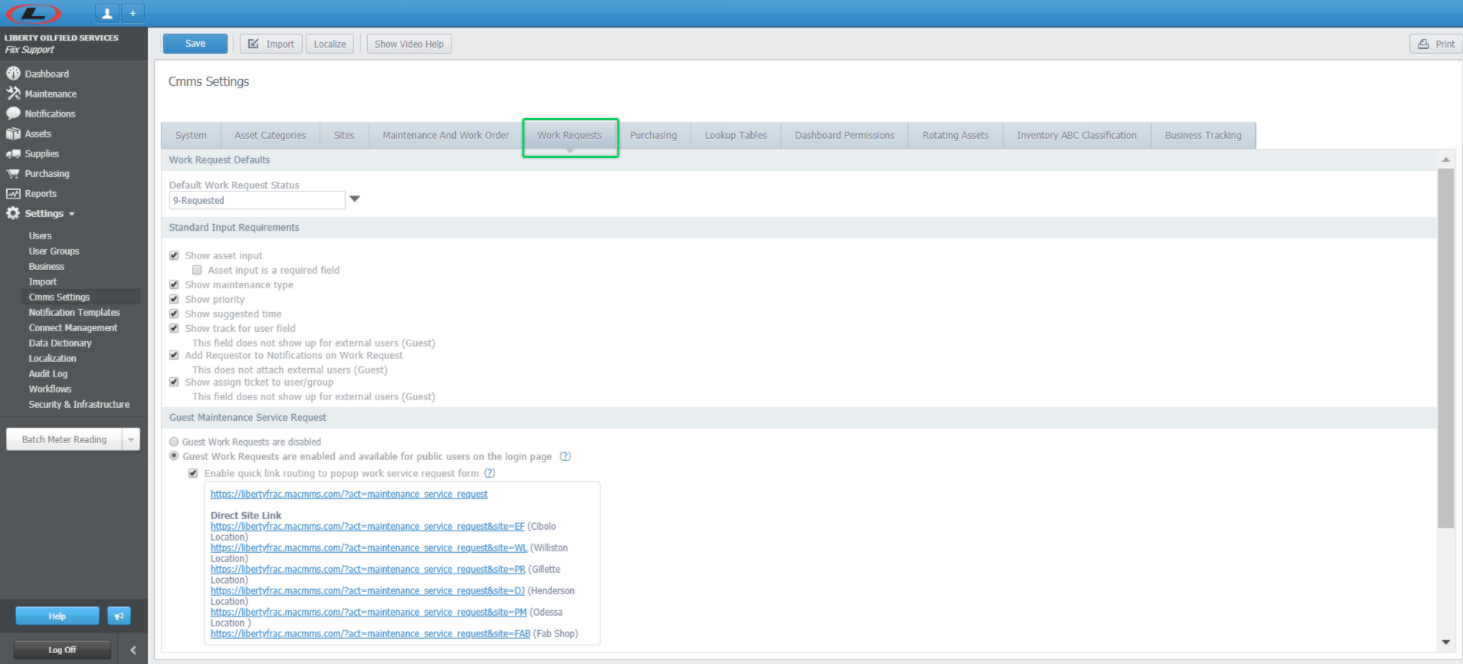
The Work Requests tab is where the user can configure the settings for how the Work Request module will display to the requestor.
Work Request Defaults
The Default Work Request Status field allows you to define which status will populate (by default) a work request when you click the work request form is opened.
Standard Input Requirements
This section allows the user to determine which fields should be displayed. Settings have been configured as follows:

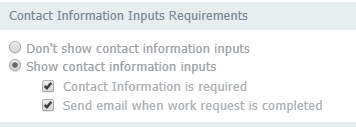
Contact Information Inputs Requirements
This section allows the user to identify if contact information for the requestor are available/required.
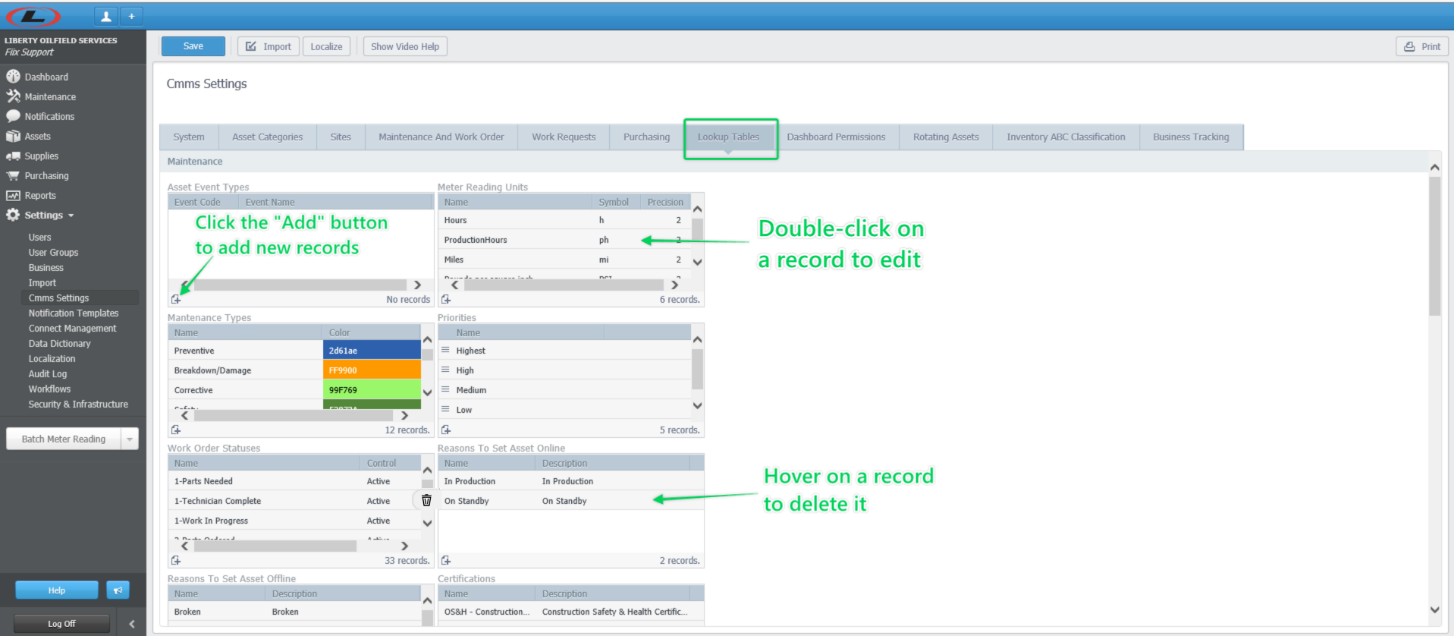
Lookup Tables
With the exception of Asset Categories, the maintenance of all user definable dropdown lists is performed in the Lookup Tables section of the CMMS. This tab allows you to: add, delete or modify values in each table.
Glossary:
API: An API is a set of routines, protocols, and tools used to build a software application. An API determines how different software components will interact with one another.
Assets: In ZenduMA, it is defined as any tangible object that requires maintenance to be performed on or to that holds a transactional value.
Work Order: A work order is a request for a task or a repair to be completed. It can be produced manually through a request submitted by a worker or client, or automatically, according to a predetermined schedule. Work orders allow teams and workers to document problems, share information, and track the work that is to be performed to solve that problem.
Supplies: Consumable parts that do not need maintenance on or to, but rather can be replaced with newer or other parts.
User Groups: Specialized groups that each user in is assigned to within the ZenduMA Software.
Scheduled Maintenance: The Schedule for which each of your work orders will be generated for your preventative maintenance. This is asset(s) specific and will have a time based, meter based or event-based trigger. It can also contain Nested PM’s which will allow a user to consolidate PM’s together if they are on the same piece of equipment and landed on the same date in a given cycle.
Projects: The Project tab is meant to allow users to track maintenance activity for projects that have a start date and an end date. It is widely used to segregate and sort maintenance activity to unveil labor cost, parts and supplies cost and time timeline tracking on perspective projects.
Work Request: Is a work order in a pending state, it usually requires an approval from a manager or supervisor to change the work request into an active work order.
Purchase Request: Is a purchase order in a pending state, it usually requires an approval from a manager or supervisor to change the purchase request into a purchase order.
Designer Reports: Reports that you can “duplicate” and modify.
Static Reports: Reports that you cannot duplicate and modify.
BOM: Bill of Materials is the list of parts that are associated with an asset. It is often a list of parts with the quantity required on a given asset.
Event: In ZenduMA, an event can be set up on an asset to both track certain events that are occurring and to “trigger” a work order to be created (if this is how the user has set it up).
MTBF (Mean Time Between Failures): Mean time between failures, or MTBF, can be described as the average time between system or component breakdowns. It’s a great way to quantify a system or component’s reliability. It is usually measured in hours and does not include repair time. It can allow you to take part in preventive actions in order to avoid failure.
MTTR (Mean Time to Repair): Mean time to repair, or MTTR, refers to the average time needed to troubleshoot and repair equipment in order to get it up and running again. It encompasses the amount of time between the start of an incident and when equipment is operational again, and ultimately measures how well an organization is able to respond to a problem and fix it.
QR Code: (abbreviated from Quick Response Code) is the trademark for a type of matrix barcode (or two-dimensional barcode) first designed in 1994 for the automotive industry in Japan. A barcode is a machine-readable optical label that contains information about the item to which it is attached.
Maintenance Types:
Preventive: Preventive maintenance is work that is performed regularly on equipment to ensure it does not fail. This kind of maintenance is performed while the equipment is working and functional, so that it doesn’t break down unexpectedly. The timeline by which preventive maintenance is scheduled can be time-based (ex. once a year) or usage trigger-based (ex. after the equipment has been in use for a certain number of hours).
Multi- Tenant: Multi-tenant refers to a software application running on one server, but serving multiple customers, or tenants, in multiple locations. Conversely, single-tenant refers to one server supporting one customer.
Breakdown/Damage: This maintenance is performed when a piece of equipment has broken down and/or is damaged and need to be fixed.
Corrective: This maintenance is performed when a piece of equipment has broken down and needs to be restored so that it can be used again. The obvious advantage of this type of maintenance is that it is only ever performed when it’s needed. Of course, the downside is that unexpected downtime due to a piece of equipment failing can be expensive and impractical.
Safety: Health and safety related work orders that are not in the “Preventive” or Scheduled maintenance category may be considered as “Safety”. An example of a Safety work order may be to clean up a spill on the floor and put pylons around it.
Upgrade: Work Orders that are deemed as “Upgrade” are for equipment that not necessarily broken or damaged but is being upgraded with new parts or replaced by another piece of equipment.
Project: Work Orders that are part of a particular project.
Meter Reading: Work Orders that are generated for the purpose of capturing meter readings or runtime hours on a particular piece of equipment.
Related Articles
Work & Products - User Guide
This document is intended for: Dispatchers, Operations Managers, Admins, and Business Owners using the platform to manage jobs, products, and marketplace offerings. What is covered in this guide (8 Items) 1. Introduction 2. Module Overview 3. ...ZenduMA (Fiix) - Admin Guide
Standard Operating Procedures- Admin Guide Table of Contents Background 4 What is a CMMS? 4 What does a CMMS do for an organization? 6 When entering data into the CMMS, it must be: 6 Why a Standard Operating Procedures manual? 7 Basic Account ...ZenduONE User Guide
Introduction ZenduONE integrates both hardware and software components to deliver a comprehensive video telematics solution aimed at boosting fleet safety and efficiency. Through features such as real-time video streaming, event-triggered recordings, ...Driver's App - User Guide
Driver App User Guide Welcome to the Driver App User Guide! This step-by-step manual will help you get started, explore all app features, and make the most of your experience. For each section, you’ll find detailed instructions, tips, and a space to ...ZenduMA - Adding Equipment assets
This article explains how to add equipment assets: Setting up your equipment assets is similar to the Add Locations and Facilities procedure. You can add as many pieces of equipment as you like, and you can also shape your hierarchy, creating ...