ZenduIoT User Guide
Introduction
Getting started
Database Setup
Recommended Setup Flow:
Setting up Groups
Setting up Users and Roles (Security Clearance)
Setting up Assets
Setting up Rules
Setting up Locations
Setting up Groups
Setting up Users and Roles (Security Clearance)
Setting up Assets
Setting up Locations
Setting up Forms
Setting up Products
Setting up Groups
Setting up Users and Roles (Security Clearance)
Setting up Beacons and Gateways
Setting up Custom Indoor Map and Placing Gateways
Setting up Locations inside Indoor Map
Groups Overview
ZenduIoT's group management functionality is designed to make fleet organization and asset categorization a breeze. This guide outlines how to create and manage groups effectively through the Admin settings.
Why Use Groups?
Groups serve as a fundamental tool in organizing your fleet, especially when dealing with multiple vehicles. You can categorize assets by departments, locations, or asset types, making it easier for reporting and monitoring purposes. For example, you can assess which location has the most equipment in use.
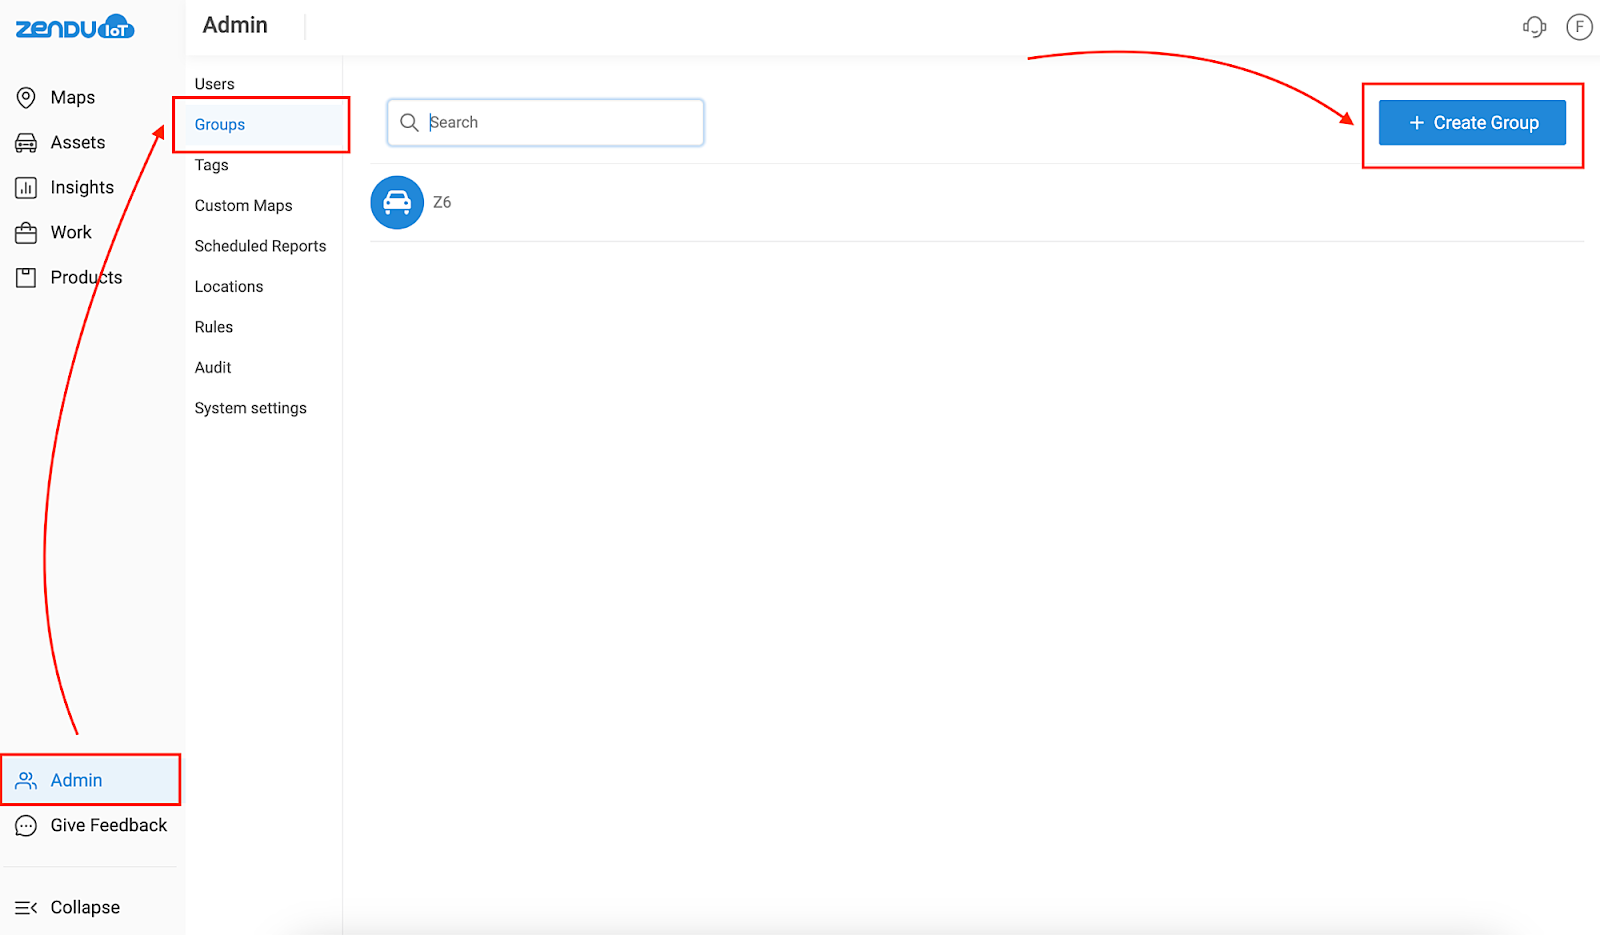
Creating a New Group
- To begin, navigate to the Admin settings within your account.
- Within Admin settings, you'll find the "Groups" section.
- Click on "+ Create Group," which is located on the top right corner of your screen.
Group Configuration
On this page, you'll need to provide the following information:
- Parent Group: Decide if the group you're creating has a Parent Group or a Sub-Group. Parent groups serve as the primary category under which sub-groups can be organized.
- Name: Assign a name to your group.
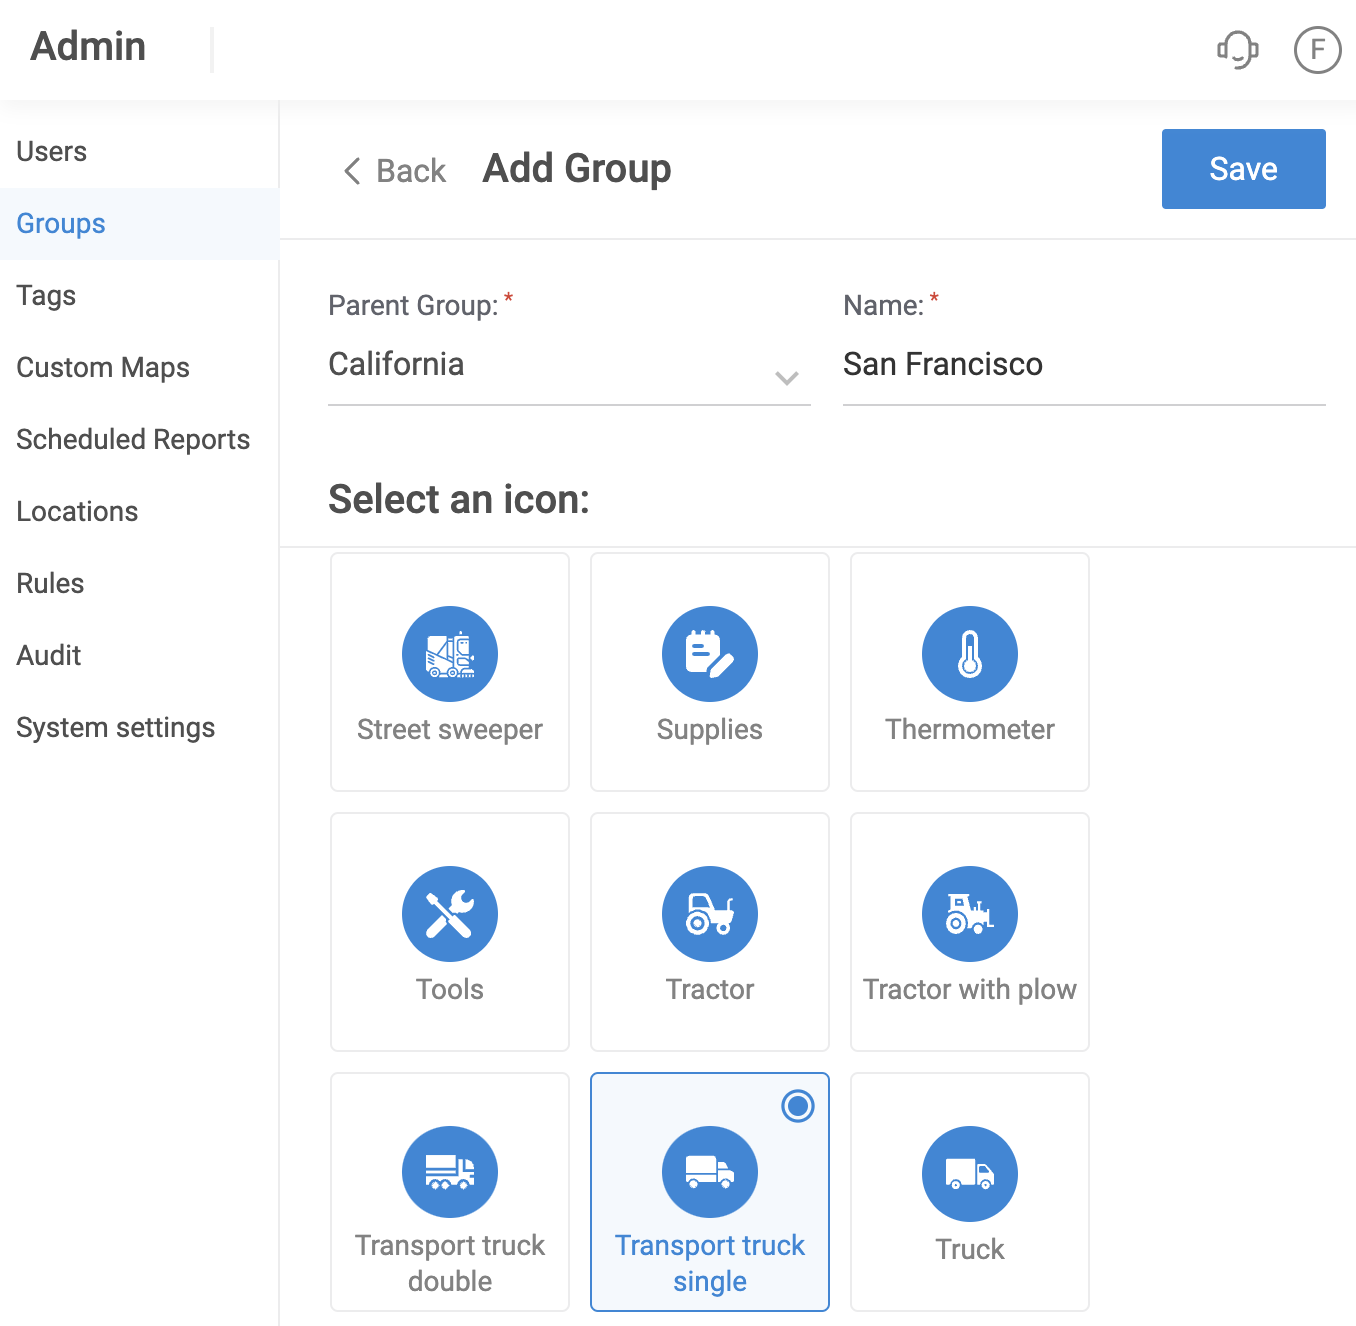
- Select an Icon: You can choose an icon that represents your group visually.
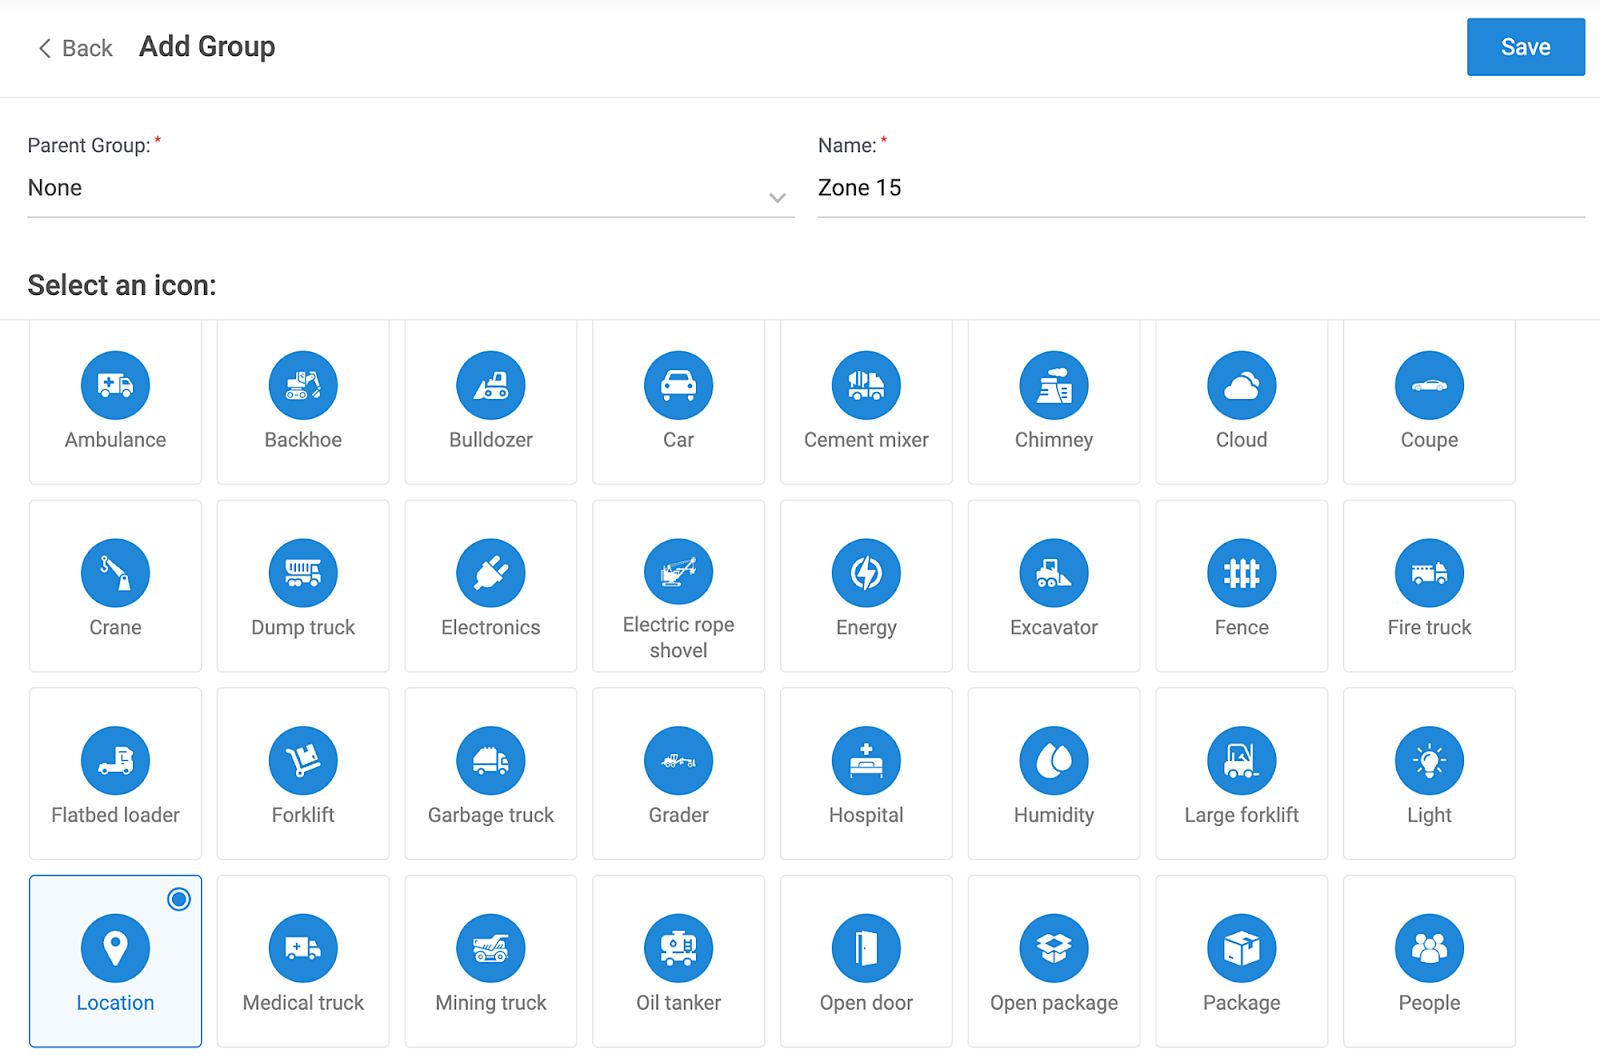
Once done, click "Save" on the top right corner of the screen.
 Remember: Parent Groups are the primary categories under which sub-groups can be added. This allows you to segregate and organize your assets according to your organizational or categorization preferences.
An Illustrative Example of Groups
Let’s take as an example that you have a fleet operating in California In this case, you would create a group for California.
Since this is the highest level of grouping and you are organizing your assets by location, the California group would not have any parent groups.
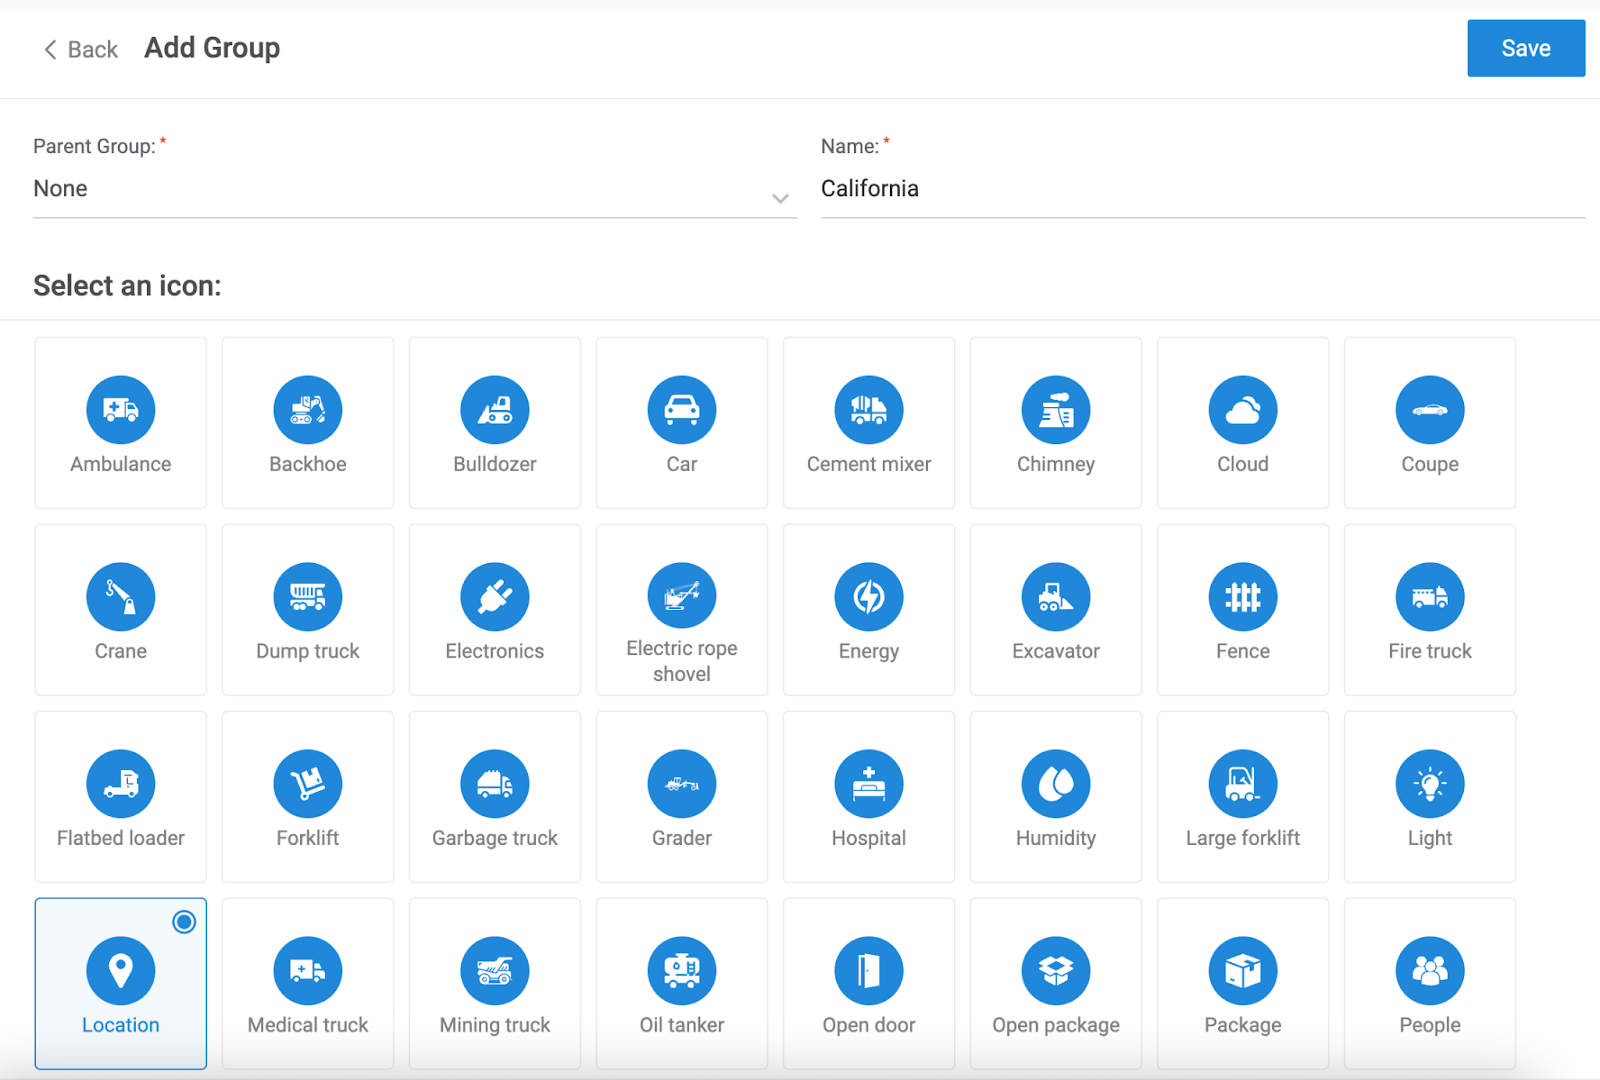
However, your California fleet operates in different locations, such as San Francisco and Los Angeles. This is where you would create sub-groups and designate California as the parent group for both.
You can continue this hierarchy by adding sub-groups to existing sub-groups, allowing for detailed organization.
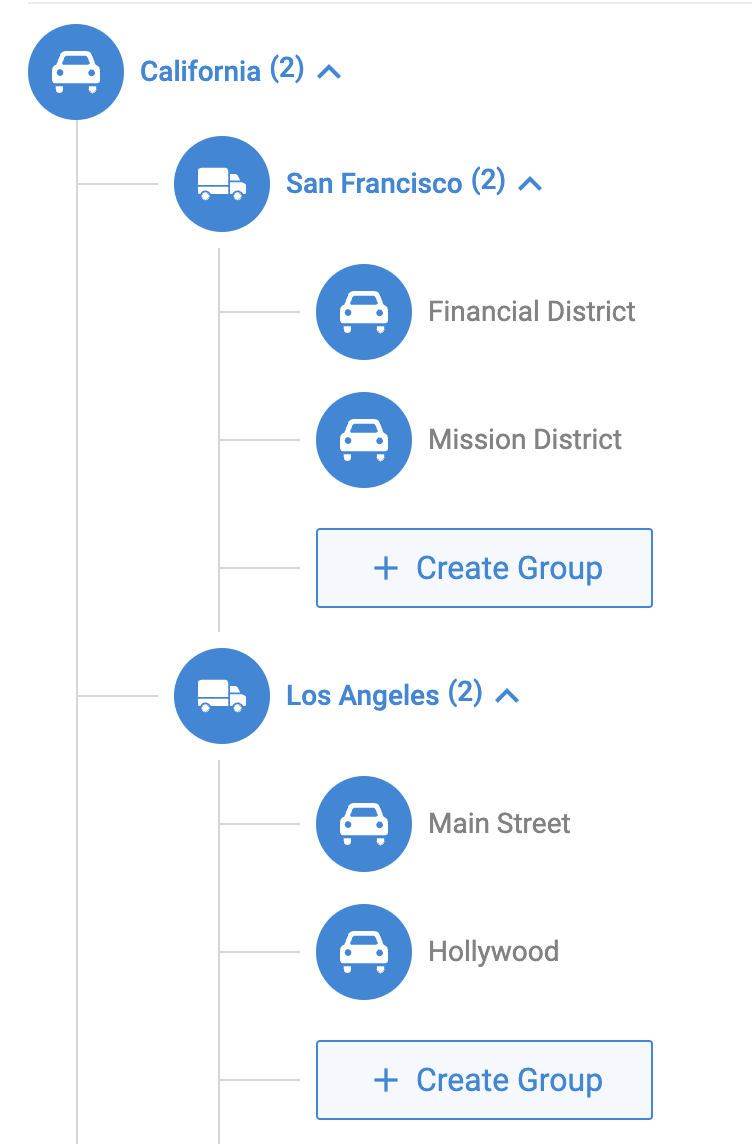
Furthermore, if you have a dedicated fleet manager in the Los Angeles group and want to restrict their access from viewing other groups, the significance of groups becomes apparent.

Assigning Users and Assets to Groups
Users and Assets can be assigned to Groups either at the time of creation or when editing and being managed. Please see the next sections on User and Asset creation/management.
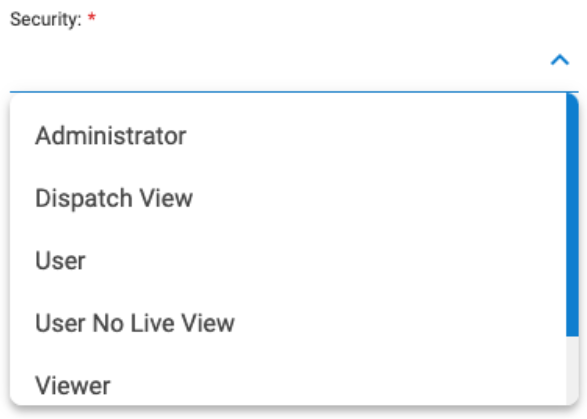
Security Clearances
- Administrator (Full access)
- User (Map & Insights access only)
- User No Live View (Map & Insights access only with no ability to livestream)
- Viewer (Map access only with no ability to livestream)
- No Access (Usually used for drivers, just to keep them registered in the system)
Locations
On the Map Overview screen, you’ll notice a "Create Location" button. Click on this button to begin setting up your location.
When prompted, you can choose between two location shapes - a circle or a polygon. For this example, we'll select "polygon."
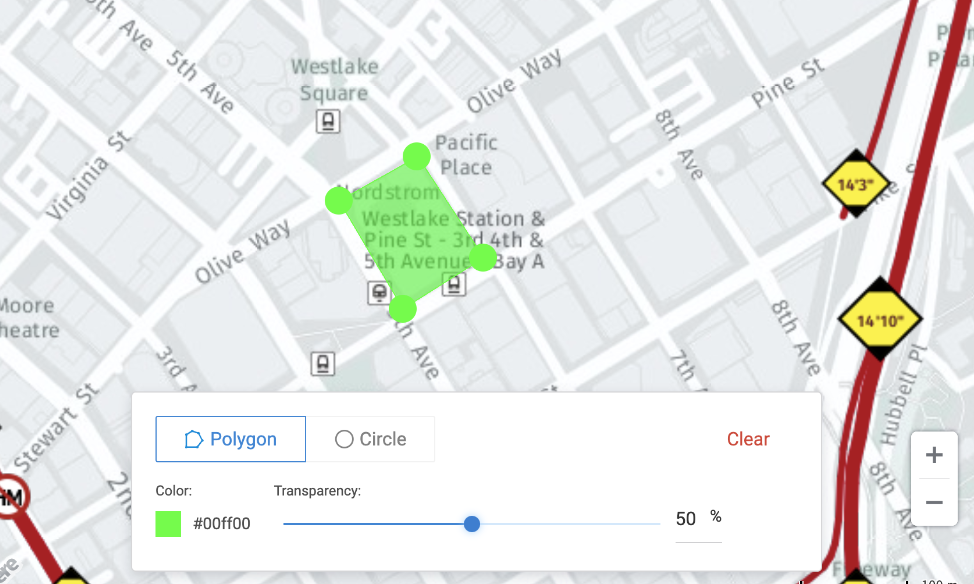
After creating the location, you can adjust the transparency on the map. If you mistakenly select an area, you can rectify it by clicking the "Clear" button, allowing you to initiate the location setup process again.
On the left side of the screen, you will be asked to input the information for that specific Location you just created.
- Name: Assign a name to the location
- Group: Assign the location to any relevant groups you have in your account.
- Tag:
- Customer
- Home
- Office
- Vendor
- Address: Search for the exact address you want to display for this location.
- Unit Number: Choose the unit number associated to this location. For example, if you have two offices, you can differentiate them by unit number.
- Notes: Add any additional notes as desired
If you select "Customer" as the Tag type, then additional fields will appear for you to input "Customer Details" associated with this Location. 
- Under the "Stop Duration" field, you can select for how long your fleet is allowed to be at that location. If the duration exceeds the defined stop duration limit, it will generate an "Exception" for that vehicle.
- The "Customer" tag allows you to get detailed reporting for a specific location. For example, if you’d like to know how many times a customer location has been visited, you can extract that from the reporting by selecting this zone.
Rules

Rule Page Overview
In order to access the Rules in your account, Admin access is required. If you have admin access, navigate to Admin > Rules.
Custom Rules
Safety Management
Coaching Management
Custom Rules
This section starts empty upon account creation, allowing you to tailor rules to suit your business needs precisely. These rules enable detailed fleet monitoring, notifications, and coaching without affecting security or scoring measures.
Custom Rules are meant for operations only, they don't drive any of your security/safety or scoring measures.
Creating a Custom Rule
On the Custom Rule page, click on "+ Create Rule"
Fill in the Details
Name
Entities
Select who this applies to.
If you wish for this Rule to apply to a few groups or assets in particular, you can select the ones of your preference. Uncheck "Select All" and proceed to select either the Groups or Drivers you want this rule to be applicable for.
Description
Severity
Rule Conditions
Trigger Range. Select monitoring time: All Times, Company Working Hours, or Custom.
- Rule Source. Choose the device to track this rule. The list will populate with the devices registered in your account.
- Rule Type. Select one of the options available in the drop-down menu.
Trigger Actions. In this section, you can edit the Trigger Actions if the Rule is violated (and marked as an Exception). Choose between:
Save video to Cloud
Save Snapshots. Select the length of the Snapshot to be sent.
Send Event Notification. Under Event Type, choose the type of notification to be sent. You can set multiple notifications per rule trigger by clicking the green plus button.
Email or SMS: Select who the email/message will be sent to. You can select for it to be sent only to the driver, or a custom email address. If you selected Custom, proceed to check the users that should receive a notification. The list will be populated with the users previously registered in your account. Edit the message you want to send every time the rule is violated.
- Text to Speech (only available on ZenduCAM cameras): When the rule is triggered, an audio coaching message will be played for the driver. You can customize this message in the given field, but keep in mind that there is a maximum of 150 characters.
Send for Review/Coaching. This will send an email notification to the selected users. Choose between sending the notifications immediately or daily.
Once you have customized the Rule according to your preferences, click Save.
Safety Management
These General Safety Rules can be customized according to your preference and the needs of your business.
Turn the Rule on/off by clicking on the toggle button next to the title
Customize the severity of every Rule
Use the quick actions on the right of the Rule to
Save Video to Cloud
Send Email/SMS text
Edit the Rule in more detail
If you click on the Edit Rule button, it will take to the screen where you're able to edit the rule in more detail.
Please note that Details and Rule Conditions can't be edited for the General Safety Rules as they are the default Rules created in the system.
Custom Rules Under Safety Management
After you have created your Custom Rules and personalized your Safety Management Rules (added by default in the system), you can now import your Custom Rules into your Safety Scoring.
- Under Safety Management, scroll down to Custom Safety Rules.
- Click on "+ Rule"
- Select the Rule you want to include and click Save.
This Custom Rule will now be under your Severity Configuration.
Coaching Management
Coaching Management allows you to review the infractions of your rules and provide the driver with the proper coaching and feedback to avoid these instances in the future.
Rules for Review and Coaching
In this section you can select which one of your Rules will go to a Needs Coaching status, instead of a Needs Review/Coaching Status. This comes in handy for the Insights > Exceptions page in your account.
Managed Video Review Service
If you have this added to your subscription, it shows which Rules are being sent to the team of professionals that review the infractions on your behalf.
Coach Assignment
In this section you can assign supervisors to your drivers. Select which users are responsible for those drivers.
Click on the Unassigned Drivers.
This will display the menu to assign Coaches to Drivers.
Proceed to select the Coach, assign the relevant Drivers and click on Save.
Users Overview
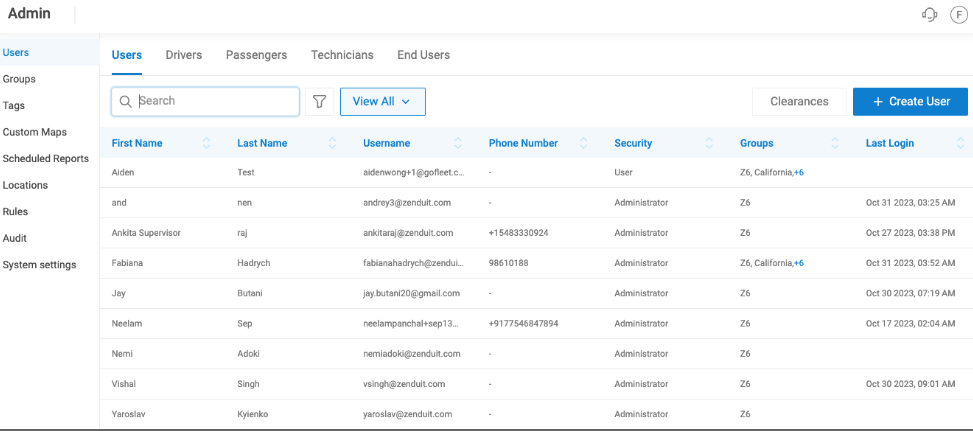
At the core of any business are its people, and ZenduIoT ensures that every key stakeholder can access your fleet management tool accordingly. The Users module is a crucial tool for your business, allowing you to manage and grant access to the right individuals effectively. Let's explore the User Overview screen and learn how to navigate its features.
User Screen Overview
Filters and Custom Views
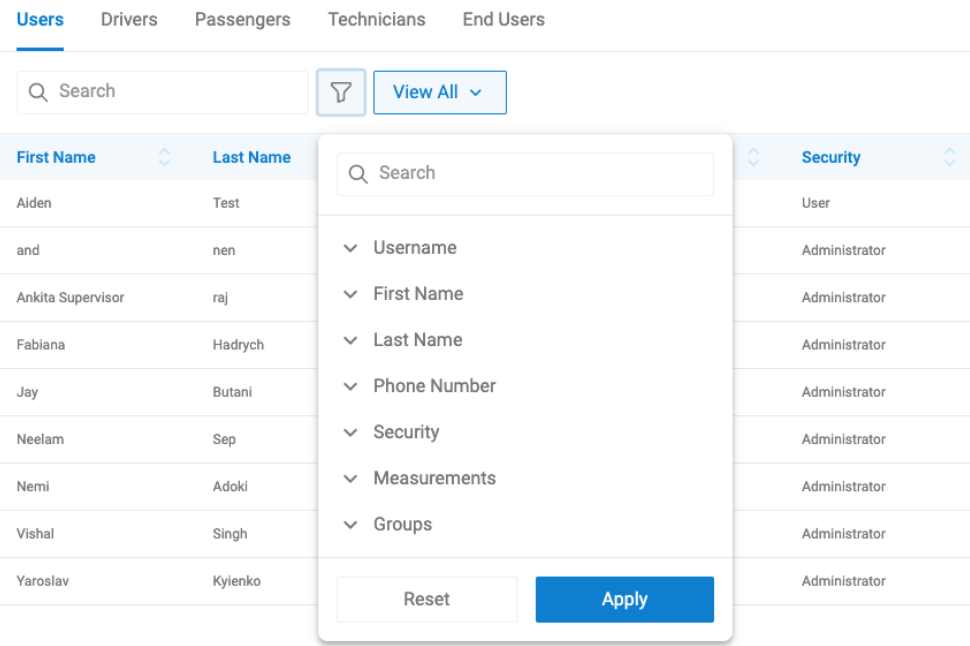
Right next to the search bar, where you can type in the name of a user and look them up directly, you’ll see a filter button.
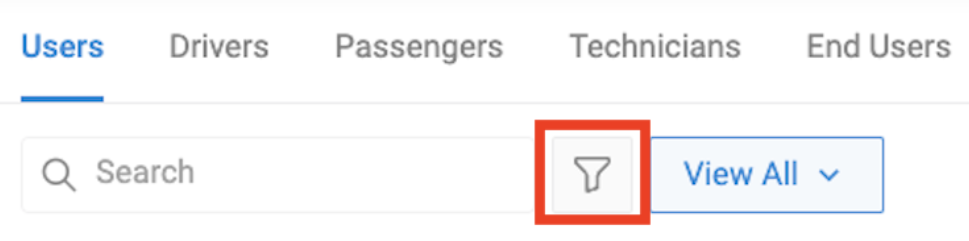
By clicking here, you’ll be able to filter your users according to:
- Username
- First & Last name
- Phone number
- Security
- Measurements
- Groups
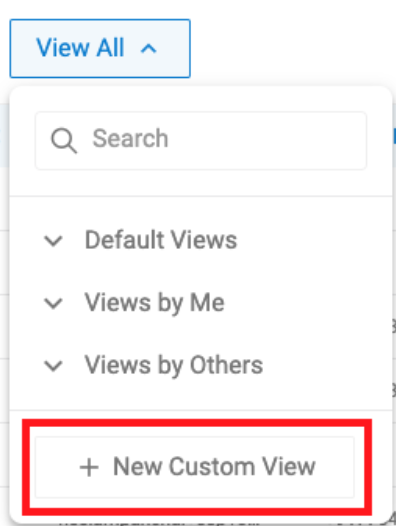
Next to the filter button, you’ll find the Views options.
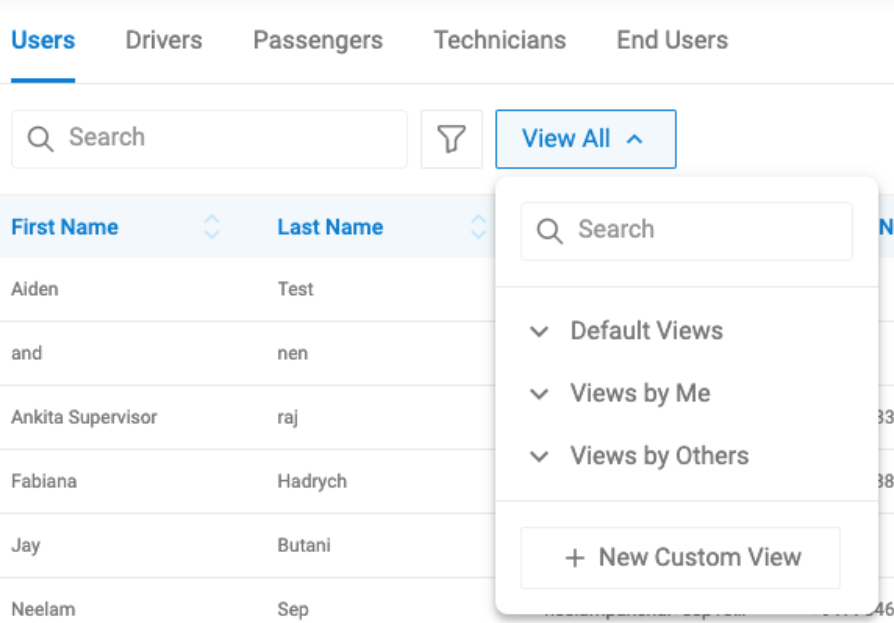
Views come in handy when you want to choose how Users are displayed on this main overview screen. You can either use the Default View that includes all users, or a Custom view.
To create a custom view, click on “+ New Custom View”.
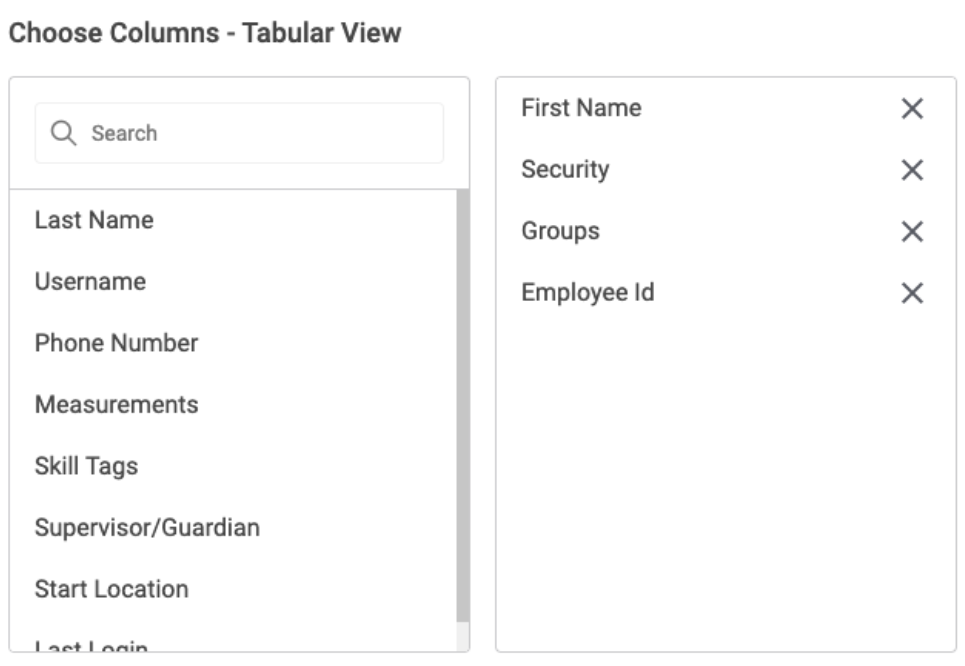
On the "Custom View" screen, you can select the columns of the information that you want to display.
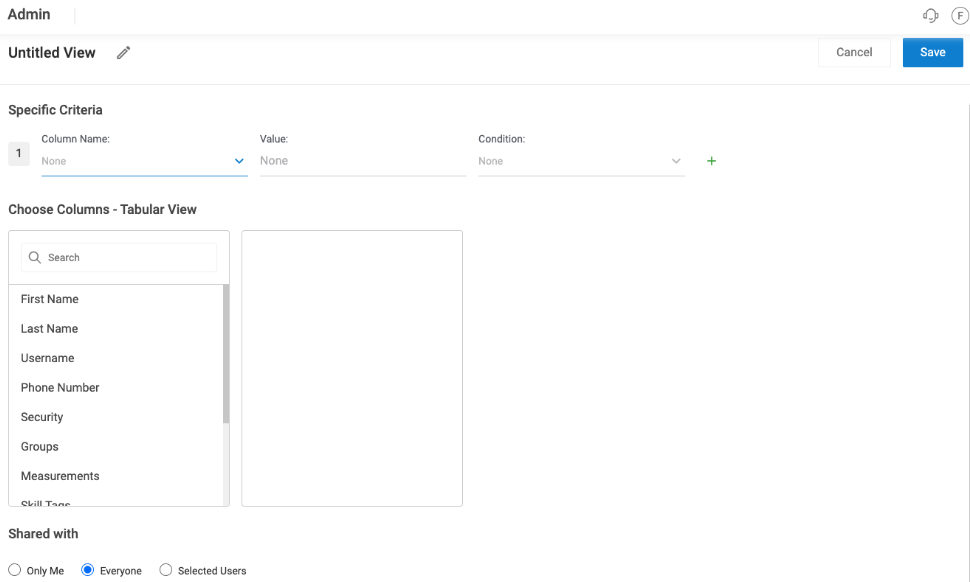
Start by naming your new custom view. Click on the "edit" icon (pencil) right next to the title.
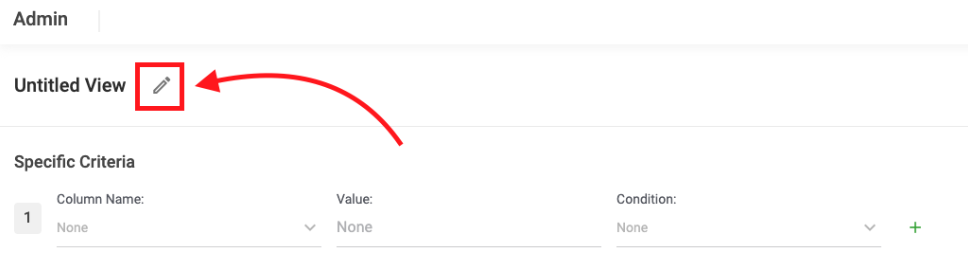
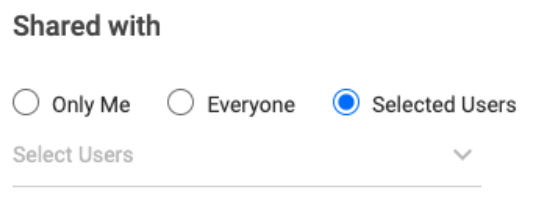
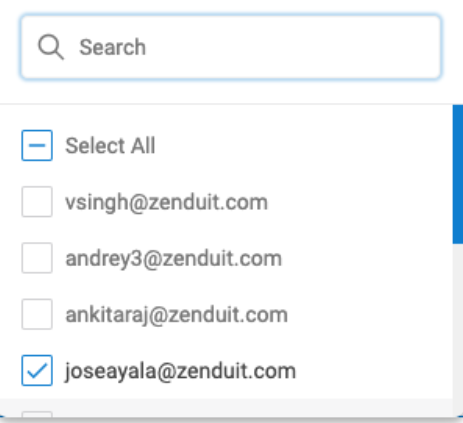
Last but not least, select if you want to share it with other users or keep the view just for you.
Once done, click on "Save" at the top right corner of your screen.
Adding a User
In order to add a new user, click on "+ Create User" at the top right corner of the Admin User Overview screen.
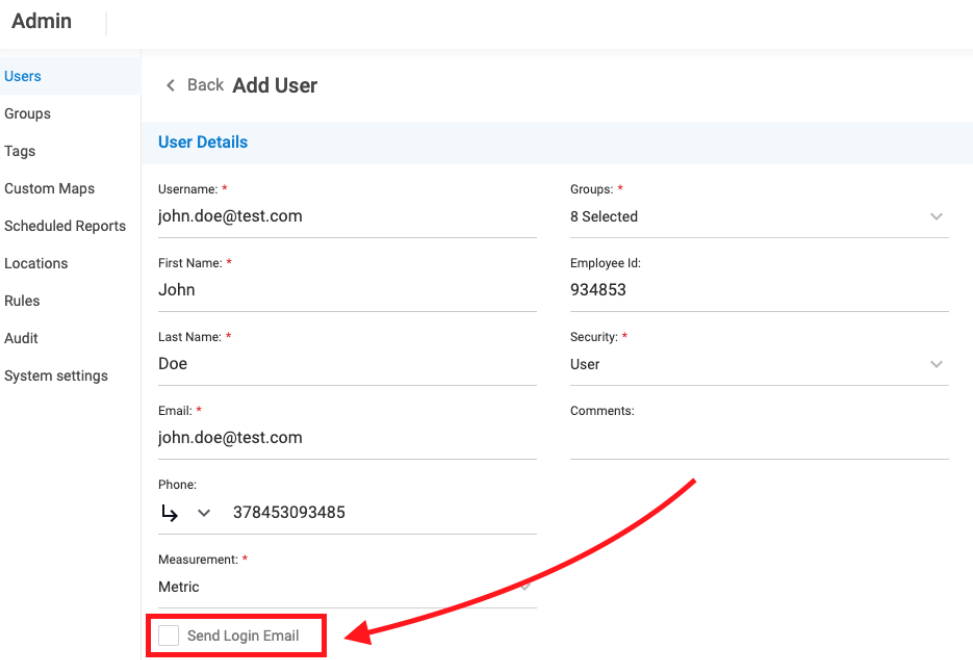
Proceed to fill in the required information for your user.

- Username (must be the same as the email address)
- Groups the user will be a part of and have access to
- First Name
- Last Name
- Employee ID
- Measurements (choose between Metric or Imperial systems).
- Security: choose between different clearance levels of access to the platform. You can also choose for them to have no access.
If you would like this user to access the platform, click on the “Send Login Email” option at the bottom of the screen to make sure they receive a set of credentials to access their account. They will be provided a system generated password which can be changed after the initial sign in.
Under Profile Details, you’ll be able to assign the user type:
- General User
- Driver
- Passenger (e.g., for a private driving business or private school bus company).
- Technician (commonly used when a business transports professionals to multiple locations).

Facial AI

- Must be on Enterprise plan: This feature is unavailable on Standard plan.
- Must position the camera in a way that clearly captures the driver's face.
- Must have Hyperlapse enabled at 1 or 10 minutes: This is how the camera captures snapshots for driver recognition.

- Low image quality
- Incorrect camera position (i.e. not front-facing)
- Poor lighting (i.e. nighttime view)
Assets Overview
Efficiently organizing and managing your assets is streamlined through the intuitive assets interface within our platform. Here's a comprehensive guide on navigating and utilizing the Asset module and the Asset Overview.
Asset Screen Overview
Click on "Assets" module on the left-side menu to view all registered assets in your account.
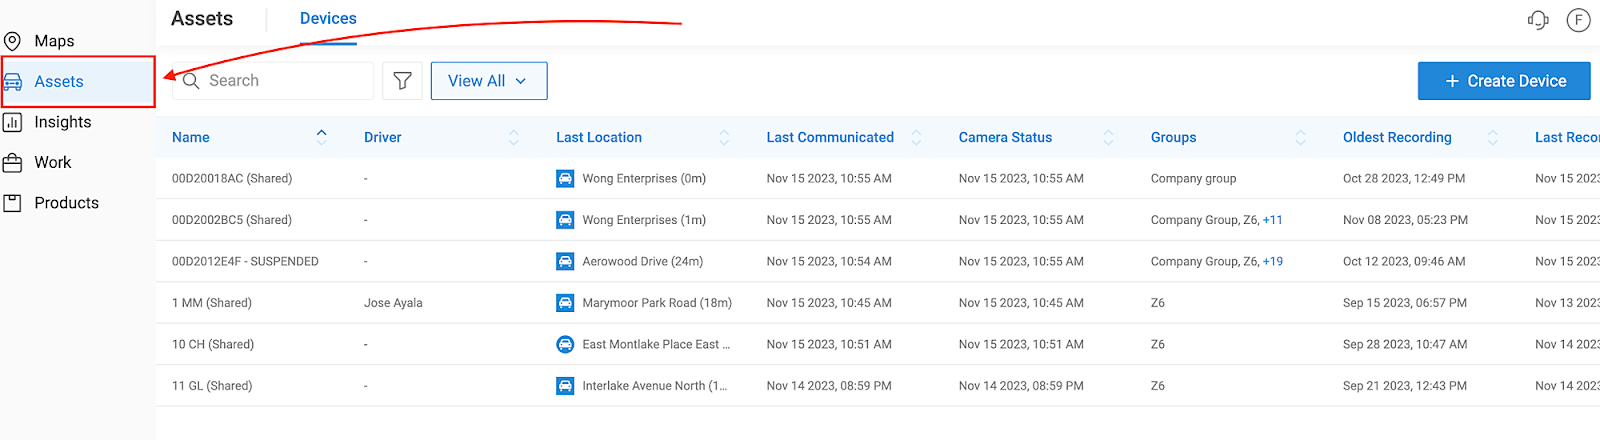
On this page you can see an overview of your assets details, including:
Name of the asset
Driver assigned
Last location recorded
Last time it communicated
Camera Status
Groups the asset has been assigned to
Oldest recording from the device within the asset
Last (or latest) recording
Recording health status
Additionally, you can search for a particular asset by Name key fields (Asset Name, Driver, Last Location, Groups, Third Party Telematics Serial, VIN).
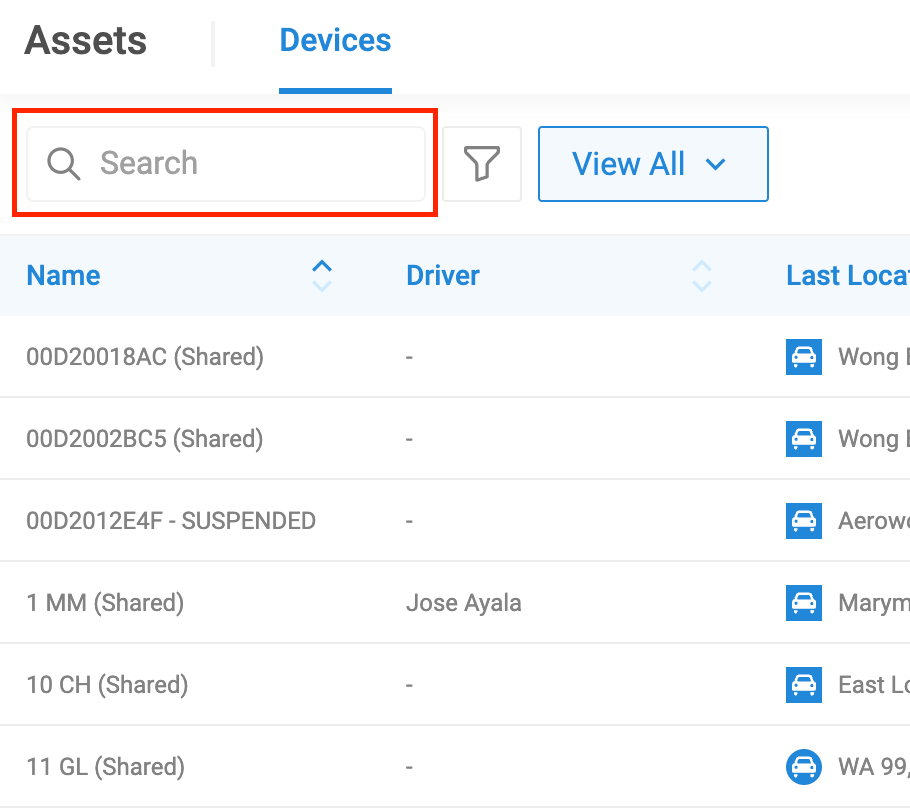
Filters and Custom Views
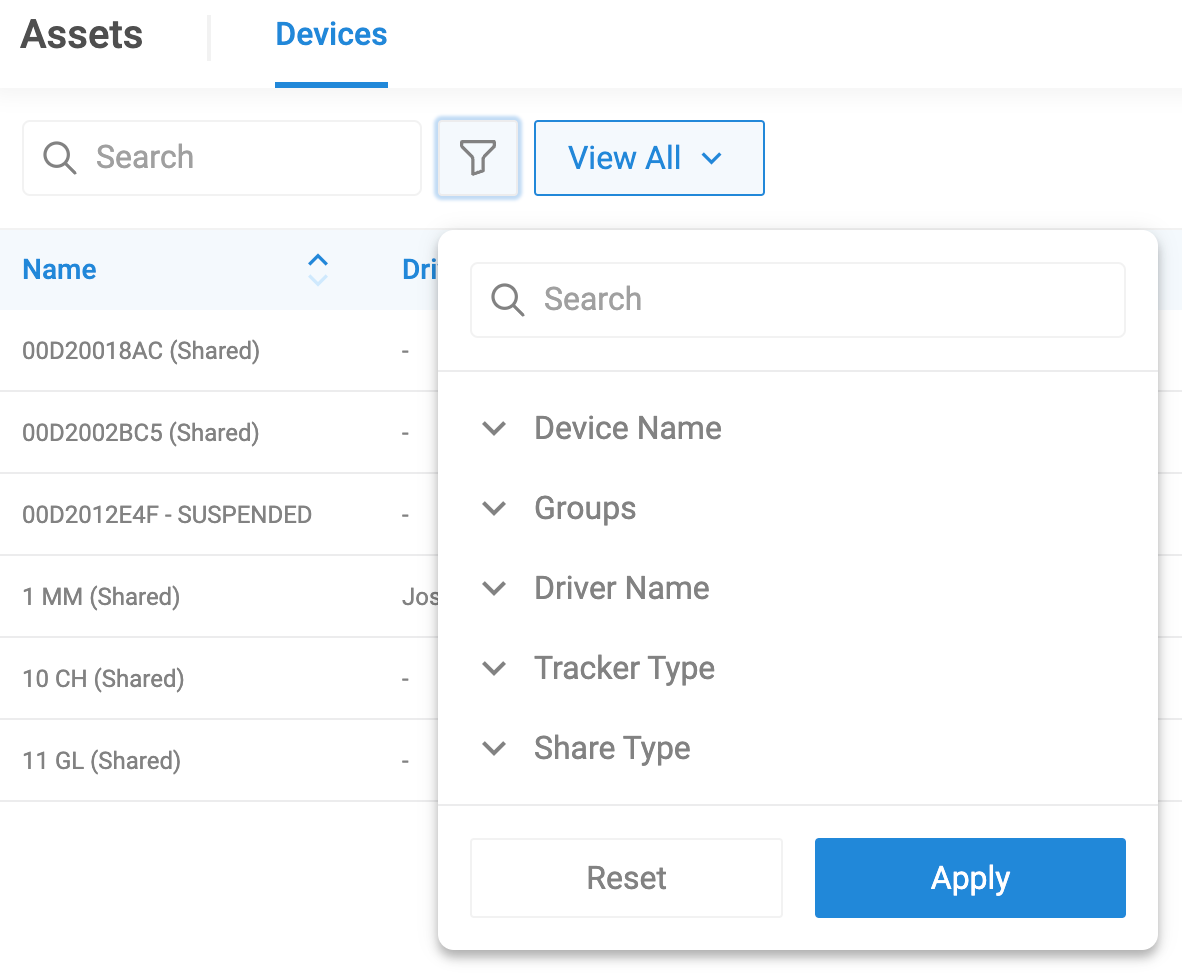
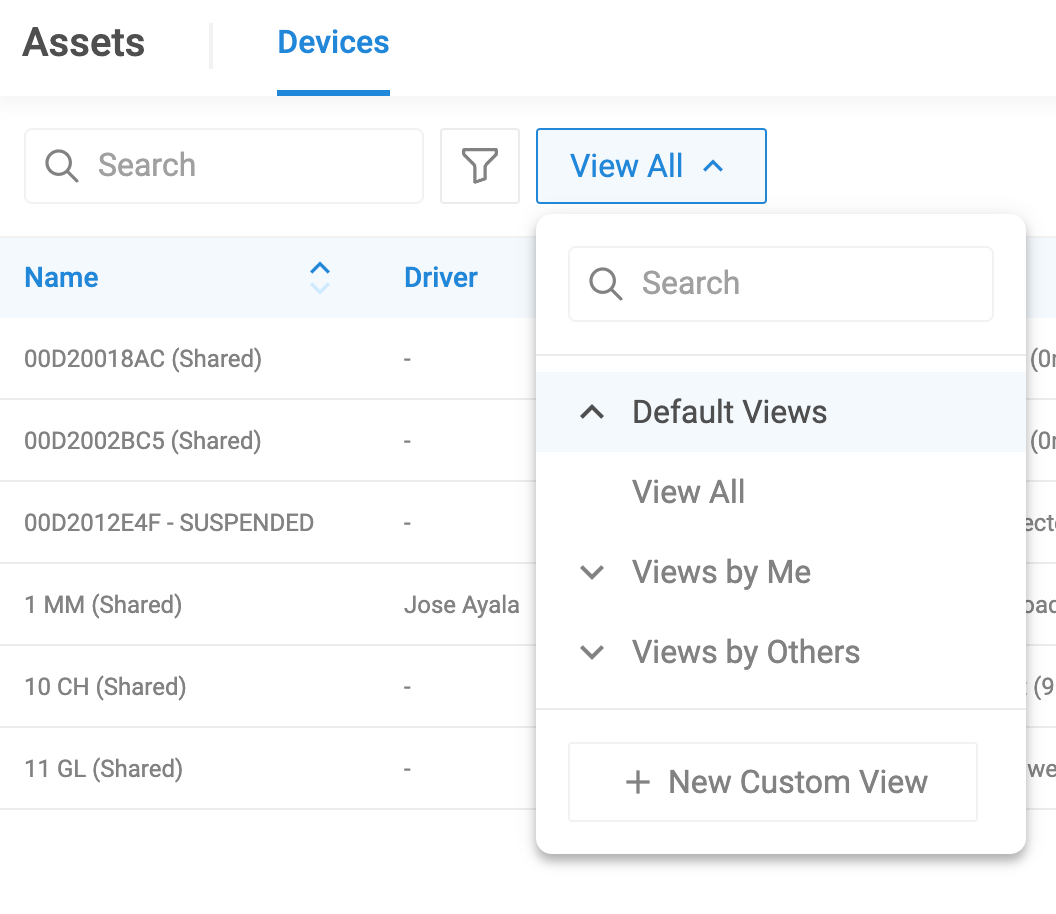
Default Views - Predefined by the system.
Views by Me - Custom views created by you (either private or shared with others).
Views by Others - Custom views created by other users that have been shared with you.
In order to create a Custom View, simply click on "+ New Custom View" and this will prompt the following screen:
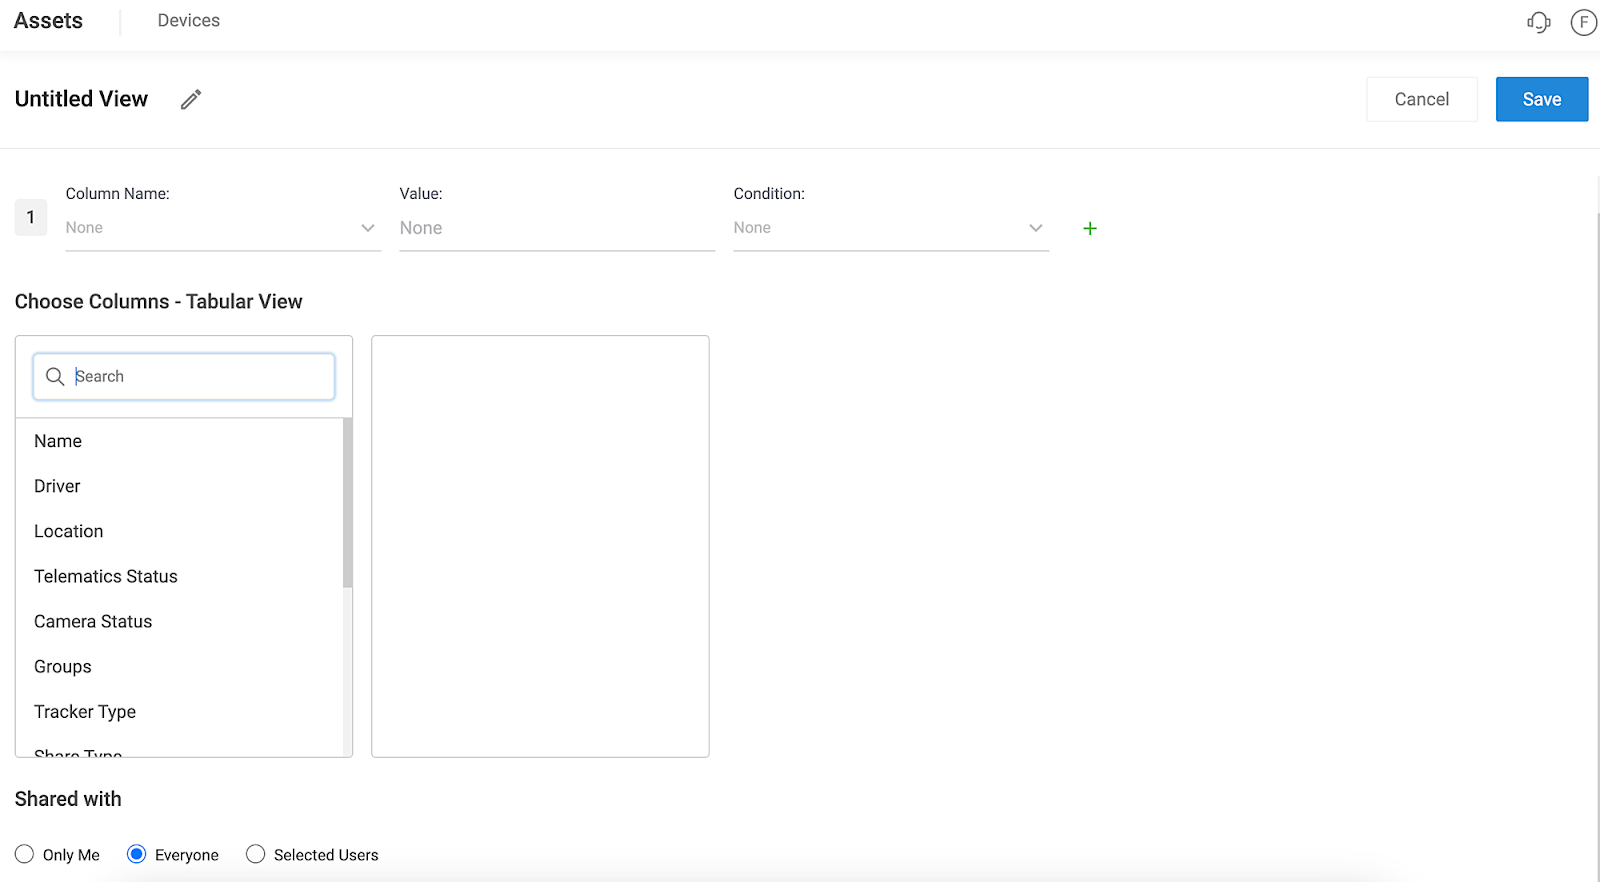
Start by naming your Asset view
Choose the columns you want to display
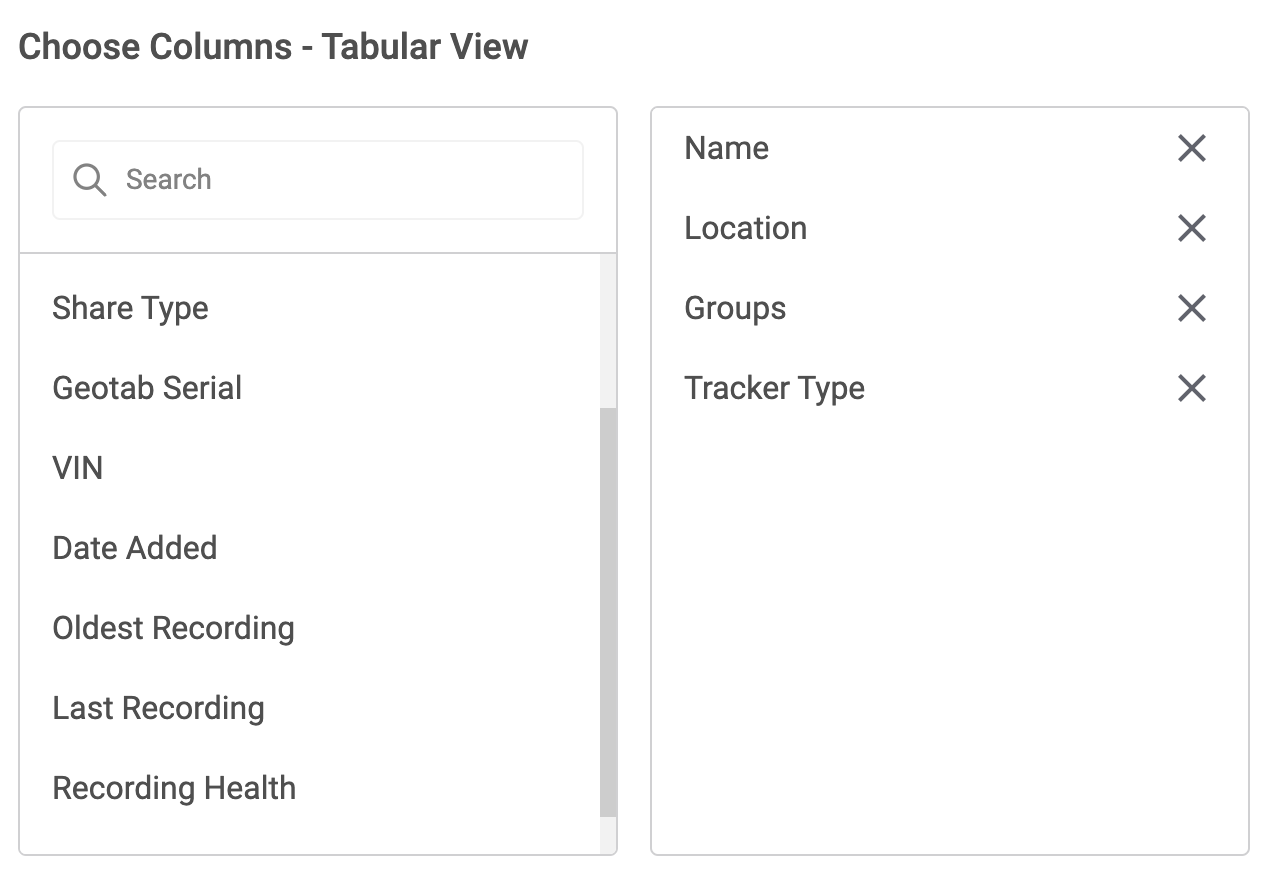
Select if you want this view to be private or if you want to share it with others
Adding a New Asset
Click on "+ Create Device" at the top-right corner to add a new asset.

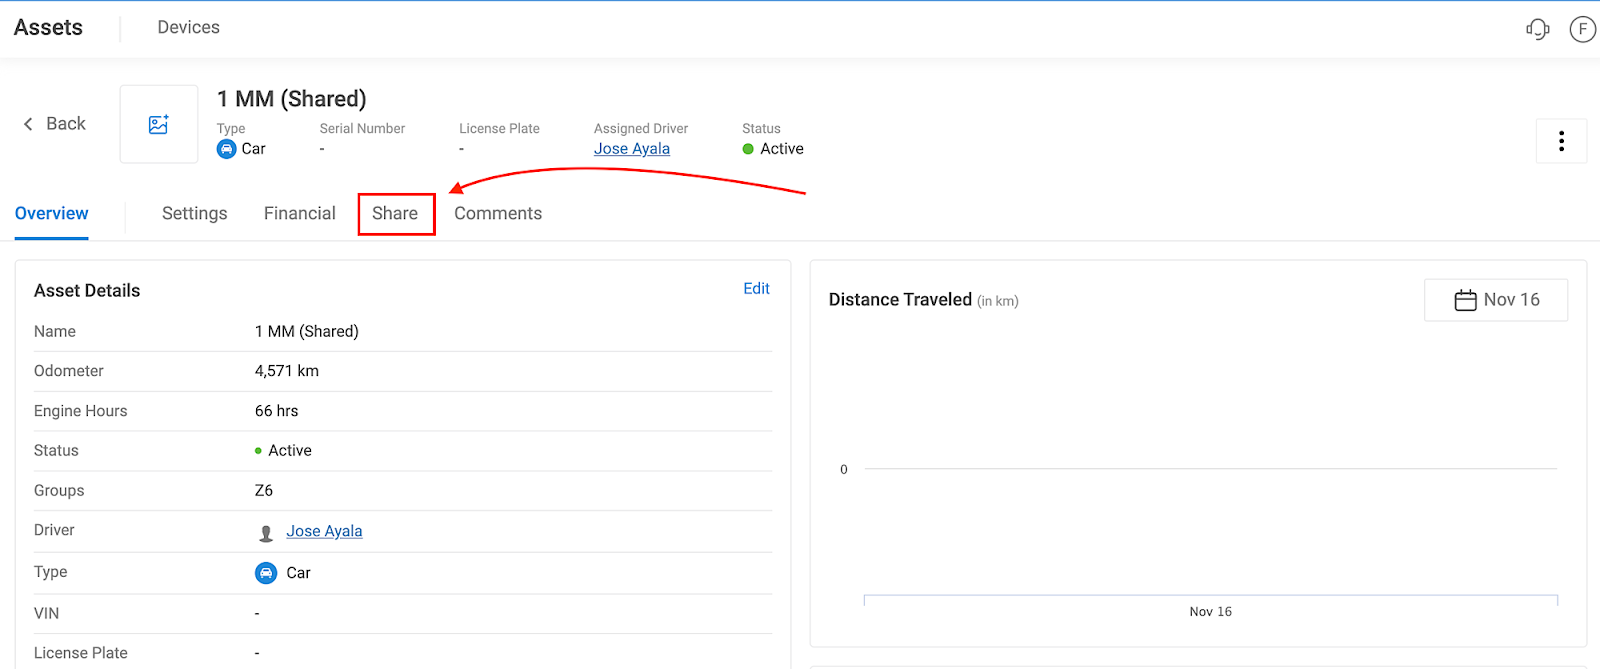
Details
Settings
Financial
Share
Comments
Details
Name of the asset or device
Groups this device will be added to
The optional details to be filled out are:
Asset Icon
Selecting a Driver. The list will be populated with the drivers registered in your account.
Manufacturer
Model
Color
Year
VIN
License Plate
Status
Odometer - Enter the amount of Miles or Kilometers this asset currently has traveled.
Engine hours - How many engine hours the asset has run.
Skills Tag - Enter a particular skills tag that has been set up by the admin to associate with the asset
Upload Photo - You can add a picture of the asset for visual reference.
Settings
This is where you will fill out further information about the device.
Device Serial - Enter the serial number for the vehicle or asset.
Tracker Type - Choose between the different types of trackers available in the system.
Third Party Telematics Serial - If this asset or device is linked to another tracker, this is where you can relate the two. (Example: Camera with a Geotab Device)
Financial
In the Financials tab, you can easily enter and manage all relevant financial data for your device. This feature allows you to generate detailed reports and gain valuable insights into the financial aspects of your fleet management operations.
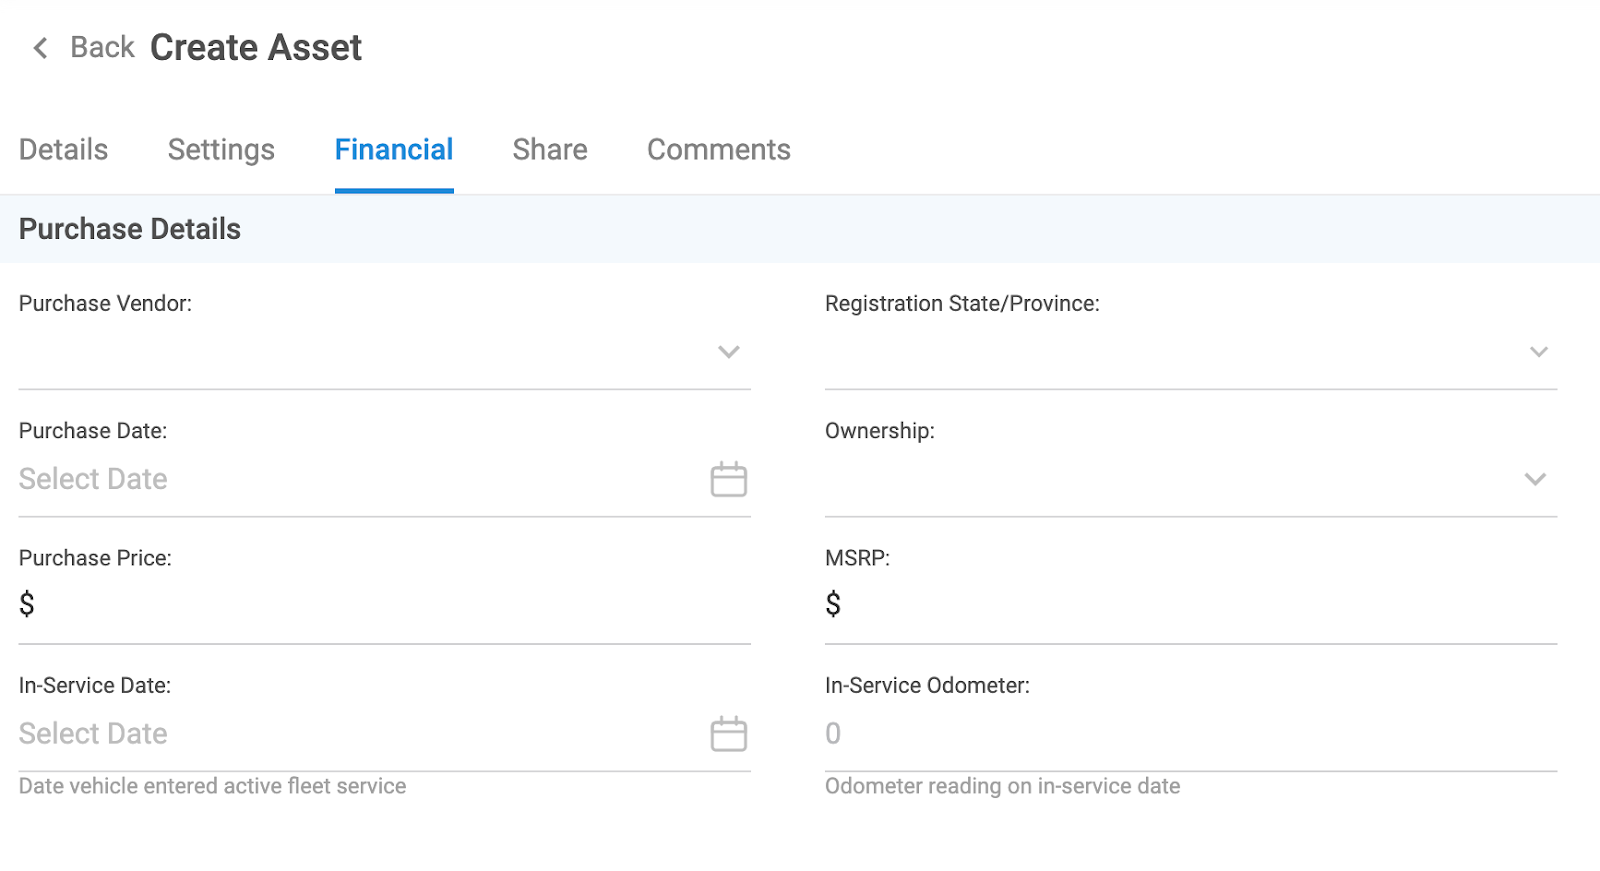
The only two elements on this page that are required to be filled out are the General Settings.
Detail how you measure the utilization for the device and the volume units used when entering fuel for the device.
Detail information about the service life in months & meter, the estimated resale value and details if you plan to sell or already sold the device.
Under Loan/Lease you can detail information about the Loan or Lease process for further analysis of the terms of the agreement. This section allows you to keep granular details of your asset for further reference and reporting purposes.
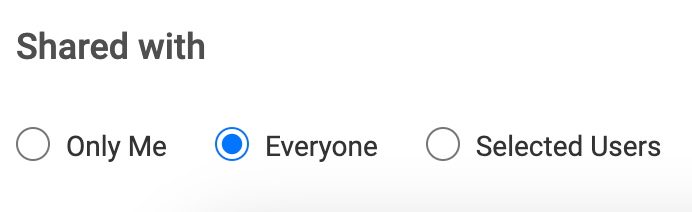
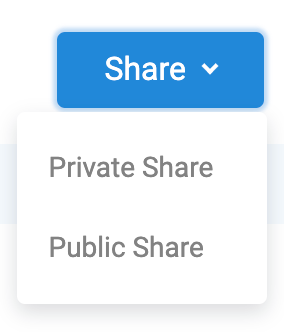
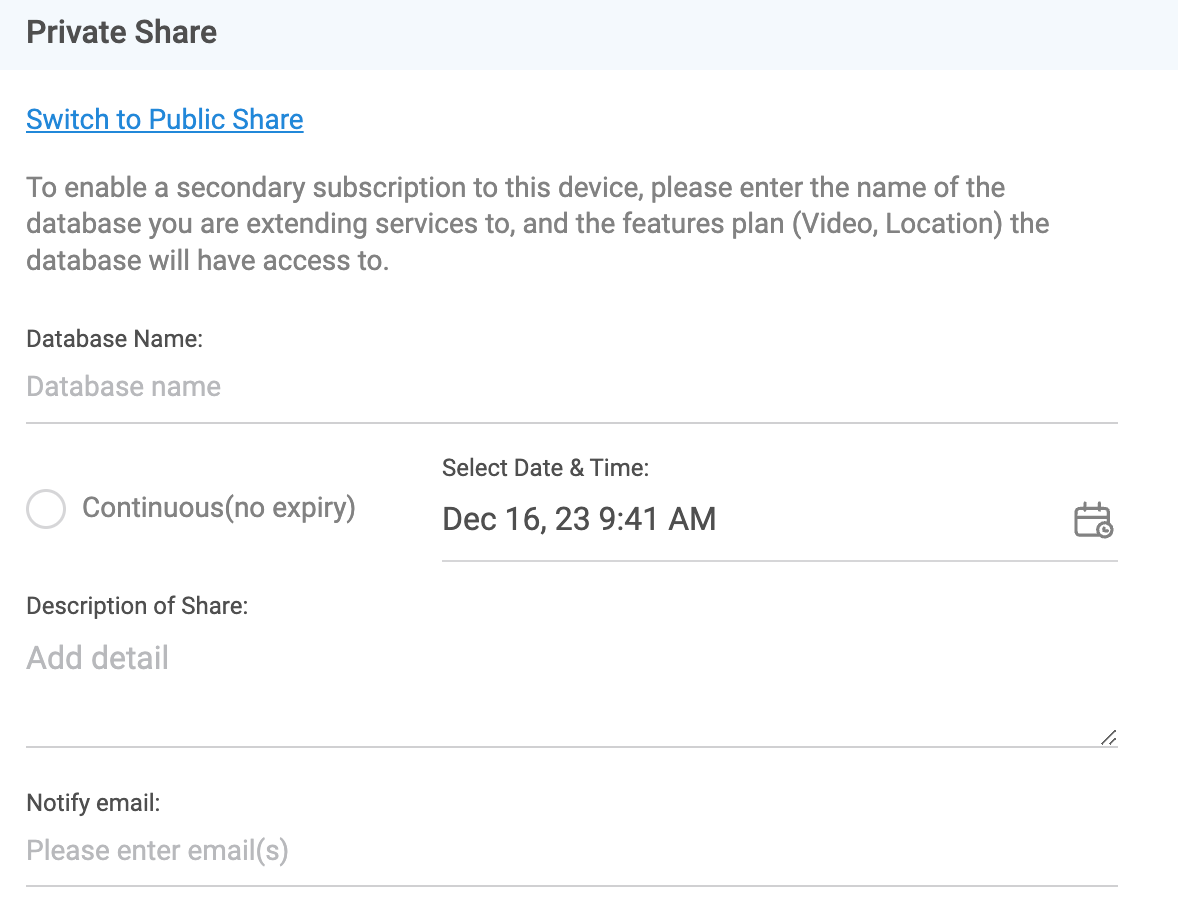
Share
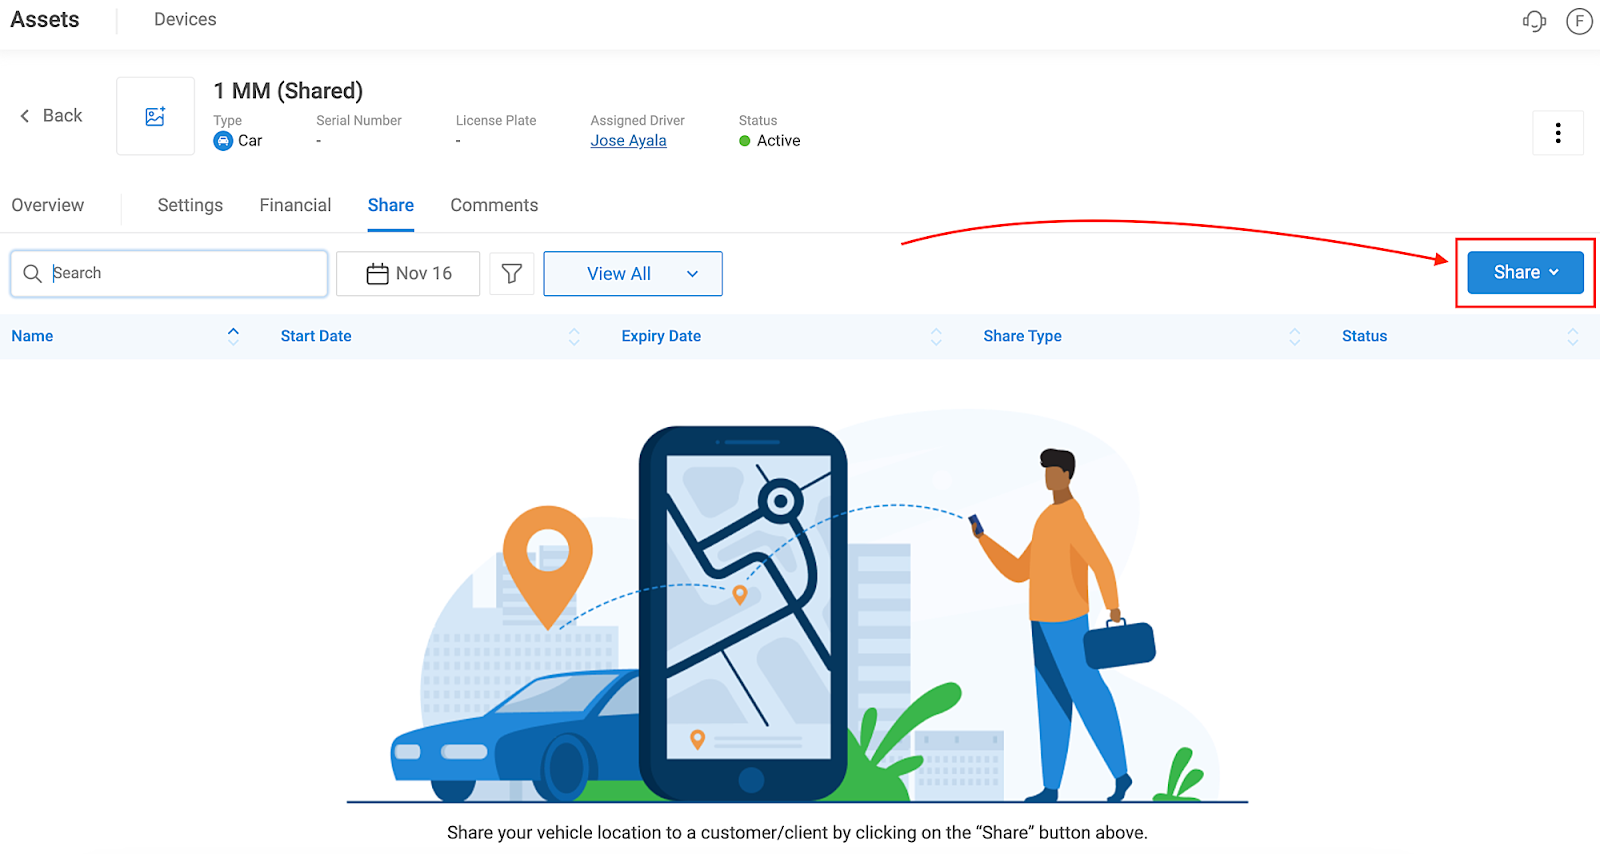
Choose between Public and Private share.
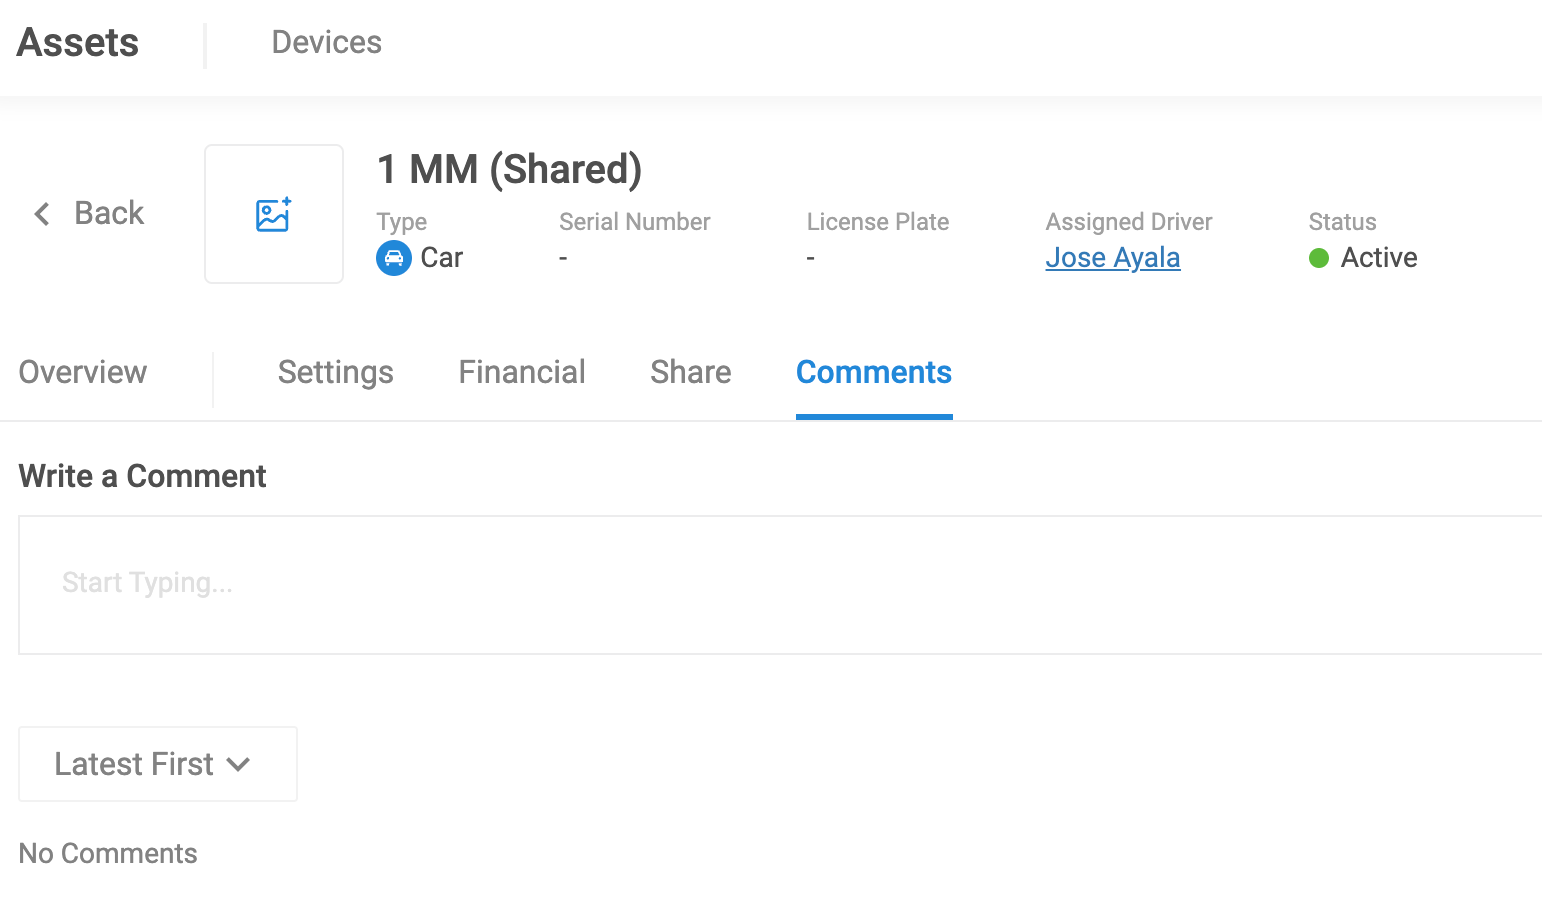
Comments
In this section, you or any other user with access to this asset/device will be able to add comments relevant to this particular asset/device. This will be visible to all users with access to this asset/device.
Software Platform Overview
Maps Module
Maps > Overview
This section provides an overview of the activity and whereabouts of all assets; they will be accessible from the assets list and the map.
- Vehicle icon -- this indicates the vehicle status. If the vehicle icon is:
- Circular, then the vehicle is active.
- Square + Blue, then the vehicle is either:
- Idle (The vehicle is on, and the device is on)
- Stationary (The vehicle is off, but the device is on and still communicating)
- Square + Grey, then the vehicle is off and the device is offline.
- Red, then the vehicle is actively triggering an exception.
 Note: Refer to the legend in the Info icon on the right-hand side of the map view to see another breakdown of these icons.
- Device icons -- these indicate the existence and statuses of any devices (i.e. Camera, Asset Tracker, Beacons) attached to the vehicle.
Note: At the top of the Assets list, you can search, sort, and filter as needed. You can also set Views, and configure your own Custom View. For more instructions on how to add a Custom View, go to Users Overview > User Screen Overview > Filters and Custom Views.- Search button: Use this button to search for any address or existing location on the map.
- Create location: This button will take you to Admin > Locations > Create Location, where you can add a location in your database.
- Map Options: Use this menu to customize your map view.
- Map Base: Change Between Modern, Standard, and Satellite
- Overlay: Add or remove map overlays for: Road Restrictions, Traffic, Incidents, Weather, Locations, and Fleet Clustering which allows to group vehicles together by showing the number of vehicles within the cluster
- Custom: Ability to overlay a custom application on the map like an ArcGIS Map
- Info: This menu is a legend that shows the icons that could appear on the map and what they represent.
- View Device: This will adjust the map view to zoom in on the device.
- View Trips: This will take you to Asset Details > Trips for this asset.
- View Jobs: This will take you to the Work > Jobs page for this asset.
- View Exceptions: This will take you to the Asset Details > Exceptions for this asset.
- Edit Device: This will take you to the edit page for this asset in the Assets module.
- View Camera: This will take you to the Asset Details > Camera page for this asset.
- Request Video: This will take you to the Asset Details > Camera > Historical > Request Video.
- Share Device: This will take you to the Share tab in this asset's page in the Assets module.
- Find Address: This will display the address of the selected area on the map.
- Create Location: This will take you to Admin > Locations > Create Location, where you can add a location in your database.
- Show Street View: This will open a new tab of Google Maps Street View, at the address of your selected location.
- Show All: This will zoom out to show all assets on the map.
- Find Nearby Assets: This will drop a pin on the map and sort the assets list by distance from the dropped pin.
- Find Proximity: This will take you to Maps > Proximity, configured at the selected location.
- Dispatch Here: This will take you to Work > Jobs > Create Job, configured at the selected location.
- Open the dropdown: You'll see a list of the Stops and Drives for the day, along with a map view on the right. The Stops show the stopped and idling time, and the Drives show the assigned driver, driving time, and distance driven.
- Assign drivers: You can also assign or reassign a driver to a Drive directly from this list.
- View stop location: Click on any Stop to see its location on the map.
- View drive details: Click on any Drive to see the camera views at that time. It will play a Hyperlapse when you hit play. You’ll also see a speed graph of the trip. Any exceptions will appear with a red warning icon. Hover over the icon to see the type of exception.
- Scrub through video: You can click different parts of the graph to jump to that time in the video. A green dot will appear on the route map to show the location of that moment.
- Request video or location details: Click anywhere on the map route to see the address or request a video for that specific time and location. Clicking "Request Video" will take you to the Camera > Historical > Request Video section.
Note: This tab works the same way as the Safety > Exceptions tab, so refer to that section for detailed navigation instructions. The difference here is that exceptions in different stages (e.g., needs review, reviewed, coached, or needs coaching) are all combined in this tab, and these exceptions are specific to this vehicle.- In the graph at the bottom, select a time when recordings are available, based on the green area of the chart.
- Then, select the channel (camera view) where you want to extract footage.
- Click "Start Streaming" to preview the selected footage.
- Select the video type -- choose between video footage or Hyperlapse 20s. If you select Hyperlapse 20s, you would receive a series of snapshots 20 seconds apart.
- Customize the duration of the footage you'd like to request.
- When you have finished configuring the request settings, hit "Send Video" in the top right corner.
- Then, fill in the name of the request, and note the email(s) you would like to send it to. Click "Save" to complete your request.
- Offline: If the camera is offline, you cannot watch its live stream. When the vehicle turns on, the camera will also turn back on.
- Sleep: If the camera is in Sleep Mode, you can wake it up remotely to start streaming.
- Online: If the camera is online, you can watch its live stream. Here's a breakdown on how to navigate the parts of this tab:
- Stream Timeout: This field allows you to configure the duration of each stream every time it's loaded/refreshed. In the above example, the stream will play for 30 seconds upon opening the tab. You can hit "Refresh Stream" to play another 30 seconds of the live stream. If the stream exceeds the total time, then it will start uploading snapshots instead.
- Total Stream Time Remaining: Whenever the live stream is loaded, time will be deducted from the total stream time enabled in the plan. In the example above, the plan allows for 10 minutes of stream time per month per device. If the stream exceeds the total time, then it will start uploading snapshots instead.
Note: On the Standard plan, previewing the stream will deduct time from the total stream time (10 minutes per month per vehicle). If the stream exceeds the total time, it will start uploading snapshots instead. On the Enterprise plan, you would have unlimited stream time.- Text-to-speech button: In the top left corner of the map view, there's a text-to-speech button. Open the overlay to send real-time audio messages to the driver.
 Note: The text-to-speech feature is only available on ZenduCAM.
Maps > Trips
Maps > Proximity
Insights Module
The "Insights" module in ZenduIoT delivers a deep dive into your fleet's performance through detailed data analysis. By leveraging comprehensive metrics and interactive reports, fleet managers can track key performance indicators, uncover trends, and identify areas for improvement. This feature enhances decision-making by providing actionable intelligence, optimizing operations, and facilitating proactive management.
Insights > Safety
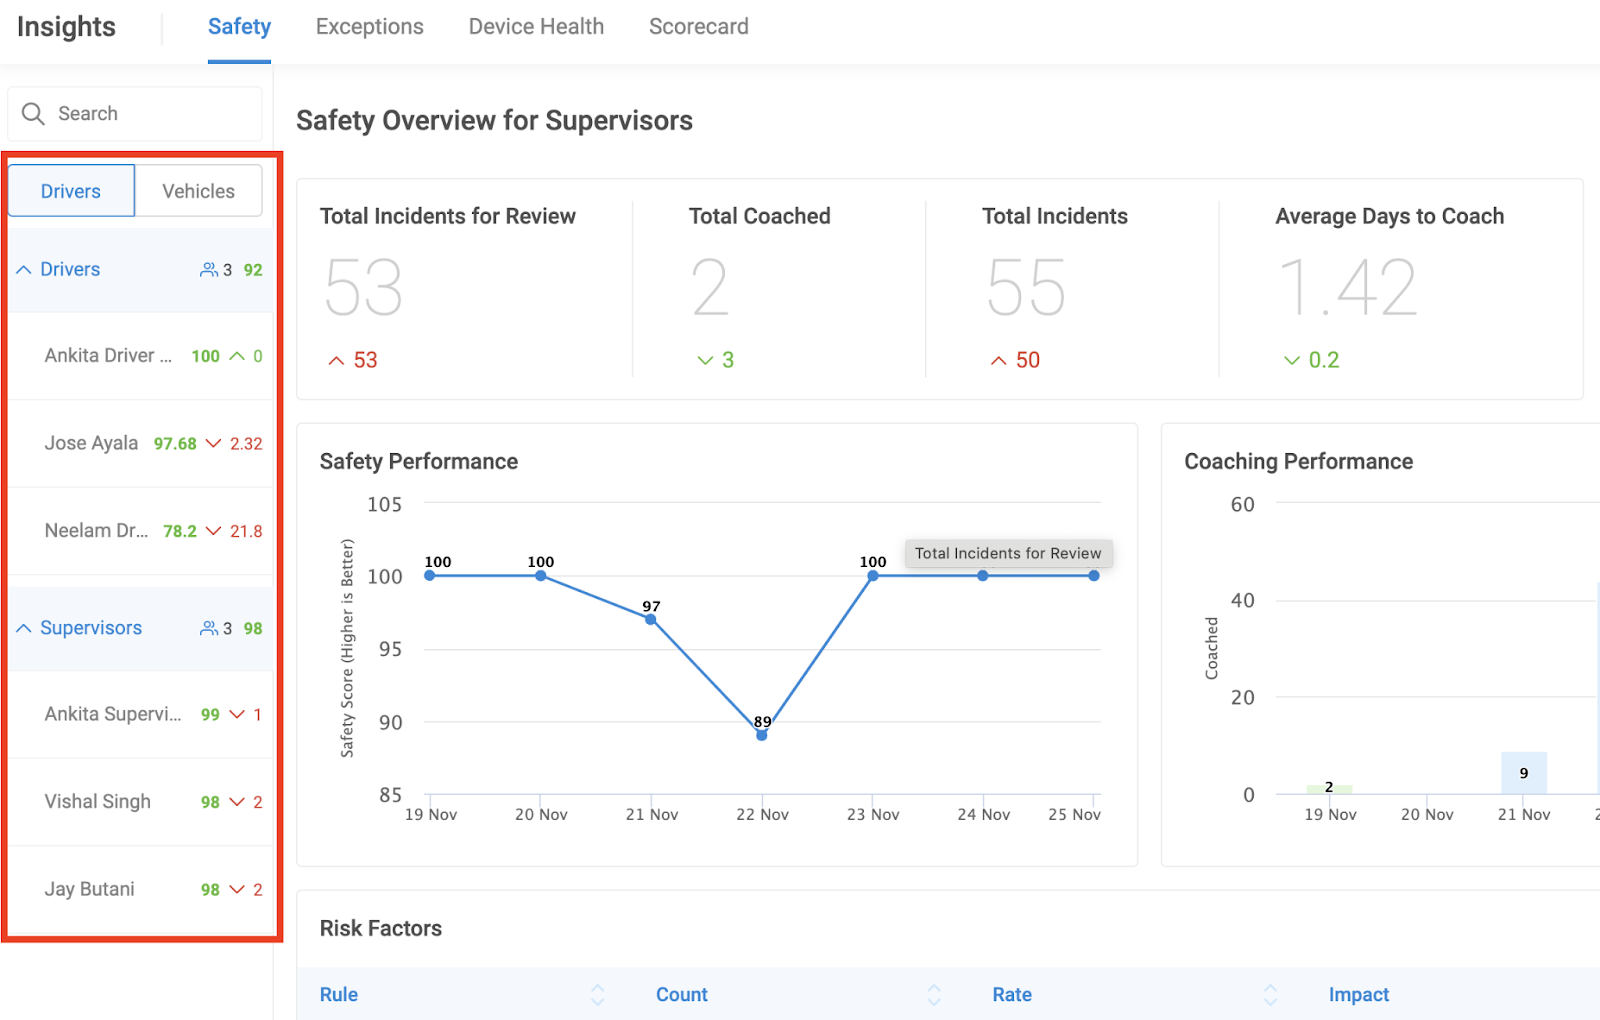
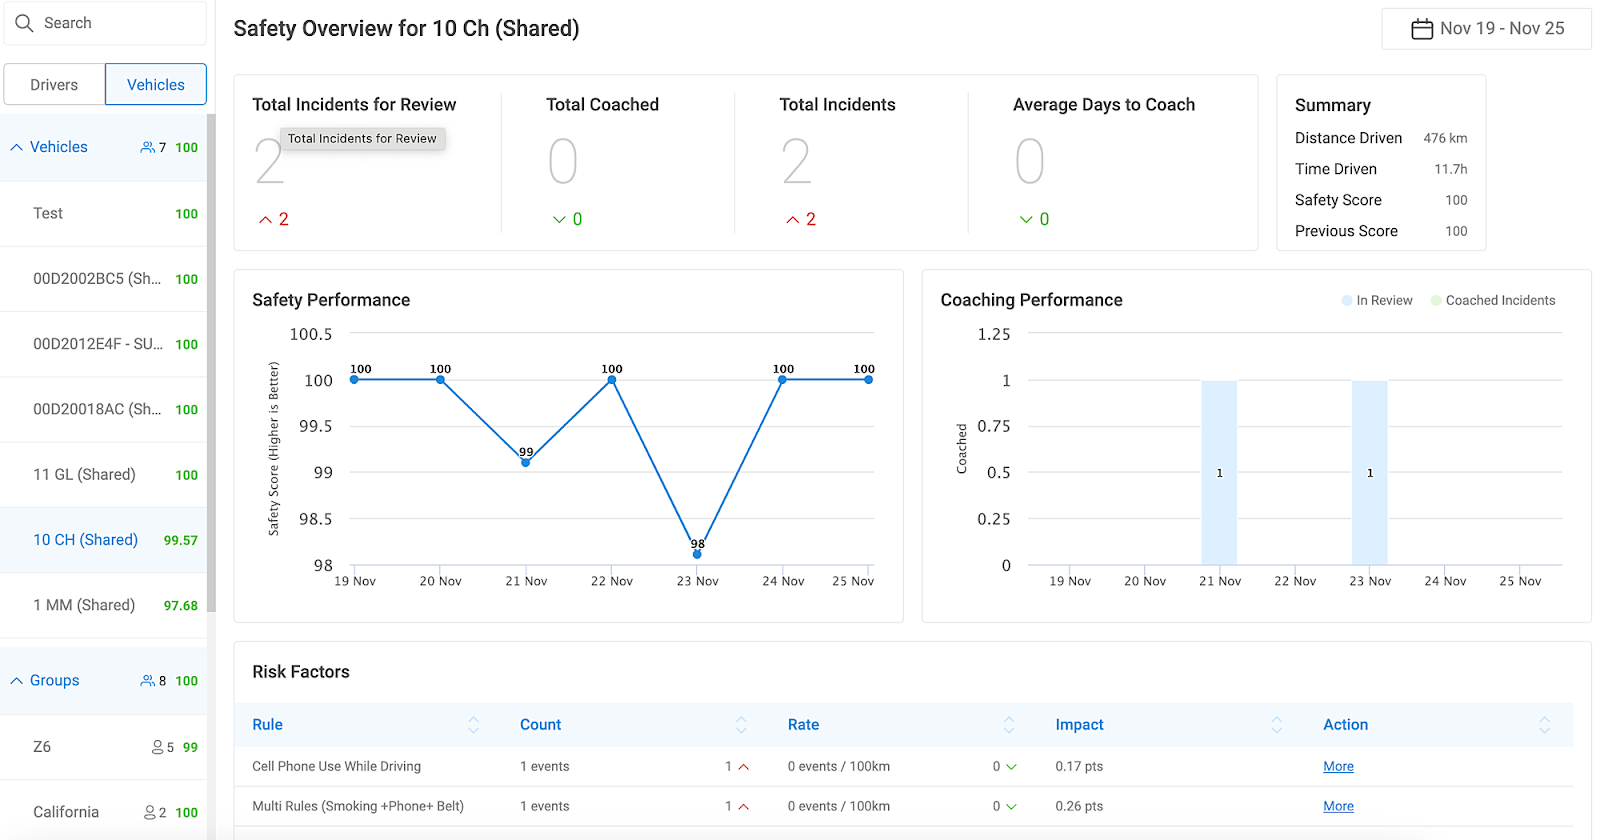
The Safety Overview within the Insights module serves as a vital tool for monitoring safety performance and driver scoring across various levels—Driver, Supervisor, Vehicle, and Group. Its primary objective is to assess safe driving practices while identifying and evaluating any potential risks within the established safety parameters of the system.
Monitoring Safety Performance
The Safety module facilitates the tracking of safety infractions and offers insights into coaching drivers to rectify these behaviors.
Setting up comprehensive Safety Management Rules is the initial step in ensuring the accuracy and relevance of the data displayed within the Safety Overview page.
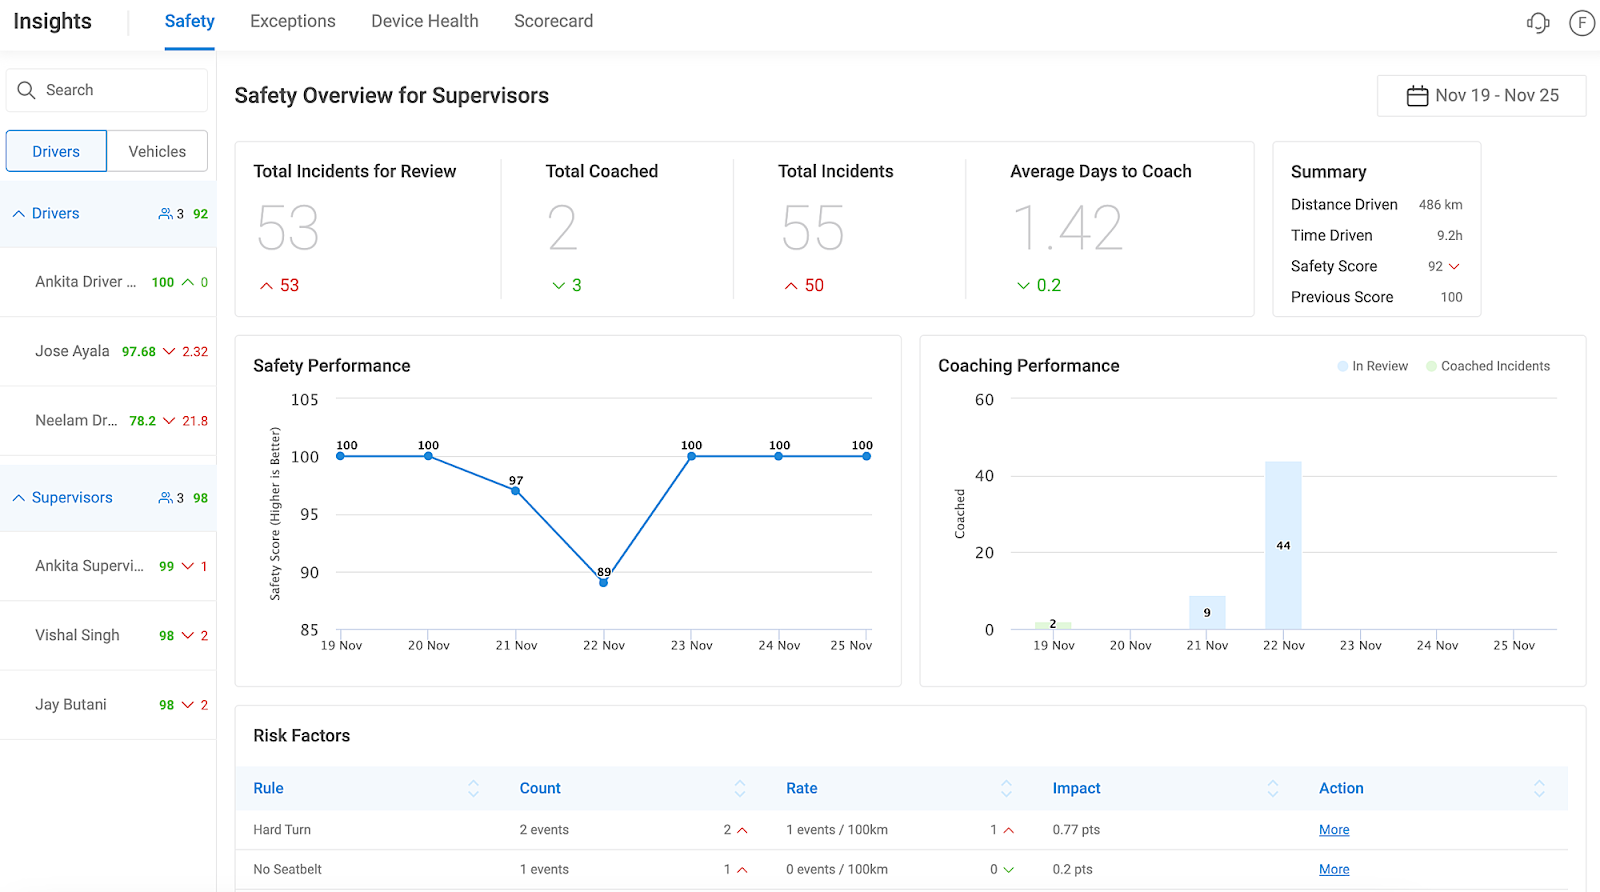
The page provides a comprehensive summary, separately detailing information for Drivers and Vehicles. It includes metrics such as:
Total Incidents for Review
Total Incidents Coached
Total Incidents
Average Days to Coach
Safety Performance
Coaching Performance
Risk Factors
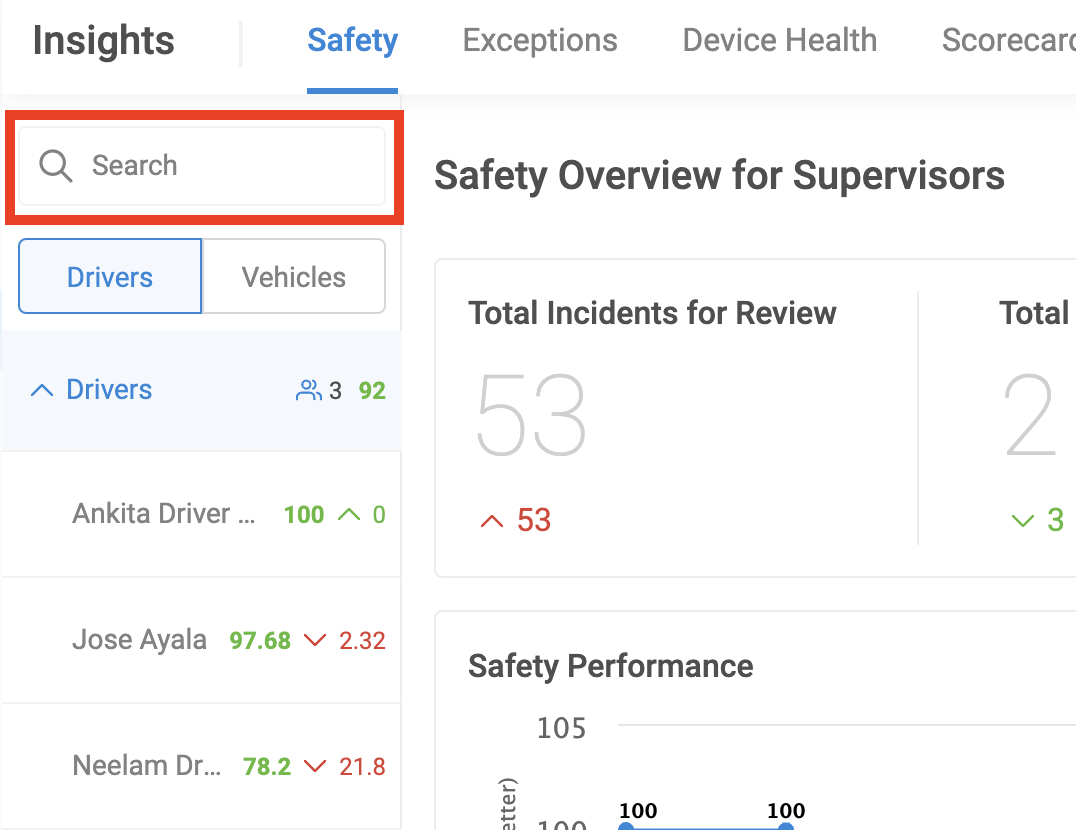
The left menu allows users to choose whether they want to view data for all Drivers or Vehicles collectively (as a group), or opt for specific Driver or Vehicle insights. The corresponding scores for each driver/vehicle are also displayed next to their names.
.
Insights > Exceptions
The Exceptions section allows for a comprehensive review and coaching of infractions tied to established Rules within your account. It facilitates filtering, search, and categorization of exceptions, enabling detailed examination and coaching.
By default, all of the infractions committed, that are tied to any of the Rules you have previously set up in your account, will come into the Exceptions queue under a Needs Review status.
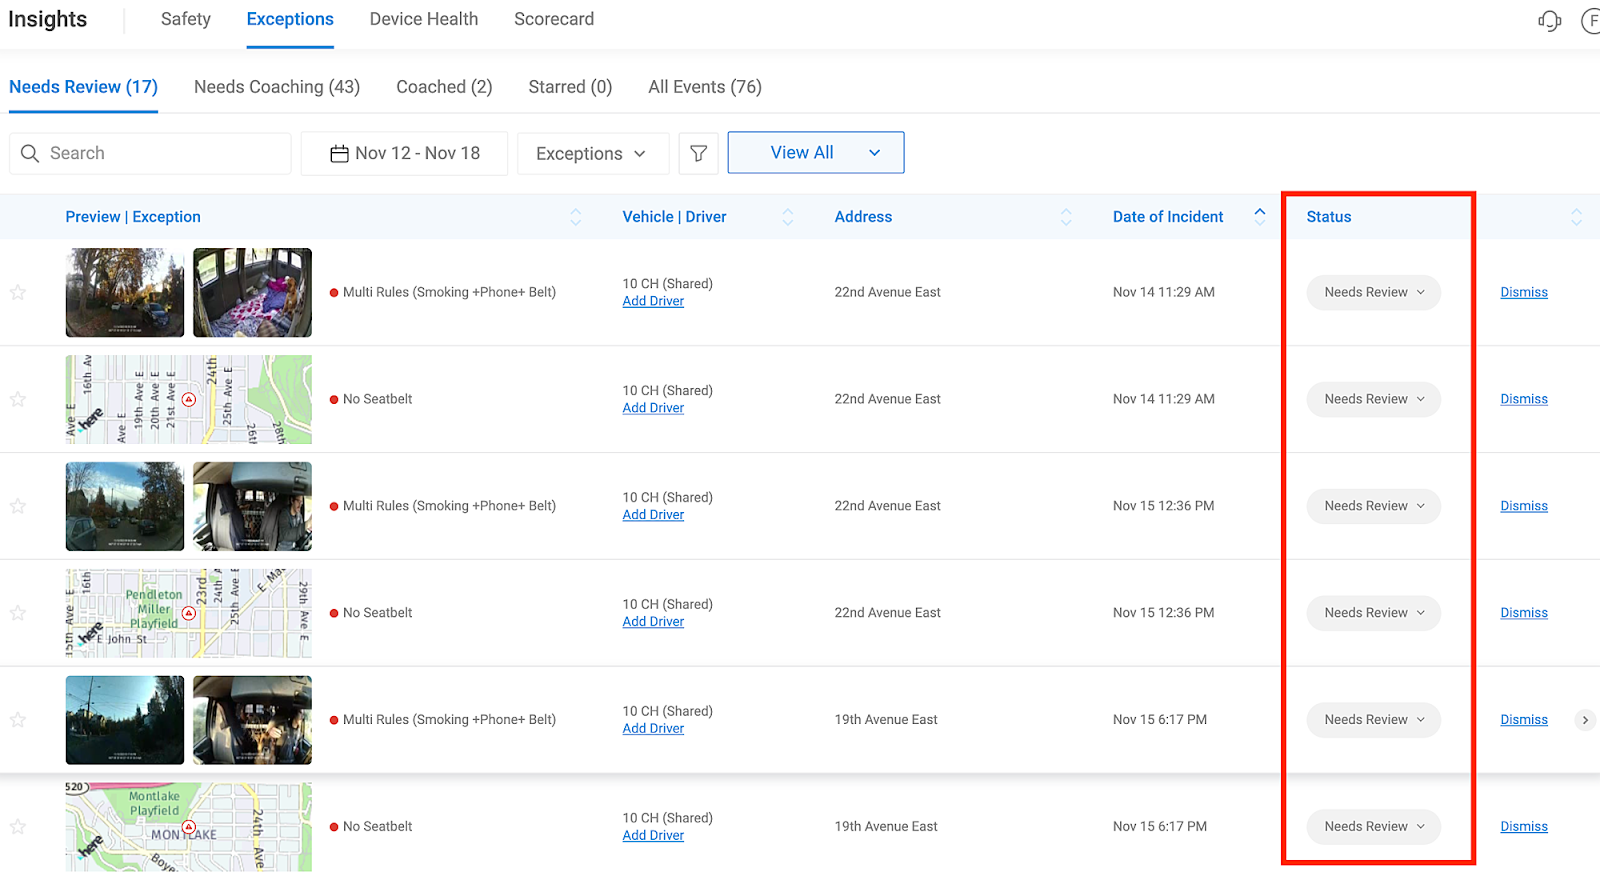
On this page, you can manage the following:
Use the search bar to look for specific infractions or rules violated.
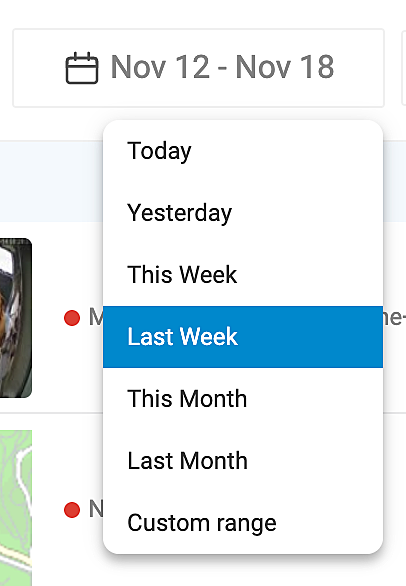
Adjust the time frame from which you want to view exceptions
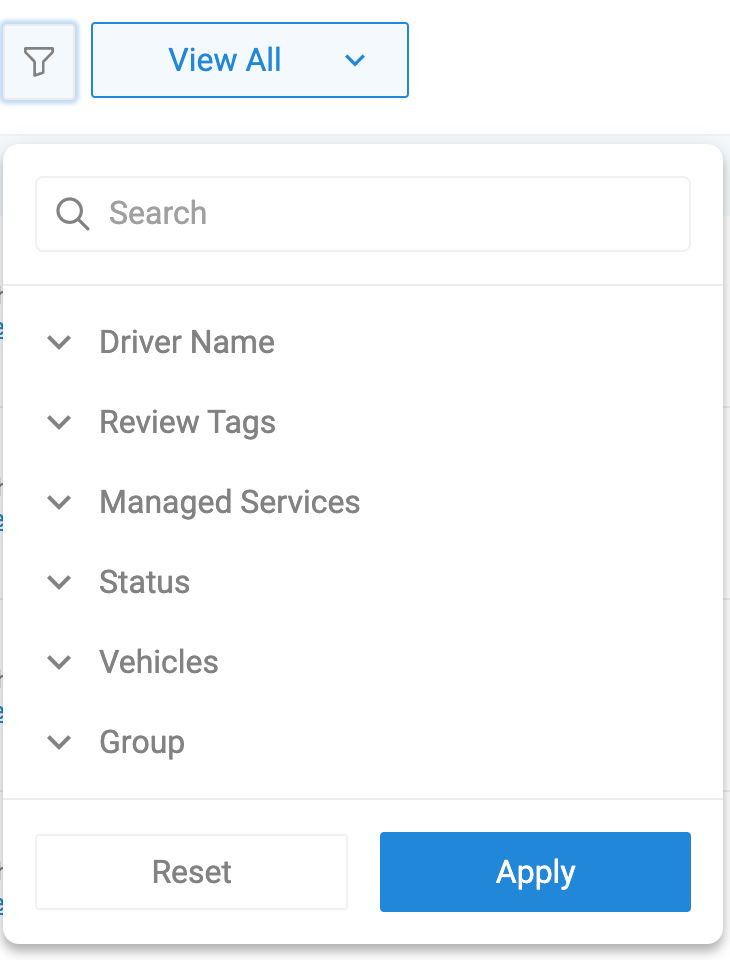
Filter the list according to the type of exception.
Filter the exceptions according to different criteria such as the following:
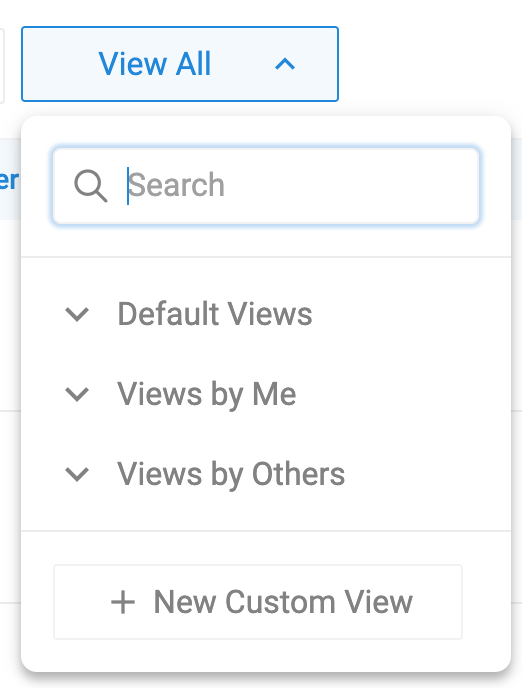
Select existing views or create a new custom view.

Review and Coach Exceptions in Detail
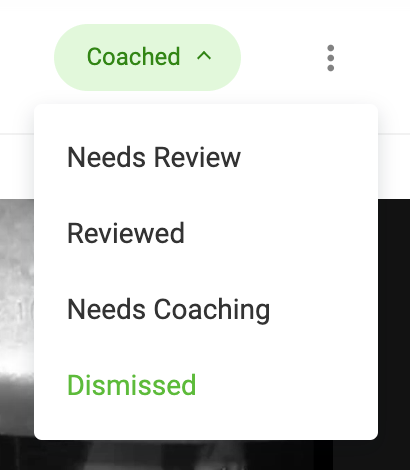
Exceptions have four statuses by which they can be categorized:
Needs Review. It hasn't been viewed yet and no actions have been taking. This is the default status under which exceptions will display once they've been recorded.
Reviewed. Once the exception has been viewed and the video has been played.
Needs Coaching. Once tags have been added, it will change to a Needs Coaching status.
Dismissed. Once the coaching summary has been added and the Exception has been marked as coached, it will go under the Dismissed queue.
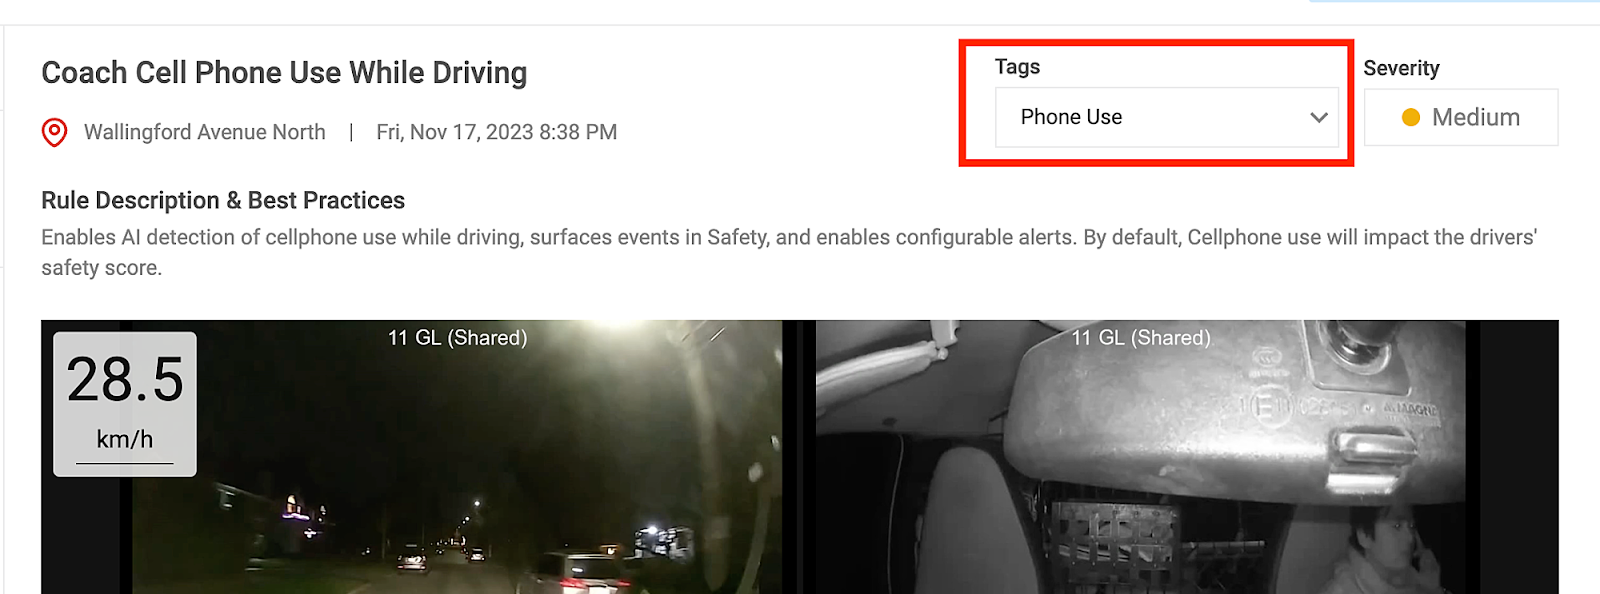
In order to review an Exception, simply click on the title and it will display the detailed view.

On this page the following information will be displayed:
Video recording (if available)

Speed Information

Map overview of the route the driver took and the event details on the right.
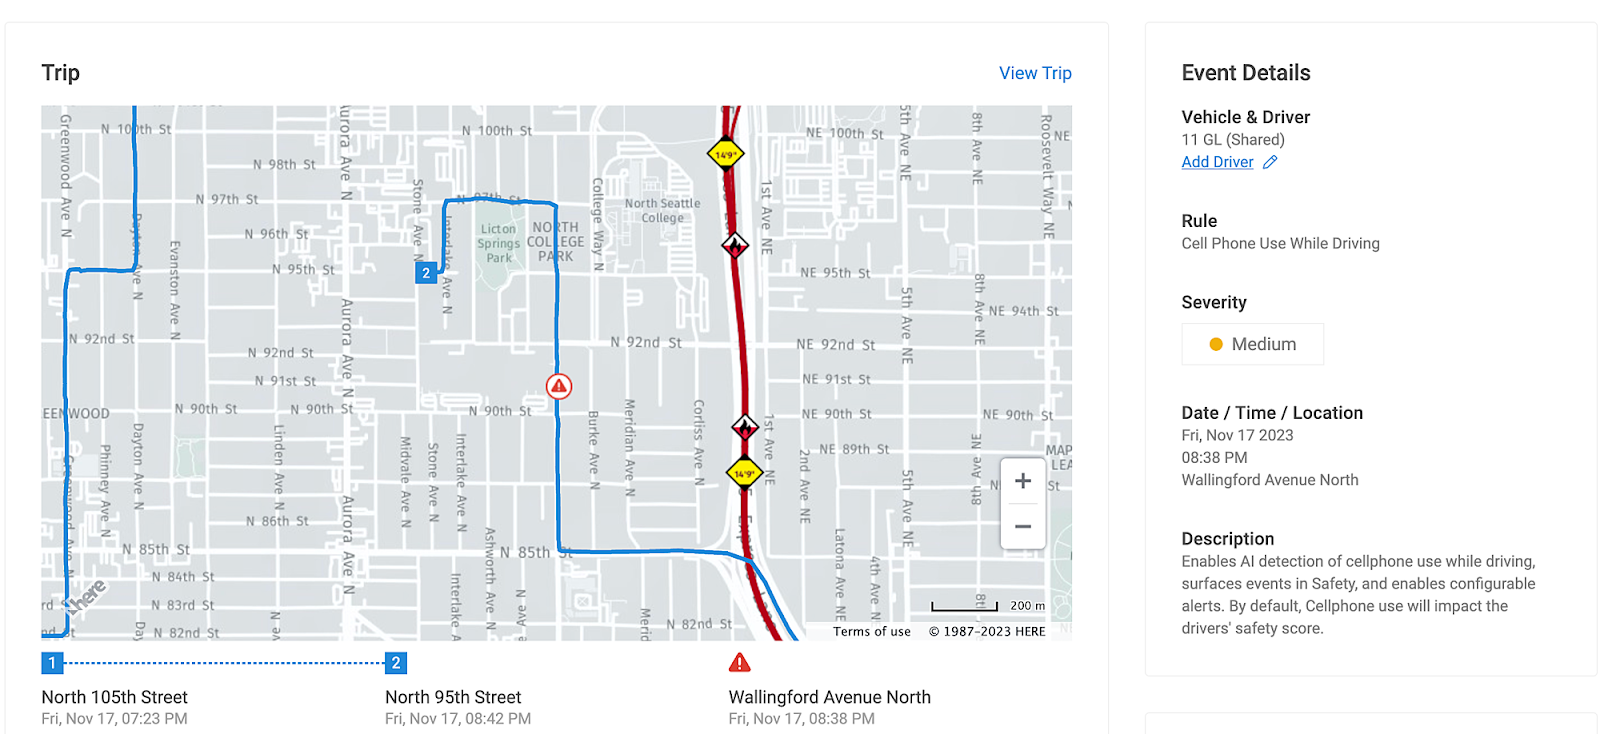
Vehicle Incident History

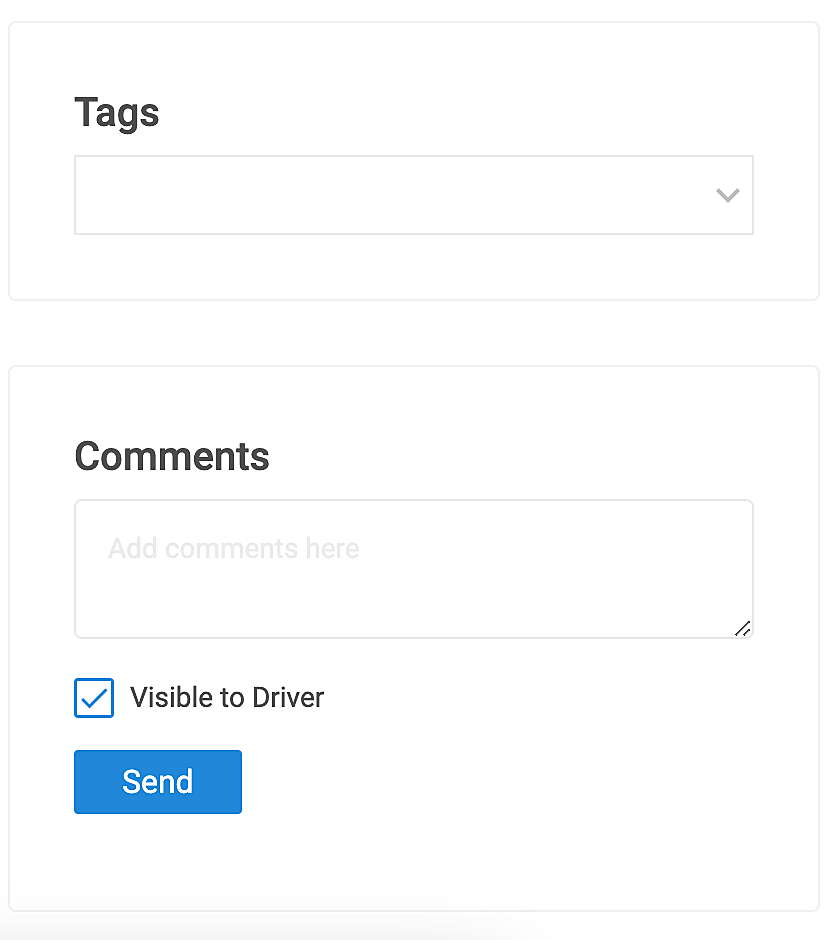
Tags and Comments. Tags can be added from this bottom menu or directly after playing the video.
Once you have played the video, you will be prompted to select tags and add coaching.
From the drop-down menu you can select the tag that aligns best with the exception you are reviewing. This counts as a coaching tag for the violation committed.
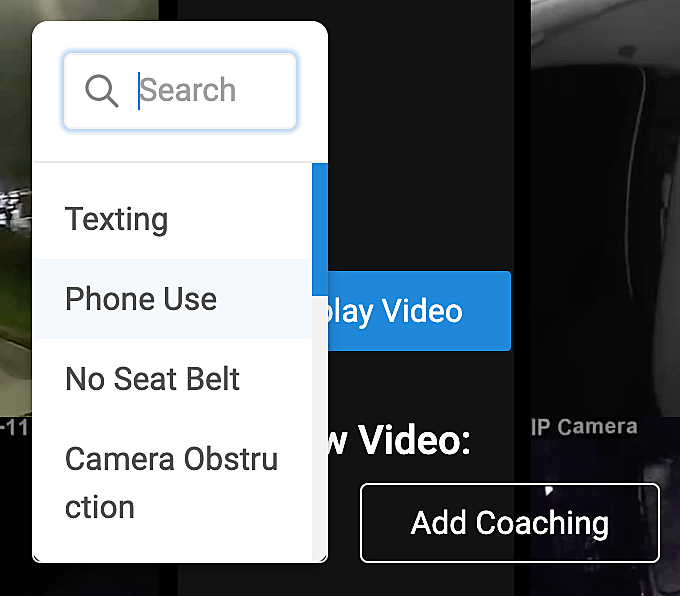
When selecting Add Coaching, you will be redirected to a different page to input the details of the coaching.

The video recording will be displayed once more for your review.
At the top, you should enter the tag of this exception.
Below the video recording, you will find the Coaching Behavior Summary. In this section, you should input the comments or summary about the coaching session. This step is vital to mark the Exception as Coached.
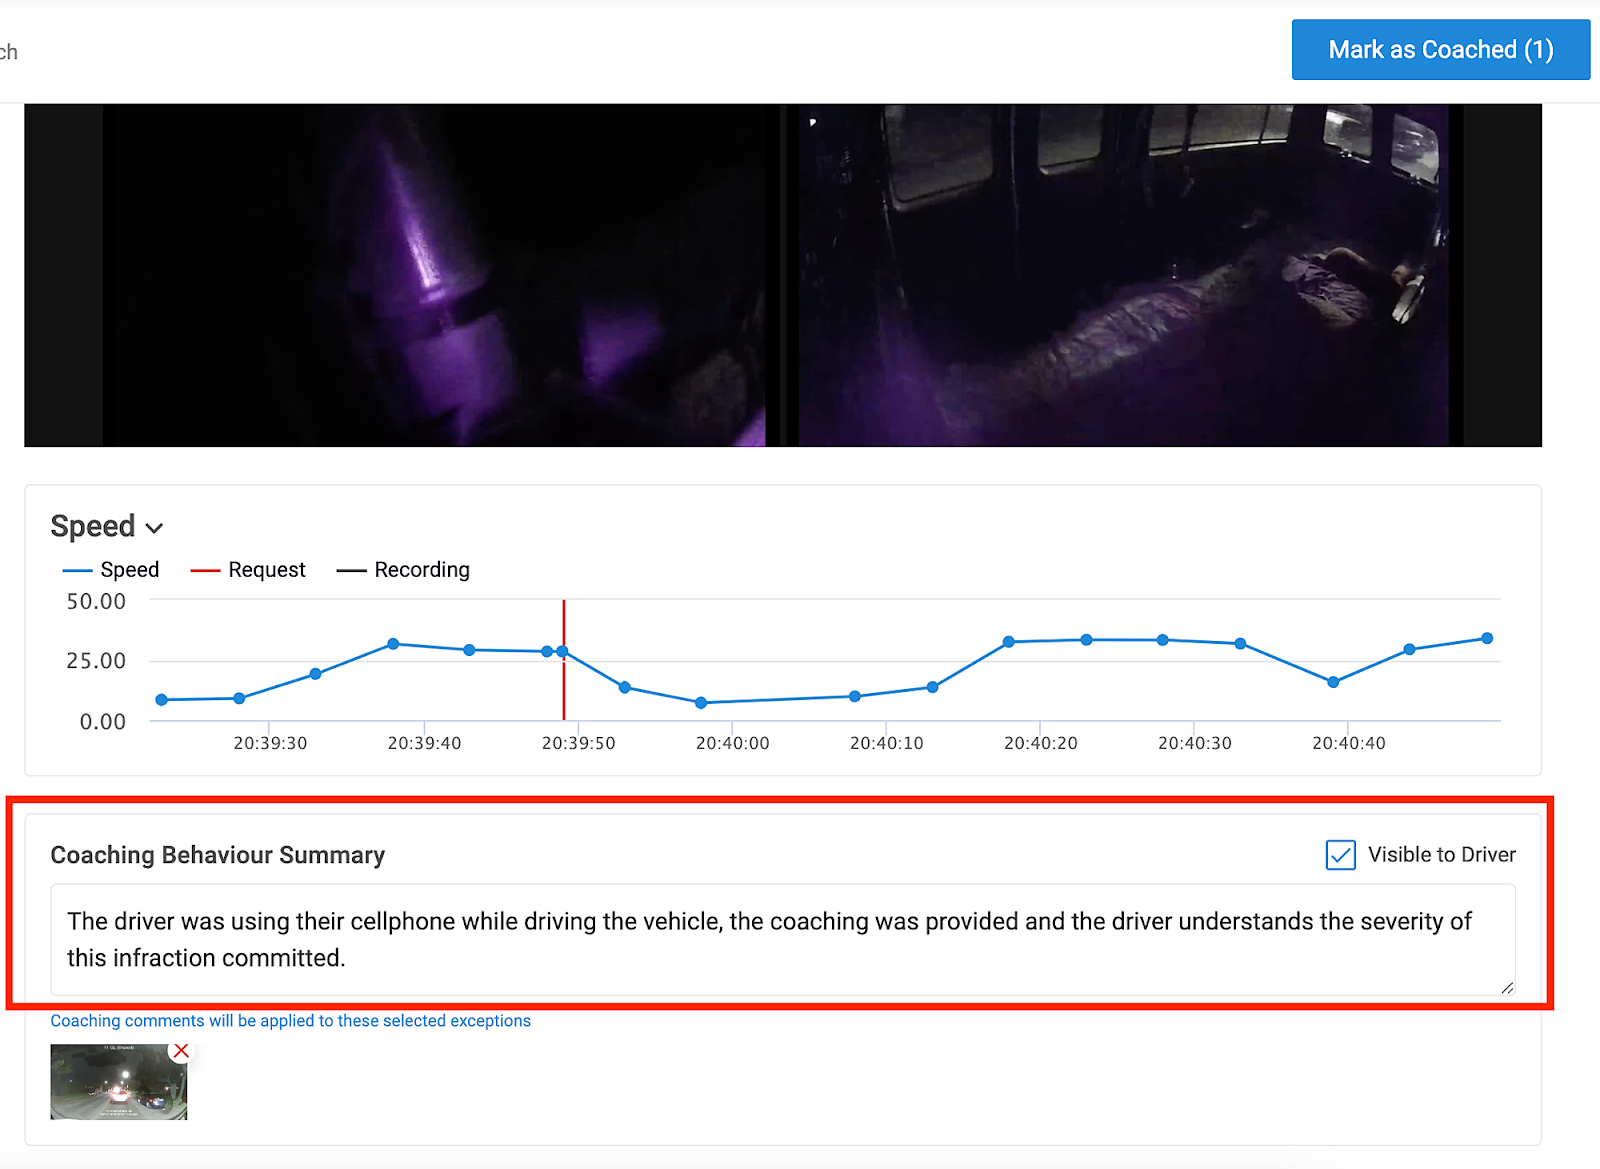
Once you've completed these steps, mark the Exception as Coached. You will receive a notification at the top of your screen once it's successfully completed.

Please remember that Vehicles need to have a driver assigned for an Exception to be marked as coached and reviewed.
Insights > Device Health
This section offers a snapshot of crucial device data, including Communication Failures, Recording Health, and Data Usage. It alerts users to devices not communicating or recording properly, offering insights for prompt attention and action.
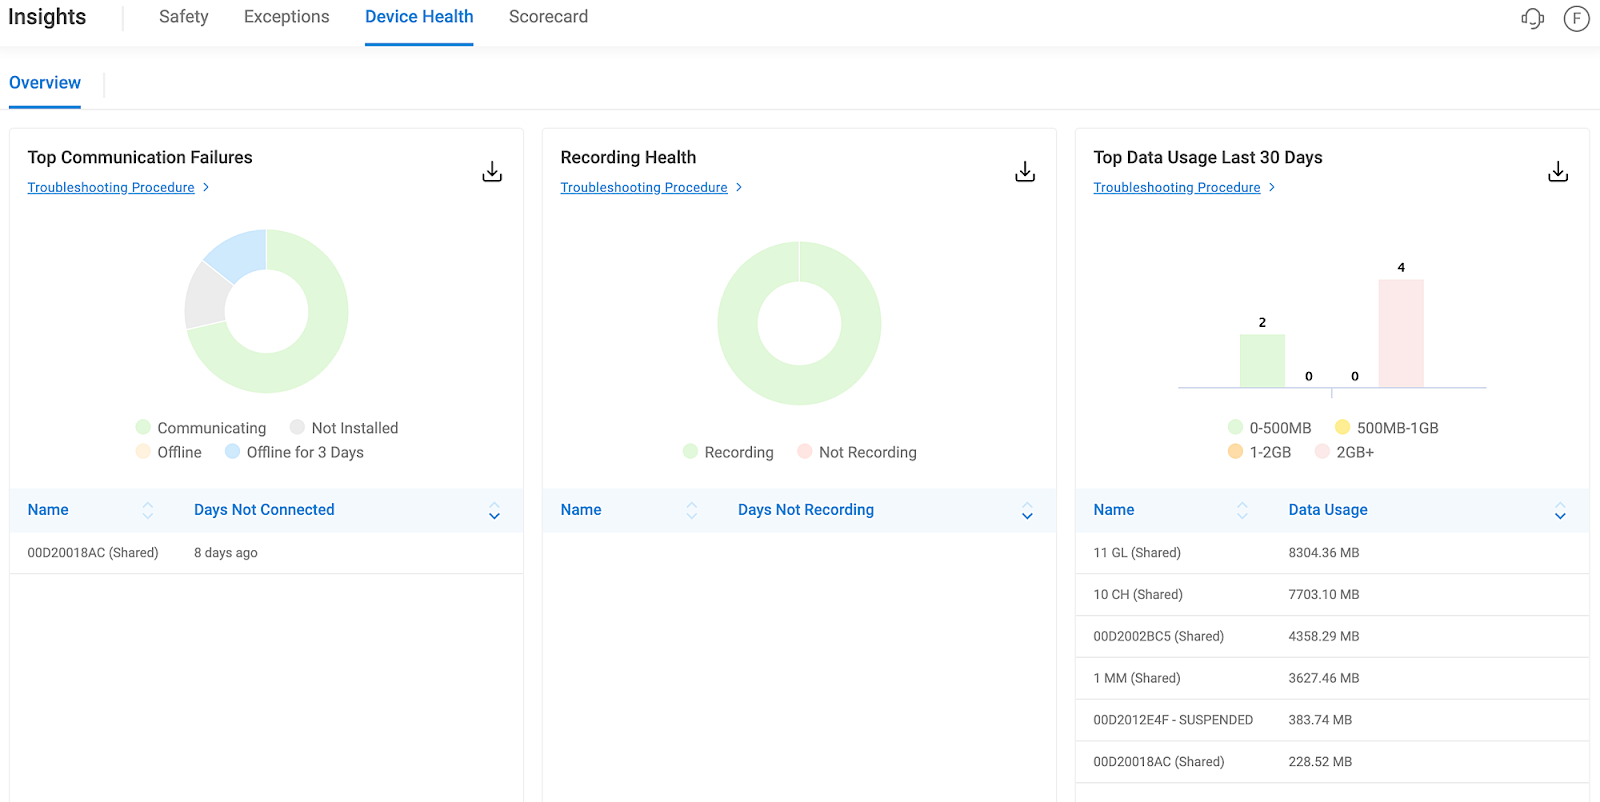
Top Communication Failures
The list will be populated with all the devices that have not been communicating for more than three days. This is with the purpose to draw your attention to them in order to review their functionality in more detail.

In the chart you will view the data:
Communicating
Not Installed. Devices that have never communicated with the system.
Offline
Offline for 3 days
Recording Health
Any device that has not been recording properly for a certain period of time will show up on this list. In this example all devices are recording correctly.

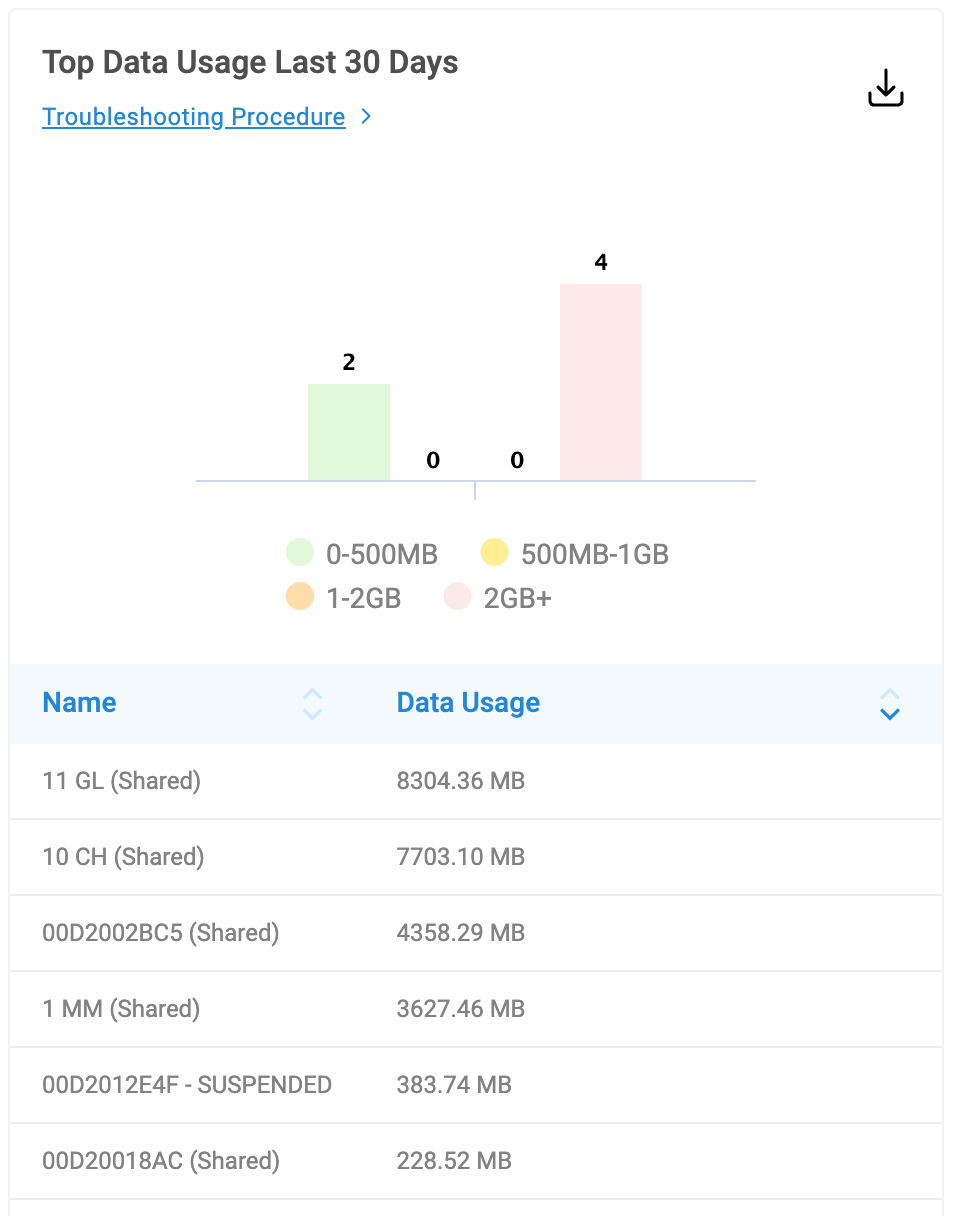
Top Data Usage
What was the top data usage from the devices that include data SIMs purchased directly from our company. If you purchase the SIM card with your own provider, we can unfortunately not track this data.
This data is also divided in brackets on the chart.
0-500MB
500MB - 1GB
1-2GB
2GB+
The Insights feature is a robust tool offering comprehensive fleet data analysis, encompassing safety monitoring, exception handling, and device health insights—empowering proactive fleet management for optimal performance.
Work Module
ZenduWork is a comprehensive work and dispatch solution designed to streamline job management and enhance the efficiency of fleet operations. By enabling the creation and dispatch of jobs directly to drivers, complete with forms for proof of delivery, ZenduWork facilitates seamless communication and operational flow between fleet managers and their on-the-ground teams. The solution's integration with telematic hardware enhances its capabilities, providing a robust platform for optimizing routes, managing dispatches, and improving service delivery.
Work > Overview
Work > Jobs
- Search for an existing location in the "Search Location" search bar
- Select an existing location directly on the map
Work > Order
Products Module
The Products module within our ZenduIoT solution serves as the central repository for managing parts and inventory, essential components consumed across various modules. This comprehensive module not only facilitates efficient inventory management but also ensures seamless integration with other operational modules, enhancing productivity and accuracy throughout the workflow. By providing robust tools for tracking, updating, and utilizing product data, our platform empowers businesses to streamline processes and optimize resource allocation effectively.
Forms Module
The Forms module in our ZenduIoT solution empowers users to create customized forms tailored to their specific operational needs, particularly in the context of deliveries and dispatching. This versatile tool enables businesses to design and deploy forms seamlessly, ensuring that every aspect of their logistics and dispatch processes aligns precisely with operational requirements. From capturing essential data fields to integrating with other modules for streamlined workflows, our platform provides a flexible and user-friendly interface for generating, managing, and utilizing forms effectively. By facilitating the creation of tailored documentation, businesses can enhance efficiency, accuracy, and compliance across their entire delivery and dispatch operations.
Forms > Templates
Forms > Submissions
Maintenance Module [Beta]
Maintenance > Service Requests
- Manual Request
- Navigate to Maintenance > Service Requests > Add Service Request.
- Fill out the "Details" section, including the asset, due date, reference, service priority, maintenance type, summary, and any relevant maintenance tags. Below is an example of how this section could be filled out.
- Assign Products, Services, and Labours to this service request.
- Open the dropdown to select items from the Products module.
- Refer to the Products section of this article for instructions on how to add a product/service in the Products module.
- Specify the quantity/hour, unit cost, and total cost. These values will be included in the overall cost when assigned to a repair order.
- Comments
- You can add comments or attach files to the service request for additional context.
- Maintenance Reminder Rule
- Navigate to Admin > Rules > Create Rule.
- Select "Maintenance Reminder" in the Rule Conditions > Rule Source dropdown.
- Customize the trigger condition (e.g. Every 1000 km). A list of existing rules will appear depending on the condition category.
- Define the service request details
- Select the maintenance type, set the due date from when the rule is triggered, and apply any relevant maintenance tags.
- Add any associated products, services, and labours as described above.
- Each time the rule is triggered, a service request will be automatically created and will appear in Maintenance > Service Requests.
- Pending Assignment: This is the default status when a service request is created but not yet assigned to a repair order.
- From this state, the only available manual action is to change it to Cancelled. You can do this directly from the main table.
- Assigned: The service request is assigned to a repair order but work has not yet started.
- In Progress: Work on the service request has started.
- On Hold: The service request is temporarily paused (e.g., waiting for parts).
- Completed: The service request has been fully resolved.
- Cancelled: The service request is no longer needed and has been cancelled.
- If the service request is already part of a repair order, it remains associated with the repair order but its status will be updated to Cancelled.
- Edit a service request directly from the Service Requests tab
- Update the status from within the repair order it's assigned to
Maintenance > Repair Orders
- Manually adding a new repair order
- Navigate to Maintenance > Repair Orders > Add Repair Order.
- Fill out the "Details" section, including the asset, service provider, reference, assigned technician, repair priority, due date, and summary of the repair. Below is an example of how this section could be filled out.
- Assign Service Requests to this repair order.
- Select an open service request pertaining to the selected asset. The "Add Service Request" button will show the number of available service requests for the selected asset.
- Alternatively, you can click "New Service Request" to create a service request back in the Services Requests tab.
- Add any additional Products, Services, and Labours to the services request.
- [Coming Soon] View the cost breakdown for the repair, which sums up any costs from the Products, Services, and Labours added. You can also add any applicable discounts or taxes to the total bill.
- Comments
- You can also add comments or attach files to the service request for additional context.
- Note: These will pertain to the overall repair order, which will also include comments of any included service requests.
- Asset Status
- You can also view and change the status of the asset directly from this page (e.g. Active, Out of Service, On Standby, Rented, Archived/Retired). This update will also reflect in the Assets tab.
- Converting service request to repair order
- To convert a service request into a repair order, navigate to the "Add/Edit Service Request" page.
- At the top center of the page, hit "Convert to Repair Order".
- This will create a new repair order with a single service request attached.
Note: You can always add additional service requests to an existing repair order by editing that repair order.- In Progress
- If any of the service requests are marked as In Progress, the repair order will also be marked as In Progress, regardless of the statuses of other services requests.
- On Hold
- If none of the service requests are In Progress, but one or more service requests are marked as On Hold, the repair order will change to On Hold.
- Assigned
- If none of the service requests are In Progress or On Hold, the repair order will be marked as Assigned.
- Completed
- If all of the service requests are marked as Completed, the repair order will automatically update to Completed.
- If at least one service request is Completed and the others are Cancelled, the repair order will still be marked as Completed.
- Cancelled
- If all of the service requests are marked as Cancelled, the repair order will automatically update to Cancelled.
- Completed
- Users can manually mark a repair order as Completed; this will automatically update all non-Cancelled service requests to Completed.
- Cancelled
- Users can manually update a repair order to Cancelled, but this will update all associated service requests statuses to Cancelled.
- The Cancelled option will only appear when there are no Completed service requests in the repair order.
Additional Modules
Support
Our support module is dedicated to ensuring seamless customer service interactions. Here, customers can easily access support forms to submit their requests, inquiries, and issues. This user-friendly interface streamlines the process of seeking assistance, empowering customers to efficiently communicate their needs. Whether it's troubleshooting, guidance, or general inquiries, our platform prioritizes responsiveness and effectiveness in addressing customer concerns. By providing a centralized hub for support interactions, we enhance customer satisfaction and foster long-term relationships built on trust and reliability.
Give Feedback
Our 'Give Feedback' button activates a versatile widget designed to foster continuous improvement and user engagement within ZenduIoT. This interactive tool not only keeps users informed about the latest product updates and enhancements but also provides a seamless avenue for submitting feedback, feature requests, and support tickets. By integrating real-time updates with a user-friendly feedback submission area, our platform empowers users to contribute directly to its evolution. This collaborative approach ensures that every user's voice is heard, facilitating ongoing enhancements that align closely with user needs and preferences.
Related Articles
ZenduMA User Guide
Standard Operating Procedures- Admin Guide Background What is a CMMS? CMMS stands for “Computerized Maintenance Management System”. Maintenance software is used by maintenance managers to assist them in the management of their maintenance activities. ...ZenBUS - Shuttle User Guide
ZenBUS Shuttle User Guide Introduction Overview ZenBUS is a software application that equips shuttle administration (managers) with the ability to create Bus Routes - giving real-time notifications and updates on the bus location and arrival. ...ZenBUS (School) Admin User Guide
ZenBUS (School) User Guide By Zenduit Introduction ZenBUS is a software application that equips school and shuttle administration (managers) with the ability to create Bus Routes - giving real-time notifications and updates on the bus location and ...ZenBUS (Shuttle) Admin User Guide
ZenBUS (Shuttle) User Guide By Zenduit Introduction ZenBUS is a software application that equips school and shuttle administration (managers) with the ability to create Bus Routes - giving real-time notifications and updates on the bus location and ...ZenBUS - Parent App (Mobile) User Guide
ZenBUS School Bus: Parent App Guide INTRODUCTION Overview ZenBUS is a software application that equips school administration (managers) with the ability to create Bus Routes - giving parents real-time notifications and updates on the bus location and ...