Step 6: Add Parts & Supplies
Overview
This procedure will go through the Parts and Supplies module. It will cover basic set-up, and explain each of the parts and supplies tabs.
1. To begin, select Supplies, Parts and Supplies, and click New
Stock
2. The following information can be populated under the Stock tab:
- Part Name
- Description
- Code
- Category
- Account
- Charge Department
- Inventory Code
- Unspc Code
- Barcode
- Make Model
- Last Price
- Total Stock
- Notes
Stock Levels Per Location
3. To enter the stock levels at a location, select the New button in the Stock Levels Per Location field.
Enter the relevant stock information:
- Location - Use the dropdown menu to define where the parts are located.
- Aisle, Row & Bin - This is additional, and optional location information.
- Qty on hand - This indicates the quantity of parts currently in inventory.
- Min Qty - This is the minimum quantity of stock that is allowed to be on hand at any given time. You can configure your CMMS to automatically add the part to the purchase planning board when your Quantity on hand goes below your Minimum Quantity.
Click OK when completed.
The Stock history will show any adjustments to the Stock levels at that particular location.
4. Your stock information will now be stored and displayed as follows.
Receipts
5. You can add receipts for a part through the Stock tab.
To add a receipt click New.
This generates a receipt in its Draft state. The following information can be added to to the receipt:
- Supplier
- Date Ordered
- Date Received
- Quantity Received
- Unit Price
- Received To - You can receive parts to multiple locations, simply click Receive To Multiple Locations
Click Receive when completed.

The receipt information will be displayed in the Stock tab.
Note: Adding the receipt updated the stock levels, as a quantity received was added to the receipt.
Any Open Purchase Order are displayed in the Stock tab.
Cycle Count
6. Select the Cycle Count tab to view and track any inventory changes. This tab lists the Stock, Cycle Count, Stock Count, Date Counted, andCounted By.
Bill of Materials (BOM)
A BOM is a list parts that are associated with, or make up an asset. BOMs are useful for assets with similar parts lists. Instead of creating the same parts list many times over, BOM’s serve as a way of quickly populating a list of parts for similar assets. You can associate parts with an asset through the BOMs tab.
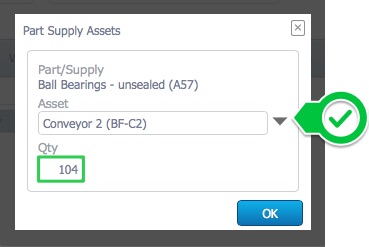
7. To associate a part with an asset, click BOMs and the New button.
8. Select the asset from the dropdown menu, add a Quantity, and click OK. Perform these steps for all associated assets.
9. The Assets along with any BOM's will now be displayed in the BOM tab.
Personnel
10. The Personnel tab is where you can assign users to the asset so that they receive any notifications related to the part. Notifications include:
- Low Stock Levels
- Order Status of the part etc.
By default, the logistics group will be added to the Personnel tab. To add more users click the New button.
11. Select the user from the dropdown and click Ok. They will now be added to the Personnel tab.
Warranties
Note:-Warranties on individual consumable parts may be difficult to track in one stock item. A suggestion would be to create an individual stock item for each batch or lot.
12. Warranties can be added to your parts in the warranties tab. To achieve this, select the Warranties tab, and click New.
13. Enter the relevant warranty information, and click OK
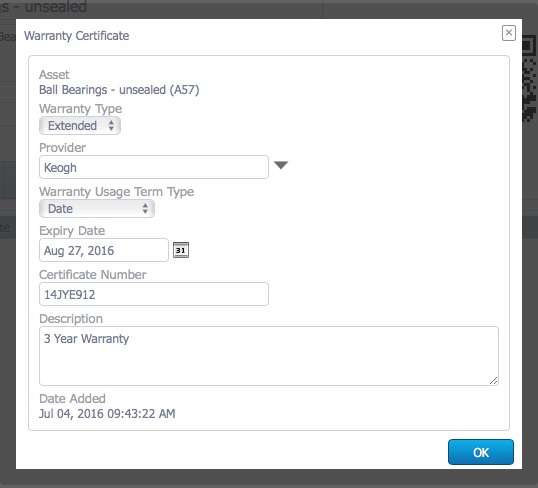
14. Your Warranty will now be stored and displayed in the Warranties tab as shown below.
Businesses
15. Any businesses associated to the part will be displayed in the Businesses tab. To add businesses, select Businesses, and click the New button
16. The record can be configured so that Request For Quotes (RFQ's) are automatically sent to the business that is selected. Business Tracking is selected by default. Select the Business, Business Type, add a Supplier Part Number, and Catalog. Select Display as primary business to display the business at the top of the parts record.
17. Select Purchasing to configure the purchasing settings for the part.
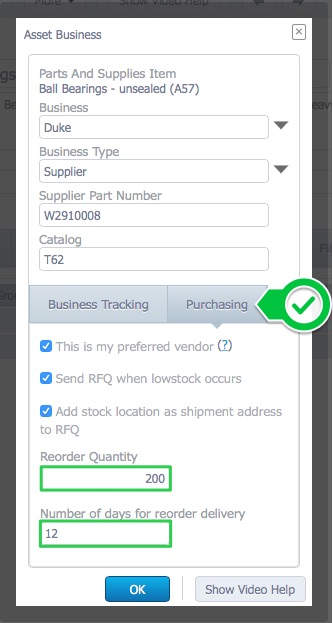
- Selecting This is my preferred vendor, automatically adds the business to the RFQ, or any purchase requests for the part and supplies item.
- Selecting Send RFQ when lowstock occurs, automatically sends an RFQ to this business when low stock occurs.
- Selecting Add stock location as shipment address to RFQ, automatically adds the stock location to the RFQ when low stock occurs.
- Adding a value to the Reorder Quantity field, automatically adds this value to the quantity requested when low stock occurs.
- Adding a value to the Number of days for reorder delivery field, adds this value to the date that the RFQ is generated. The resulting date is used to define the expected delivery date for the RFQ. This date is only added to the RFQ that is generated automatically when low stock occurs.
Click OK to finish.
Note:- You can add as many businesses to the part as you please.
Files
18. You can add files to the parts in the same fashion as you would for any other aspect of the CMMS. You can either use the New button, and select the files from your saved documents, or you can simply drag and drop the file into the files tab.
Custom
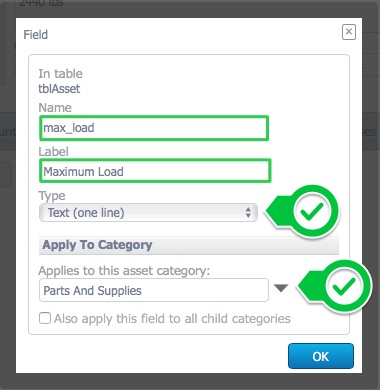
19. Select the Custom tab, and click Add New Custom Field to add custom fields
Add a Name, Label, Type, and define the category that the custom field applies to. Select Also apply this field to all child categories if this field should apply to sub-categories, and click OK.
Log
20. The Log tab will track the following information for the part:
- Work Order
- Date Used
- Inventory Cost
- Completion Notes
Related Articles
How to Add Receipts on Mobile
Overview This procedure demonstrates how to add a new receipt to a parts record. Steps: 1. Open a parts record, press Receipts, and Add Receipts 2. Select a Supplier from the dropdown menu, add a Quantity Recieved, Unit Price, select the ...Adding Vehicles to ZenduWork application
This article explains how to add vehicles to ZenduWork Application Steps: 1. Go to Zenduwork > Then Admin > Select Vehicles 2. Then Click on Add 3. Add important information like Vehicle name, Vehicle type, groups, license ...Using ZenduONE Reports: Features & Functionalities
Intended Audience: This guide is for ZenduONE users—fleet managers, operations staff, and administrators—who want a comprehensive, step-by-step walkthrough to create, customize, manage, and utilize reports within the ZenduONE Reports Module. What ...Step 2: Add New Users
Overview T here are two types of users in the CMMS, Active and Inactive users. Active users can login to the CMMS. Inactive Users Cannot login to the CMMS . There is no difference when setting up active and inactive user accounts. When it ...Adding Meter Readings on Mobile
Overview This procedure demonstrates how to add a meter reading to an asset. Meter readings can be added to the Locations/Facilities, Equipment, Tools, and Work Order modules. The steps to follow are identical for all four modules. Steps: 1. Open a ...